Guide for replacing bladder inside of wing?

Please register or login

Welcome to ScubaBoard, the world's largest scuba diving community. Registration is not required to read the forums, but we encourage you to join. Joining has its benefits and enables you to participate in the discussions.

Benefits of registering include

  • Ability to post and comment on topics and discussions.
  • A Free photo gallery to share your dive photos with the world.
  • You can make this box go away

Joining is quick and easy. Log in or Register now!

geoff w

Contributor
Scuba Instructor
Divemaster
Messages
1,007
Reaction score
333
Location
malibu
# of dives
1000 - 2499
Somehow through my own carelessness I got a small puncture in the bladder for my Voyager EXP wing the other week. A call to DiveRite last week to learn replacement wings are available and not overly expensive made my day. While waiting for the new bladder to arrive, I unzipped the wing and unscrewed the inflator hose and lower dump valve. Putting it all back together seems pretty straightforward, but I didn't see anything on the DiveRite web site about the process. Any tips or tricks I should be aware of?

Looking at the wing fabric where the puncture is, there's a slight tear, so I'll find something to patch it with on the inside to keep the tear from growing before I put the new bladder in and button it all up
 
It's pretty much as straight-forward as it appears. Don't over-tighten the OPV and inflator elbow...just need to be tight enough to hold air and not come off.
 
It's pretty much as straight-forward as it appears...
Maybe even simpler than that :) I loved my DiveRite setup before this, and am even more impressed with the well thought out design and construction after this

I unzipped the wing and unscrewed the inflate and dump to remove the bladder, then patched the wing itself with some ballistic nylon and Aquaseal on the inside to keep the fabric from tearing at the puncture. My old bladder looked to be some kind of flexible polyethylene with welded seams (I patched inside and outside with Tear-Aid Home and kept as a backup). The new bladder looks to be a little more robust, being made from similar material to a lift bag. The old bladder was a bit larger than the wing itself, and the new bladder is even bigger. Amazing when DiveRite told me the Voyager and Travel wings use the same size bladder!

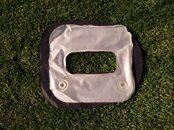
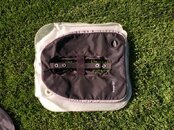
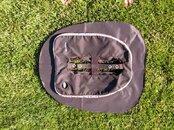
Here are a few photos showing the differences if anyone is interested

Old bladder (white) on top of new (black)
IMG_20131109_133635.jpg

Wing shell on top of old bladder
IMG_20131109_133718.jpg

Wing shell on top of new bladder
IMG_20131109_133808.jpg
 
Cool! My homemade spare bladder looks exactly like Dive Rites new bladder. They are both heat sealed nylon. FYI the bladder has to be slightly larger than the casing. This way all the pressure is contained within the stronger casing and the bladder only keeps things airtight - but no pressure on the seams. The only reason to not super-size the bladder is getting folds in the bladder when it is inflated. This will lead to air trapping. The Voyager and Travel wings are close enough in size to easily use the same bladder. This keeps Dive Rite's costs down.

As mentioned above the bladder is easy to fix with Aquaseal, or probably some Tear-Aid or Tenacious tape. The repair only has to be air-tight, but doesn't have to be high pressure tight. Cleaning and prepping the area well first is the key.
 
https://www.shearwater.com/products/peregrine/

Back
Top Bottom