


PVC Scuba Tank Rack
10 Tank Capacity
Supplies
7 x 10 schedule 40 PVC pipe 1 ¼ inch diameter
12 x 5 way PVC connector
18 x 4 way PVC connector
6 x 3way PVC connector
PVC cement
Saw to cut PVC
Rubber mallet
Sand paper
Cut
54x 8.25 inch long 1 ¼ inch diameter PVC
18x 15 inch long 1 ¼ inch diameter PVC
6x 12 inch long 1 ¼ inch diameter PVC
Preparation and design
I chose to make a ten tank holder with a back rail so I could fit it on my boat. I have enough space there for this size rack. The design can be adapted to a one row holder for a total of 4 to 5 tanks or a two row holder for eight tanks. See the end for sketches and supplies needed. Any design can be done with or without a back rail. Figure one a and b shows my completed project and the final measurements. Any of these racks if used in any transportation land or sea will need to be carefully and thoroughly secured. Scuba tanks can be dangerous and cause serious injuries if not properly secured.
Tips
Always align all pieces prior to using any glue.
Always assemble in the order described.
Make sure when gluing each piece sits all the way into the coupler.
Make sure all lengths of pipe are cut to the correct size. Do not use a PVC cutter the ends are never even.
Use fresh glue it will give you more time to seat each piece, more important with the wall to wall assembly.
Sand the ends of each pipe.
Mistakes will happen learn from them and move on.
Construction
Start with the outer wall of the tank holder (figure 2). First construct the upper bar then the lower bar. Make sure you lay out all the pieces first and dry assemble the wall. This becomes more important as you go along. Once dry assembled make sure each piece is seated completely. Assemble on a flat surface so there is no warping to the wall. To assemble start with the bottom section, first glue the corner piece to an 8.25 piece PVC (figure 3a). Then add the second piece making sure it is aligned correctly. Then add the next 8.25 PVC piece then the end piece. Once assembled add the 15 inch pieces one at a time making sure they seat completely into the coupler. I used a rubber mallet to make sure each piece was in all the way (Figure 3b). Next check and make sure the top piece still aligns with the bottom assembled pieces. Once sure they align start the process over for the top rail by putting the corner piece then the middle piece then the end. Now you have your first hard glue. Glue the top piece and the bottom section together. Quickly place glue into the female coupler and then around the male end of the pipe, you will need to join each of the three pieces quickly. Here is where getting the two aligned right away is important (Figure 3c). Also using the rubber mallet to make sure all pieces seat correctly is very important. Move fast. Learning these steps will help as you progress through the project and need to glue 6 pieces together at once.
Once the first wall is complete move on to make an inner wall (figure 4). First dry assemble the wall with all pieces necessary. Then check the alignment to make sure it will align with the first wall. Once sure of this again start with the bottom row then assemble the top row (figure 5). Place the 15 inch sections into the bottom piece assuring that they seat completely with the mallet. Then glue the top piece on the lower section of wall (figure 6). It is very important to make sure this piece is in the direction you want since the rail assembly will be in the wrong place if you do not take care (Figure 6b). Now glue the 8.25 PVC pieces individually into the outer wall. Now here is your first very hard glue. First check alignment of the inner wall to the outer wall. Make sure you can easily attach this to the 8.25 pipes sticking out. Once sure of this and having a mallet nearby place glue into the female end of the coupler then around the male ends of the pipes. Make sure you are aligned properly. Quickly seat the inner wall onto the outer wall and use the mallet to seat all the pieces onto the outer wall.
Now that that went well you can move on in the assembly. Copy the above steps creating each inner wall, then checking its alignment and gluing it to the enlarging structure. The end wall attachment is the same as above.
To construct the rail make sure all pieces are aligned and assembled. Here is where you will see how well you did in the assembly. There may be some difference in the lengths of the pieces of PVC that will be needed. Make sure you correct for this when assembling the top rail (Figure 7). Place the 12 inch pieces into the tank rack one at a time. Make sure to seat all the way. Then glue the female couplers of the rail and the male ends of the pipes. Quickly align and seat using the mallet.
Congratulations!!!! You are done.
Single row four tank design with rail.
5x 10 1 ¼ inch schedule 40 PVC Pipe
5 way connector x 3
4 way connector x 11
3 way connector x 6
Cut
8.25 x 30 1 ¼ inch PVC pipe
15 x 10 1 ¼ inch PVC pipe
12 x 5 1 ¼ inch PVC pipe
See 4 tank rack single row
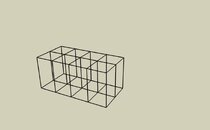
Eight tank design without rail.
See * tank rack no rail
5x 10 1¼ inch PVC pipe sch. 40
5 way connector x 6
4 way connector x 16
3 way connector x 8
Cut
15 x 15
8.25 x 44
10 Tank Capacity
Supplies
7 x 10 schedule 40 PVC pipe 1 ¼ inch diameter
12 x 5 way PVC connector
18 x 4 way PVC connector
6 x 3way PVC connector
PVC cement
Saw to cut PVC
Rubber mallet
Sand paper
Cut
54x 8.25 inch long 1 ¼ inch diameter PVC
18x 15 inch long 1 ¼ inch diameter PVC
6x 12 inch long 1 ¼ inch diameter PVC
Preparation and design
I chose to make a ten tank holder with a back rail so I could fit it on my boat. I have enough space there for this size rack. The design can be adapted to a one row holder for a total of 4 to 5 tanks or a two row holder for eight tanks. See the end for sketches and supplies needed. Any design can be done with or without a back rail. Figure one a and b shows my completed project and the final measurements. Any of these racks if used in any transportation land or sea will need to be carefully and thoroughly secured. Scuba tanks can be dangerous and cause serious injuries if not properly secured.
Tips
Always align all pieces prior to using any glue.
Always assemble in the order described.
Make sure when gluing each piece sits all the way into the coupler.
Make sure all lengths of pipe are cut to the correct size. Do not use a PVC cutter the ends are never even.
Use fresh glue it will give you more time to seat each piece, more important with the wall to wall assembly.
Sand the ends of each pipe.
Mistakes will happen learn from them and move on.
Construction
Start with the outer wall of the tank holder (figure 2). First construct the upper bar then the lower bar. Make sure you lay out all the pieces first and dry assemble the wall. This becomes more important as you go along. Once dry assembled make sure each piece is seated completely. Assemble on a flat surface so there is no warping to the wall. To assemble start with the bottom section, first glue the corner piece to an 8.25 piece PVC (figure 3a). Then add the second piece making sure it is aligned correctly. Then add the next 8.25 PVC piece then the end piece. Once assembled add the 15 inch pieces one at a time making sure they seat completely into the coupler. I used a rubber mallet to make sure each piece was in all the way (Figure 3b). Next check and make sure the top piece still aligns with the bottom assembled pieces. Once sure they align start the process over for the top rail by putting the corner piece then the middle piece then the end. Now you have your first hard glue. Glue the top piece and the bottom section together. Quickly place glue into the female coupler and then around the male end of the pipe, you will need to join each of the three pieces quickly. Here is where getting the two aligned right away is important (Figure 3c). Also using the rubber mallet to make sure all pieces seat correctly is very important. Move fast. Learning these steps will help as you progress through the project and need to glue 6 pieces together at once.
Once the first wall is complete move on to make an inner wall (figure 4). First dry assemble the wall with all pieces necessary. Then check the alignment to make sure it will align with the first wall. Once sure of this again start with the bottom row then assemble the top row (figure 5). Place the 15 inch sections into the bottom piece assuring that they seat completely with the mallet. Then glue the top piece on the lower section of wall (figure 6). It is very important to make sure this piece is in the direction you want since the rail assembly will be in the wrong place if you do not take care (Figure 6b). Now glue the 8.25 PVC pieces individually into the outer wall. Now here is your first very hard glue. First check alignment of the inner wall to the outer wall. Make sure you can easily attach this to the 8.25 pipes sticking out. Once sure of this and having a mallet nearby place glue into the female end of the coupler then around the male ends of the pipes. Make sure you are aligned properly. Quickly seat the inner wall onto the outer wall and use the mallet to seat all the pieces onto the outer wall.
Now that that went well you can move on in the assembly. Copy the above steps creating each inner wall, then checking its alignment and gluing it to the enlarging structure. The end wall attachment is the same as above.
To construct the rail make sure all pieces are aligned and assembled. Here is where you will see how well you did in the assembly. There may be some difference in the lengths of the pieces of PVC that will be needed. Make sure you correct for this when assembling the top rail (Figure 7). Place the 12 inch pieces into the tank rack one at a time. Make sure to seat all the way. Then glue the female couplers of the rail and the male ends of the pipes. Quickly align and seat using the mallet.
Congratulations!!!! You are done.
Single row four tank design with rail.
5x 10 1 ¼ inch schedule 40 PVC Pipe
5 way connector x 3
4 way connector x 11
3 way connector x 6
Cut
8.25 x 30 1 ¼ inch PVC pipe
15 x 10 1 ¼ inch PVC pipe
12 x 5 1 ¼ inch PVC pipe
See 4 tank rack single row
Eight tank design without rail.
See * tank rack no rail
5x 10 1¼ inch PVC pipe sch. 40
5 way connector x 6
4 way connector x 16
3 way connector x 8
Cut
15 x 15
8.25 x 44
Attachments
-
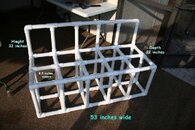 figure 1a.jpg100.1 KB · Views: 4,670
 -
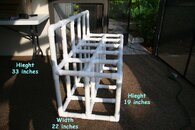 Figure 1b.jpg90.6 KB · Views: 2,453
 -
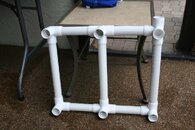 Figure 2.jpg98.8 KB · Views: 2,223
 -
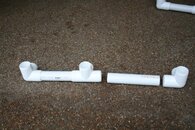 Figure 3.jpg130.3 KB · Views: 1,969
 -
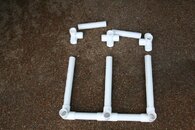 Figure 3b.jpg140.8 KB · Views: 2,154
 -
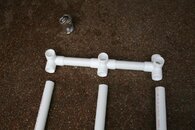 Figure 3c.jpg115.3 KB · Views: 2,011
 -
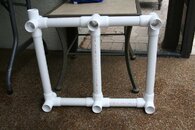 Figure 4.jpg106.6 KB · Views: 2,060
 -
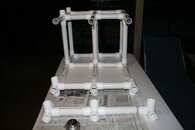 Figure 5.jpg50.6 KB · Views: 1,878
 -
 Figure 6b .jpg81.3 KB · Views: 2,390
 -
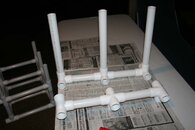 Figure 6.jpg62.2 KB · Views: 1,737
 -
 Figure 7.jpg101 KB · Views: 2,528
 -
 4 tank rack single w rail.jpg67.2 KB · Views: 2,869
 -
 8 tank rack no raill.jpg78.1 KB · Views: 2,705
