Dive depth logger with arduino

Please register or login

Welcome to ScubaBoard, the world's largest scuba diving community. Registration is not required to read the forums, but we encourage you to join. Joining has its benefits and enables you to participate in the discussions.

Benefits of registering include

  • Ability to post and comment on topics and discussions.
  • A Free photo gallery to share your dive photos with the world.
  • You can make this box go away

Joining is quick and easy. Log in or Register now!

buton

Contributor
Messages
435
Reaction score
66
Location
Fort Worth, Tx
# of dives
50 - 99
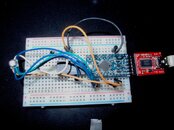
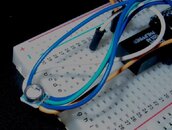
So i am in the process of doing my own logger with an Arduino pro mini and the pressure sensor ms5541c MS5541C

IMAG1098.jpg

so far now i am reading the temperature and the pressure which is reading in texas 983 mbar which is fine i think.


next step is to add a graphic display which i already ordered, i bought two of them to see which one looks cooler..


Monochrome 128x64 OLED graphic display ID: 326 - $19.50 : Adafruit Industries, Unique & fun DIY electronics and kits
Nokia 5110/3310 monochrome LCD + extras ID: 338 - $10.00 : Adafruit Industries, Unique & fun DIY electronics and kits
oled12864_LRG.jpg

and
nokia5110_LRG.jpg


my concern is how to install the sensor exposed, i am planning to buy one of the boxes below. How can i install the sensor is pretty small is 5.8 mm in diameter, i wonder if doing a hole and install it with some epoxy resin or glue... do you have any ideas? on who can i mount it?


Medium waterproof OtterBox [2000] ID: 341 - $15.00 : Adafruit Industries, Unique & fun DIY electronics and kits
otter2000compare_LRG.jpg


after trying out this on the pool i will work on saving data of temperature, and time to an micro sd card so you can download in excel and graph you dive profile.


i will keep you informed ...

any ideas on how to put the sensor exposed to the water will be very usefull

thanks
 
in that picture the sensor has an o-ring of 5.8mm but it is kind of thick. other option is put the oring and press the sensor against housing.

here are more pics of the sensor
 

Attachments

  • P5120146.jpg
    P5120146.jpg
    42.7 KB · Views: 1,163
  • P5120151.jpg
    P5120151.jpg
    36.4 KB · Views: 979
I would try it just in the box. Chances are good that it is sensitive enough to feel any degree of compression, and the box will compress some even though it is rigid. As long as the box is waterproof the air will compress accordingly. Give it a try, what have you got to loose.
 
I hooked an oled display and it is working reading temp and presure..posting pictures tomorrow
 
so this is how it is looking so far, i am going to buy the dry case and put inside and see what happens...

also i will do some touch up to the screen and do a mor visual HMI...

temperature is in C and pressure on mbar


i have this conected to a 3.3 v lithium battery(coin) it has been running since yesterday at 11 pm..

so far almost 11 hours with a sampling interval of 5 seconds..
dcoled.jpgdcoled2.jpg
 
so this is how it is looking so far, i am going to buy the dry case and put inside and see what happens...

also i will do some touch up to the screen and do a mor visual HMI...

temperature is in C and pressure on mbar


i have this conected to a 3.3 v lithium battery(coin) it has been running since yesterday at 11 pm..

so far almost 11 hours with a sampling interval of 5 seconds..
View attachment 124404View attachment 124405


Hi! Interesting project you have going there! do keep us updated!

I have two ideas on what you can do to house the electronics.

Idea 1:

I would like to recommend that you try a normal plastic box solely to protect the electronics from knocks and bumps. I don't think there's an issue with electronics performing under pressure. =p but i'm a mechanical guy, so i wouldn't know.

Next, drill a hole big enough for the wires (but not big enough for the sensor to pass through) and leave the sensor outside the box, connected to the board in the box via the wires. It doesn't have to be water proof at this stage.

After that, put the plastic box and the sensor into a water proof bag like one of these:
waterproof-bag-for-iphone-ipod.jpg

The box provides the structural strength for the circuitry, and the waterproof bag provides the waterproofing, while still allowing the pressure to get to the sensor. The only downside is that there still might be some pressure transmitted to the circuitary, but i don't think that should be a problem.


The next idea i have is simpler, but might be riskier.

Idea 2:

wrap the sensor with a condom. Leave the open end of the condom in the box and the sensor head outside the box. Then close the box, clamping on the wires and condom. It's a good ideal to ensure sufficient spacing between the wires so that the o-ring of the box can wrap around the wires completely.

If you get the right kind of box with suitably compressible o-rings, and the gap between the faces sealing the o-ring is just nice, it might just work!

There's obviously a few problems with this idea, such as O-ring being deformed, wires breaking due to the clamping, you might not even be able to close the cover properly. But it's a neat idea if it works! hahah..
 
I worked on this the last week and I got to test the system under pressure in a chamber were my LDS test the computers. The electronics where no in a box so we just tested for a pressure equivalent to 40 feet.. see the pictures, the sensor was accurate as I can say, the analog gage was at about 40 feet and the sensor was reading 40 feet and the equivalent in mbar…

Look at the pictures…

I also got last Friday the MicroSD card module and I am getting a new microsd card this week( the one I got at home did not work(old)..

I tested my cellphone memory card with the microcontroller and it got to read my files an everything..

My goal for this week is to make the necessary function to write to a text file the temperature and pressure from the sensor in the file so you can open it in excel format delimited by “ , “.


I will keep you posted…


IMAG1114.jpgIMAG1111.jpgIMAG1112.jpgIMAG1113.jpg
 

Back
Top Bottom