


Aqua-Andy
Contributor
Well I'm home with the Flu and feeling kind of OK and not like total crap (at this moment in time) I thought I would get this done.
For the disclaimer, this was my first drysuit repair other than p-valves and one neck seal and claim to be no expert on this topic. I have done one dive with the suit after the modification and all went well. Please check back in a year or two to see if the repair has failed, I will update if it happens.
The problem with my Fusion is I have always had a heck of a time getting my wrists and undergarments into the cuffs. I could get my wrists in fine but always had to fight the undergarment. What would happen is the undergarment would not make it all the way through and I would have a cold spot on my wrist. one other thing that was happening was the cuff ring would end up over the palm of my hand and it would make tasks like clipping and unclipping stage bottles a chore. Fed up with the situation I removed the wrist seals for a closer inspection thinking it would be nice to shorten the sleeves a little. This is what I found.jpg") When whites attaches the cuffs I think what happens is the suit and cuff rings are inside out and when they turn the suit right side in it causes the cuff and material to pucker causing not just a reduced diameter but edges where the undergarment catches and hangs up. Now what you have is the undergarment pushing the cuff ring down towards you hand and in my case over my palm. So I thought why not hack up the suit and see if I can make it better.
When whites attaches the cuffs I think what happens is the suit and cuff rings are inside out and when they turn the suit right side in it causes the cuff and material to pucker causing not just a reduced diameter but edges where the undergarment catches and hangs up. Now what you have is the undergarment pushing the cuff ring down towards you hand and in my case over my palm. So I thought why not hack up the suit and see if I can make it better.
I started by inverting the cuff it takes some strength and a little finesse.jpg") so this is what you have. Now what I did was use a heat gun to heat the factory sealing tape
so this is what you have. Now what I did was use a heat gun to heat the factory sealing tape .jpg") and slowly peel it all off. This is what you will end up with
and slowly peel it all off. This is what you will end up with .jpg")
Now you will want to use a razor blade or seam ripper to remove all the factory stitching.jpg") . this is what it should look like when you are done
. this is what it should look like when you are done.jpg") . No turning back now
. No turning back now !!!
!!!
Now you will need to clean all the threads from the cuffs.jpg") . Now I only wanted to shorten the sleeves a small amount, this repair will shorten them about 1/2" anyway. I cut off just the part that had the stitching in it
. Now I only wanted to shorten the sleeves a small amount, this repair will shorten them about 1/2" anyway. I cut off just the part that had the stitching in it.jpg") . The next step is to turn the cuff back right side out and scuff up the cuffs with some sand paper( I had some 250 grit and seamed to work fine)
. The next step is to turn the cuff back right side out and scuff up the cuffs with some sand paper( I had some 250 grit and seamed to work fine) .jpg") . Now you will need to clean the parts to be glued, I used MEK (yes my local Mom and Pop hardware store still has the real stuff) when you think all the parts are clean, clean them again just to be sure
. Now you will need to clean the parts to be glued, I used MEK (yes my local Mom and Pop hardware store still has the real stuff) when you think all the parts are clean, clean them again just to be sure.jpg")
I had some of the factory recommend heat tape lying around from a neck seal I decided to use contact cement on instead. I cut the tape the proper width and used a heat gun to apply it to the now right side out cuff ring..jpg")
 Now you will need to fold the cuff in on itself and place it in the sleeve
Now you will need to fold the cuff in on itself and place it in the sleeve .jpg") What I did was make sure the seam in the suit was over where the heat tape overlapped so it would possibly give a better seal in this uneven area. Now just heat small portions and roll with a wall paper seam roller. It should look something like this when you are done
What I did was make sure the seam in the suit was over where the heat tape overlapped so it would possibly give a better seal in this uneven area. Now just heat small portions and roll with a wall paper seam roller. It should look something like this when you are done.jpg") I will post pictures later of the Velcro installed. to be continued....
I will post pictures later of the Velcro installed. to be continued....
For the disclaimer, this was my first drysuit repair other than p-valves and one neck seal and claim to be no expert on this topic. I have done one dive with the suit after the modification and all went well. Please check back in a year or two to see if the repair has failed, I will update if it happens.
The problem with my Fusion is I have always had a heck of a time getting my wrists and undergarments into the cuffs. I could get my wrists in fine but always had to fight the undergarment. What would happen is the undergarment would not make it all the way through and I would have a cold spot on my wrist. one other thing that was happening was the cuff ring would end up over the palm of my hand and it would make tasks like clipping and unclipping stage bottles a chore. Fed up with the situation I removed the wrist seals for a closer inspection thinking it would be nice to shorten the sleeves a little. This is what I found
When whites attaches the cuffs I think what happens is the suit and cuff rings are inside out and when they turn the suit right side in it causes the cuff and material to pucker causing not just a reduced diameter but edges where the undergarment catches and hangs up. Now what you have is the undergarment pushing the cuff ring down towards you hand and in my case over my palm. So I thought why not hack up the suit and see if I can make it better. I started by inverting the cuff it takes some strength and a little finesse
so this is what you have. Now what I did was use a heat gun to heat the factory sealing tape and slowly peel it all off. This is what you will end up with Now you will want to use a razor blade or seam ripper to remove all the factory stitching
. this is what it should look like when you are done. No turning back now!!!Now you will need to clean all the threads from the cuffs
. Now I only wanted to shorten the sleeves a small amount, this repair will shorten them about 1/2" anyway. I cut off just the part that had the stitching in it. The next step is to turn the cuff back right side out and scuff up the cuffs with some sand paper( I had some 250 grit and seamed to work fine) . Now you will need to clean the parts to be glued, I used MEK (yes my local Mom and Pop hardware store still has the real stuff) when you think all the parts are clean, clean them again just to be sureI had some of the factory recommend heat tape lying around from a neck seal I decided to use contact cement on instead. I cut the tape the proper width and used a heat gun to apply it to the now right side out cuff ring.
Now you will need to fold the cuff in on itself and place it in the sleeve What I did was make sure the seam in the suit was over where the heat tape overlapped so it would possibly give a better seal in this uneven area. Now just heat small portions and roll with a wall paper seam roller. It should look something like this when you are doneI will post pictures later of the Velcro installed. to be continued....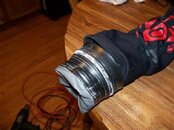
.jpg")
.jpg")
.jpg")
.jpg")

.jpg")
