Innovative Dive Bag Redux

Please register or login

Welcome to ScubaBoard, the world's largest scuba diving community. Registration is not required to read the forums, but we encourage you to join. Joining has its benefits and enables you to participate in the discussions.

Benefits of registering include

  • Ability to post and comment on topics and discussions.
  • A Free photo gallery to share your dive photos with the world.
  • You can make this box go away

Joining is quick and easy. Log in or Register now!

fjpatrum

Contributor
Messages
2,777
Reaction score
592
Location
DC area
# of dives
50 - 99
This thread: http://www.scubaboard.com/forums/making-your-own-gear/441264-innovative-dive-bag.html got me thinking about a dive bag that could also be used as a "standard" backpack. As such, I started working up a plan/pattern. I happened to have a couple of old hiking backpacks that I haven't had in about 8 years so I used those as materials and to help with a couple of the "conversion" details. Attached are a couple pictures of the backpacks and the initial pattern. There are some pieces left out of the pattern as I haven't decided yet how to do those parts but I wanted to get this started.

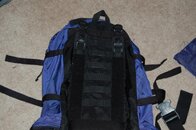
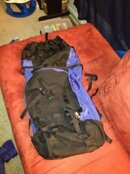
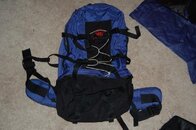
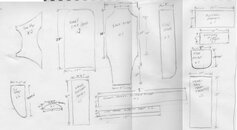
The first picture is the existing adjustable harness system for the backpacks. I'll be reusing this as part of the "conversion" system. The next two are just shots of the backpacks to give an idea of the features they had. The last is a shrunken version of the "pattern", which is really just a group of sketches I put together with rough dimensions to show the idea of the part's shapes.


EDIT: To clarify, this backpack is intended to use a backplate and harness to avoid checking them in luggage while traveling. I have decided to make it possible to do that or use an existing shoulder strap system to use the bag as a "standard backpack" when not traveling with diving gear.
 

Attachments

  • backpackharnesssystem.jpg
    backpackharnesssystem.jpg
    38.4 KB · Views: 462
  • backpackoriginal.jpg
    backpackoriginal.jpg
    64.2 KB · Views: 367
  • backpackoriginal2.jpg
    backpackoriginal2.jpg
    37 KB · Views: 367
  • bppattern.jpg
    bppattern.jpg
    20.3 KB · Views: 392
Last edited:
So, I started with my sketch:
BPWSnaponBackpack.jpg

From that, and the two backpacks I had, I came up with the rough pattern in the first post and then started taking apart the backpacks. The pieces I could leave in place I did. This image shows the front panel and bottom panel in place as they are in the final assembly. The other parts were/will be modified slightly.
parts.jpg

From here on I will write the steps as if they were being done from scratch. As such, some steps will either have repeated pictures or the picture will be withheld until the step that explains that particular assembly step.
 
And now for the instructions:

1) Sew zipper onto front panel around rounded edge, right sides together.
2) Fold Front panel zipper flap in half length-wise, wrong sides together, and sew at open edge.
3) Sew front panel zipper flap to open half of zipper on front panel, right sides together.
4) Fold all four edges of bottom flap cover 1/2 inch, wrong sides together. Sew at 3/8 inch.
5) Sew gear loops onto right side of bottom flap cover as desired.
6) Sew bottom flap cover (wrong side) onto bottom panel (right side) at side edges.
7) Sew gear loops (as desired) to bottom edge of front panel and fold toward right side top of front panel.
8) Pin bottom panel to bottom edge of front panel, right sides together. Sew edge 1/2 inch.

Backflapcover.jpg
Because the front panel and bottom flap were already assembled, with the gear loops on the front panel, all I had to do was sew the bottom flap cover and add the gear loops to it (Steps 4, 5, and 6). The gear loops I attached are the four tabs on the bottom. The box of matches is just to show that the flap is only sewn on two edges and allows the back flap to pass through the bottom and the flap cover.

9) Fold 3 edges of Gear flap (x2) 1/2 inch, wrong sides together and sew. Attach 1" webbing straps 1 1/2 inch from folded edge and sew using 3 sets of bar stitches.
10) Pin wrong side of gear flaps to right side of front panel (and zipper cover). Sew at edge 3/8 inch.


Front.jpgFrontpanel.jpgGearflap.jpg
Shown in pictures above, but not listed in directions: Sew daisy chain down center of front panel. Use bar stitches spaced as desired. (I used two finger's width as the spacing). Sew adjustable gear loops at top of front panel in line with the bottom gear loops attached in step 7.


You might want to look into some hydration type backpacks for another approach. I have one that can be used two ways. The first is with the hydration part that incorporates the shoulder straps alone and the second that attaches a standard backpack to the hydration part. If you use the standard backpack part that attaches to the hydration part as your lift bag you could separate the lift bag from from the rest of the backpack leaving the shoulder straps and other items not needed for the lift bag part on the surface.
 
richkeller, I think there's some confusion. This isn't a "dive bag" for using during diving, but for carrying gear and integrating a backplate such that when traveling you don't need to check your plate or take up space in your carry on bag with it.

I should have been more clear in my original post. I'll edit to update that.
 
You could cut 4 pieces of metal to fit the sides of the plate with holes drilled to match the holes on the plate, then bolt them together with whatever you want to use as the backpack sandwiched in between.
 
You could cut 4 pieces of metal to fit the sides of the plate with holes drilled to match the holes on the plate, then bolt them together with whatever you want to use as the backpack sandwiched in between.

You could but it would weigh 3 or 4 times the weight of a plate (depending upon size of the side panels), not counting whatever gear you want to actually carry in said backpack. This is to be for travel purposes and as such I'm going for light weight. The discussion of features and ideas we had in the thread I linked in the first post is what started me down this path.

The design is mostly set so this is a "build" thread, of sorts.
 
Sorry man, I was just trying to help. By all means carry on talking to yourself I will not interrupt you again.
 
Sorry man, I was just trying to help. By all means carry on talking to yourself I will not interrupt you again.
I suspect, with the reasonable number of views this thread has received, that I'm a long way from talking to myself.

While I appreciate the ideas you've proffered, like I said, the basic design is already decided and now it's just implementation.

I'd be very interested in any comments you (or anyone else) have about the details of this project as it unfolds. What would you do differently in design of a soft-sided, convertible backpack to fit "over a backplate" like this one? What would you suggest doing differently with respect to my sewing methods or gear/accessory choices etc? Do you have questions/comments about why I did something a particular way etc etc?
 
fj, I like your idea very much. In fact, returning from my last trip from Coz I had a similar thought. I inserted my BP/W into my rucksack and the same light came on. As I did not want to cut up my carry on, I used the shoulder straps that came with it-but thought it would be a cool idea just to have my BP straps coming through the back and for an extra heavy load possibly the waist straps too.

For those of us who would prefer not to do too much sewing, etc. why not just cut the old shoulder straps off an existing rucksack and cut slots for the BP straps?

Press on with your project, I'm looking forward to seeing the finished project.
 

Back
Top Bottom