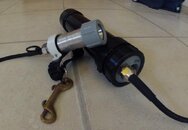
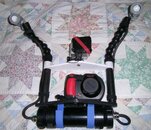
Like most of my projects this evolved over time from a simple flashlight fix to a full on can light from scratch project. I am very pleased with both lights and my friends are impressed enough to pay me to make them one.
Both lights have been dive tested to 80' multiple times and pressure pot tested to 110'. The battery canister is constructed from 2" schedule 40 ABS and the light head from a solid rod of aluminum. Tools used were fairly standard shop tools with use of a midi lathe without special metal working tools. If you are clever a drill press would probably do.
Light source is an easily available "1000 lumen" drop in module with your choice of single, 3, or 5 modes. The can light version looks, feels, and acts like many commercial canister lights. The video version above is built with 2 light heads (1000 lumen each) and one battery canister. The light heads only differ in that a cone of regular white paper is over the included reflector. Cost with shipping of parts - including the battery packs and charger comes to about $150.
Detailed plans and parts list (with suppliers and costs) are below: The pictures that go with the plans will come in later posts.
Each LED module is designed to run for over an hour on one 18650 battery. The can light has 6 of these (parallel) with one module. The video light has 2 modules and 6 batteries.
Homemade canister light construction – Cheryl Mitchell - May 10, 2013
Materials:
| Can light construction | total cost | ||||||||
| UPGRADED PARTS | |||||||||
| item | # | cost/each | cost/light | supplier | supplier part # | cost/each | cost/light | supplier | |
| BATTERY PACK | $62.95 | ||||||||
| 3x18650 protected pack 3.7 V 7.8 Ah in triangular shape | 2 | $30.00 | $60.00 | BatterySpace.com | Custom Li-Ion 18650 Battery: 3.7v 7800mAh (28.86wh) Triangular Shape w/ PCB | ||||
| Set Std Tamiya connecters | 1 | $2.95 | $2.95 | BatterySpace.com | Connector/Adaptor: A Pair of Tamiya Connectors (Male + Female) | ||||
| BATTERY CHARGER | |||||||||
| TLP-4000 | 1 | $24.95 | $24.95 | BatterySpace.com | Smart Charger (3.0A) for 3.7V Li-ion/Polymer Rechargeable Battery Pack (Standard Female Tamiya plug) | ||||
| CANISTER/HEAD | $40.11 | ||||||||
| 2" ABS pipe - 2 feet | 0.4 | $3.85 | $1.54 | Home Depot | |||||
| 2" ABS cap | 1 | $4.73 | $4.73 | Home Depot | |||||
| 2" ABSC male adapter | 1 | $2.57 | $2.57 | Home Depot | NIBCO 2 in. ABS DWV Hub x SJ Trap Adapter-C5801-7 at The Home Depot | ||||
| 2-1/4 plastic rod for cansiter plug | 1 | $0.00 | $0.00 | Interstate plastics - remnants bin | |||||
| SPST bat switch w/ 15/32 threads | 1 | $3.22 | $3.22 | newark.com | switch | $8.00 | tlslights.com | ||
| waterproof boot (APM Hexseal) | 1 | $3.67 | $3.67 | newark.com | boot | $5.50 | tlslights.com | ||
| IP 68 brass nickel plated wire glands, M16 x 1.5 threads | 2 | $4.91 | $9.82 | newark.com | 02M0349 | Argo glands | $13.00 | tlslights.com | |
| SJOOW 16ga cable per foot | 4 | $0.40 | $1.60 | Home Depot | |||||
| 1-1/4" Alum rod - 12" | 0.25 | $8.66 | $2.17 | Exact-metals.com | |||||
| 1" female plastic conduit adapter | 1 | $0.79 | $0.79 | Home Depot | Carlon 1-1/4 in. Non-Metallic Female Adapter-E942GR at The Home Depot | ||||
| 800 lumen 3 mode drop-in | 1 | $8.70 | $8.70 | dx.com | 1000 lumen single mode with flashlight body | $15.50 | dx.com | ||
| acrylic lens - clear 1/??" plastic | 1 | $1.00 | $1.00 | Tap Plastics - scrap bin | |||||
| o-ring head #120 | 1 | $0.10 | $0.10 | The O-ring store | |||||
| o-ring head sand barrier #217 | 1 | $0.10 | $0.10 | The O-ring store | |||||
| o-ring canister #226 | 1 | $0.10 | $0.10 | The O-ring store | |||||
| 2" 1/2" plastic rod | 1 | ||||||||
| 6-32 nut | 1 | ||||||||
| 6-32 x 1" machine screw | 1 | ||||||||
| 1/2" high 6-32 standoff male/female | 1 | ||||||||
| spring 5/16 x5/8 x.026 | 1 | OSH | C-556 | ||||||
| GOODMAN HANDLE | $6.87 | ||||||||
| plastic | 1 | $0.00 | $0.00 | Tap Plastics - scrap bin | |||||
| 3/4" wide elastic elastic - 1 yard | 1 | $0.00 | $0.00 | JoAnn's Fabric | |||||
| 3/4" d-ring | 1 | $0.89 | $0.89 | Dolphin scuba | |||||
| brass bolt snap | 1 | $3.98 | $3.98 | Home Depot | SS bolt snap | ||||
| SS screws | 2 | $2.00 | Home Depot |
CONSTRUCTION
Light head construction:
Aluminum light head body:
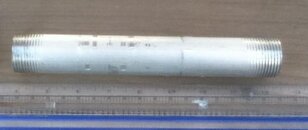
Thread the end of the 1-1/4 Aluminum rod with standard 1” pipe threading. Thread back from the end 5/8”. Check the length of the threading by screwing on a 1” female adapter until it comes within 1/8” of seating. You may need to ‘open up’ the threads on the female adapter first. See the “light head lens and cap” directions.
Fig. 1
Cut the aluminum rod into a 3-3/4 to 4” length with the threading on one end. It is easier to do the threading on a longer piece of rod.
Step drill (use increasingly larger drill sizes) a 9/16” hole all the way through, being very careful to have the hole centered. Using a lathe works much better than a drill press, but both can work.
Working from the threaded end:
· Step drill a 7/8” hole 1-3/8” deep
· Step drill a 1-1/16” hole 1/16” deep. Note: I drilled the hole with a 1” drill and then bored out the remaining 1/16” diameter
· Turn a smooth transition from the bottom of the 1-1/16” to the top of the 7/8” holes – an alternative method is to step drill the 1” or 1-1/16” diameter hole back far enough so the reflector protrudes slightly, but not more than 1/32”
· Turn an outer O-ring groove (optional) ….” From the threaded end face. This acts as a sand barrier. It is not intended as a waterproof seal.
· Sand and then Polish the threaded end face to at least 600 grit (I used 2400 grit). This is a sealing face – NO defects.
Working from the unthreaded end:
· Tap the hole with a M16 x 1.5 tap
· Sand and then Polish the end face to at least 600 grit (I used 2400 grit). This is a sealing face – NO defects.
Light head lens and cap:
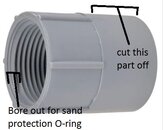
Cut most of the smooth section of the 1” female pipe adapter off. Leave the entire inner ring. Lathe or sand the remaining smooth section down until flush. Sand pretty if you want.
Fig 2.
Cut a circular acrylic or other strong clear plastic lens to just fit all the way flush into the remaining adapter from the threaded side. Make sure there are no scratches on the lens where the O-ring will seat. Cover the lens plastic with tape on both sides while cutting/shaping it.
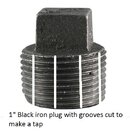
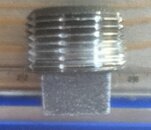
Check that the lens assembly with O-ring will seat tightly. If not then using a piece of metal 1” threaded pipe loosen up the threading on the adapter. You are using the pipe as a crude tap. Remember these are all tapered threads – and the taper is working against you. The threads are NOT the seal and should work smoothly. I made a crude $2 tap that works well.
Fig. 3 and 4
Clean all parts very well, lubricate a #120 O-ring lightly with silicon grease and assemble. IMPORTANT: the O-ring sits between the light head body and the lens. There is no O-ring between the lens and the retaining ring (what was the 1” female adapter).
Canister plug:
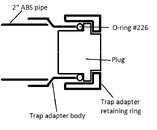
Lathe a 1” thick piece of 2-1/4” diameter plastic or aluminum rod to fit into the 2” male trap adapter.
· Lathe a shoulder (optional) to fit loosely (it needs to turn smoothly) into the opening of the trap adapter retaining ring.
· Lathe the body to fit (again loosely) into the threaded portion of the trap adapter retaining ring
· Lathe all but a 1/8” wide ring so it will fit snuggly but smoothly into the 2” trap adapter body. This ring compresses the sealing O-ring between the plug and the canister.
· Remove all flashing. Make sure the sealing ring face is without defects. This is a sealing face – NO defects.
· Drill 2 holes into the plug: A 9/16” one, and thread that with the M16 x 1.5 tap. A 15/32” hole for the switch. Using a ¾” Forstner bit countersink this hole so that only 4 threads show on the switch. Make sure this countersunk face is free of defects. This is a sealing face – NO defects. Usually no touch up is needed.
Fig 5 and 6
Trap Adapter:
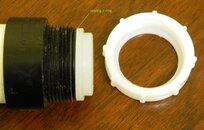
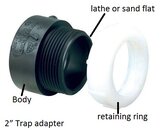
· Discard the thin plastic ring that fits between the adapter body and retaining ring. It is not needed.
· Lathe or sand the threaded end down to remove the narrowed end. This will give a larger sealing surface
· Sand and Polish this smooth. This is best done by hand on an absolutely flat surface. The ABS tends to melt with high speeds. Or a clean lathed edge works well. This is a sealing face – NO defects.
Fig 7.
Canister:
Using ABS glue, glue the end cap and trap adapter to the 2” ABS pipe. Set aside.
Battery packs:
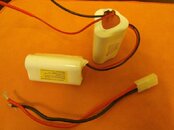
Wire your 1 or 2 battery packs to the FEMALE Tamiya connect in parallel. All the 2 or 3 black wires together, and all the 2 or 3 red wires together. Don’t forget to thread on the heat shrink insulation FIRST.
Fig 8
Light head wiring:
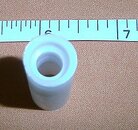
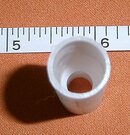
Cut a 2” length of ½” diameter plastic rod.
Drill a 7/64” hole the whole length
Drill a 3/8” hole for ¼” at one end (this is the spring retaining end) Fig. 9
Drill a 7/16” hole for 1-” at the other end (this is to hold the wires) Fig. 10
Fig. 11 and 12
Cut a length of 16 ga SJOOW cable 4-6” longer than you want the final can light cable to be.
Loosely thread one cable gland onto the cable. Gland threads facing the cut end of the cable.
Take 1-1/2” of the outer cable jacket off and trim neatly.
Strip ¾” of the insulation from both wires.
Cut off ½ of the exposed conductors on the positive (white) wire. This will leave a thinner (and more manageable) wire.
o Twist and form into a loop and tin with solder. The loop should be just large enough to allow a 6/32 screw to pass.
o Screw this loop onto the male end of the standoff and secure tightly with the 6-32 nut.
Fan out the conductors from the black wire and fold the exposed black wire in half back on itself.
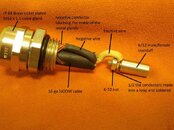
· Slide the cable gland toward the end of the cable inserting the fanned black wire conductors inside the gland touching the metal. This is your negative contact – conducts through the aluminum light head body.
· Tighten the gland securely.
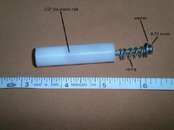
Slide the plastic rod, large cavity toward the gland, over the standoff, white wire, and folded black wire. Seat it on the gland.
Fig. 13
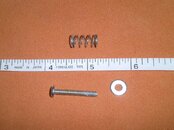
Place the spring in the smaller cavity and screw the long 6-32 screw into the standoff with a washer between the screw head and the spring. This is your positive contact.
Thread the gland into the aluminum light head body and tighten securely.
Drop in your LED module, and screw on the lens assembly tightly. The tighter it is, the better it seals – make sure the O-ring does not deform inward. The LED module reflector should protrude no more than a 1/32” at full compression. This slight protrusion keeps the O-ring from deforming inward.
If you want a diffused light instead of a focused one, then insert the paper cone into the reflector before sealing up the light head. I use the diffused version as a video light (with 2 light heads on a single canister that is mounted to my camera tray)
Canister head wiring.
Thread the second cable gland onto your cable. Gland threads face the cut end of the cable.
Strip 2” of outer cable sheath off and strip 1/4” of both the black and white wire insulation off.
Tighten the cable gland securely with the very little if any of the outer cable sheath protruding beyond the gland threads.
Insert the Bat switch into the non-threaded hole. Using the depth control nut adjust so only 4 threads show on the outside of the plug. Using a 5/8” deep socket, gently screw the switch boot securely onto the switch threads.
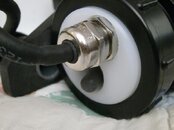
Thread the gland into the plug and tighten securely – do not over tighten and strip the threads.
Fig. 14
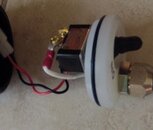
Wire the cable and the MALE Tamiya connector to the plug and switch.
· Solder the black cable wire to the black Tamiya wire. Don’t forget the heat shrink tubing as insulation
· White cable wire goes to one switch contact (screw or solder). Protect with heat shrink tubing (thread it on first!) if you wish.
· Red Tamiya wire goes to the other switch contact (screw or solder). Protect with heat shrink tubing (thread it on first!) if you wish.
Fig. 15
Lightly lubricate a #226 O-ring and place on the inner part of the plug. IMPORTANT: O-ring sits between the canister and the plug.
Final testing and comments:
· Remove the LED Module and connect the battery packs.
· Test polarity and continuity of connections.
o The center contact is positive
o The light head body is negative
o Should be 4.1 to 4.2 Volts with a fully charged battery pack
· Test waterproofness
o Remove LED module, but leave the reflector in the light head. The reflector screws off of the module
o Remove the battery packs
o Seal all openings
o Submerge in a bucket of water for an hour, or put in a pressure tester.
o If no leaks you are good.
o The canister and light head threads DO get wet. This is normal, but do dry them off before opening.
· Attach the Goodman Handle and canister rigging of your choice and enjoy.


