Making difficult to find SP 109 parts. Adjustment knob

Please register or login

Welcome to ScubaBoard, the world's largest scuba diving community. Registration is not required to read the forums, but we encourage you to join. Joining has its benefits and enables you to participate in the discussions.

Benefits of registering include

  • Ability to post and comment on topics and discussions.
  • A Free photo gallery to share your dive photos with the world.
  • You can make this box go away

Joining is quick and easy. Log in or Register now!

raftingtigger

Contributor
Scuba Instructor
Divemaster
Messages
1,307
Reaction score
817
Location
Woodland, CA, USA
# of dives
500 - 999
Currently in the works. Pictures and instructions to follow. As of this time I have a functional, but not fully finished model.

PM me if you are interested in one of a limited number of Beta test adjustment knobs. Only cost will be positive or negative feedback on this thread.
 
Is this 3D printed?
 
No, much more old school. The first three are a lathe turned internal portion with a SS screw as a rod and a cast plastic knob. I am in the process of casting the internal portion as a time saver.

Current process is:

Cut a piece of Delrin (or similar) plastic 3/4" x 3/4" by the length of the internal portion (I don't recall off the top of my head). Drill a pilot hole down the center and thread this hole with a 10-24 tap. Drill a counterset space for the SS 10-24 x 1-1/2" phillips head machine screw.
Thread this screw into the Delrin piece and mount on my lathe. Round and reduce the Delrin piece for the threads, shaft and o-ring groove.
Remove from the lathe and use a 1/2" x 20 die to thread where needed.
Firmly screw on a 10-24 SS nyloc nut.
Using a home cast alignment tool insert the nut into a freshly poured casting of the knob.
Let set until cured and remove.

The ewer process is to cast the internal part and then put that into the lathe to drill the pilot hole for the tap. I'm not casting the screw into the internal portion since I can't get it absolutely centered that way. Any eccentricity will make the part useless. The knob however does not need to be fully centered. One of my first 3 is significantly off center and it isn't noticeable in use.
 
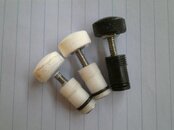
Made 4 with 2 more hardening. Here are 3 of them. The 4th is installed in my primary and set for dive testing this weekend.
PICT0153.jpg

All are turned internal parts, with a cast knob. The 2 hardening are cast internal parts.
 
That's awesome! They look great. I don't have the lathe or the casting materials (and fortunately I haven't needed an adjustment knob yet), but this is really cool. Thanks for sharing.
 
Last night I decided to cast the internal part with the screw inside. Took it out today and spun it on my lathe to check for true - was right on. The current knobs are black, and I have (or will have) about 4 extra. PM me with your address if you want to Beta test one. All I ask is feedback positive or negative.

Also FWIW, I am Beta testing the poppet modification, diaphragm cover, logo, repaired exhaust tee, and knob this weekend - all in my primary 2nd. The regulator cracks at 0.9 - 2.4" depending on the adjustment knob position and breaths sweet in the pool. (and before the flames start - I can shut off the air to that stage and have 2 others immediately available if something goes wrong.)
 
Why are you using the stainless screw at all? It seems to me it would be faster and more reliable to make the whole part out of delrin. Then you could make the whole thing in one lathe setup, knurling and everything.
 
Good question, actually the first one was done that way and when cutting the thread the shaft sheared. I can't make the shaft any larger diameter, it won't fit with the retaining pin. Besides the hand lathing takes time and multiple measurements and fittings. I also can't cast the entire knob the way I am doing it. It would need to be a closed 2 part mold and my technique is not that advanced.

A better method would be to turn a brass rod on a duplicating metal lathe, which unfortunately isn't a tool I have currently. What I do have is a woodturning MIDI lathe with hand held tools. It is amazing the precision I have accomplished with this, but it is time consuming. I also get to learn a new technique (mold making and casting) along with making useful parts. Lastly I think I have come up with a method that a reasonably talented DIYer can use with readily available materials and tools.
 
Ok, I see your dilemma. I thought you were using a metal lathe. It must be tough to get those o-ring grooves done precisely by hand!

Still, If you cut the thread (with a die) first, you could support the end on a live center and then cut the relief last working towards the chuck and it might work better. Still, you are right that it is a thin shaft that may not be strong enough in plastic and requires stainless or brass.
 
Also FWIW, I am Beta testing the poppet modification, diaphragm cover, logo, repaired exhaust tee, and knob this weekend - all in my primary 2nd. The regulator cracks at 0.9 - 2.4" depending on the adjustment knob position and breaths sweet in the pool. (and before the flames start - I can shut off the air to that stage and have 2 others immediately available if something goes wrong.)

Everything worked like a charm.

---------- Post added May 24th, 2014 at 01:41 PM ----------

Made 4 with 2 more hardening. Here are 3 of them. The 4th is installed in my primary and set for dive testing this weekend.
View attachment 184154

All are turned internal parts, with a cast knob. The 2 hardening are cast internal parts.

All the techniques work well. I found I could even cast the screw in the internal parts without problems. The cast internal parts do need a clean up and thread cleaning (with a die) before they work smoothly.
 
https://www.shearwater.com/products/swift/

Back
Top Bottom