How to restore a Piston Regulator that has IP creep

Please register or login

Welcome to ScubaBoard, the world's largest scuba diving community. Registration is not required to read the forums, but we encourage you to join. Joining has its benefits and enables you to participate in the discussions.

Benefits of registering include

  • Ability to post and comment on topics and discussions.
  • A Free photo gallery to share your dive photos with the world.
  • You can make this box go away

Joining is quick and easy. Log in or Register now!

rsingler

Scuba Instructor, Tinkerer in Brass
Staff member
ScubaBoard Sponsor
Messages
8,338
Reaction score
12,416
Location
Napa, California
# of dives
500 - 999
We’ve all fallen for it. For pennies on the dollar, we bought a great deal on eBay that looked perfect in the pictures and was “just serviced!”, but ended up having IP creep. Here’s a quick tutorial on how to restore a piston regulator that has an IP creep. And the key piece of the tutorial is showing you how to restore a blunt-end piston in post #4 (look for a future thread on restoring an older knife-edge piston).

If you don’t know what IP creep is, or have never taken a first stage apart, this is probably not the thread to start with. But if you have an idea how to handle a pick, and have access to tools, then this will lead you through the restoration of an eBay Atomic Aquatics Z2 that was pretty on the outside,
IMG_20190404_090018938.jpg
but awful inside.
Here’s where we’re starting: a cosmetically beautiful first stage, perhaps 8 years old, that nonetheless showed IP creep when we put it on a gauge.
Note that even taking it apart was a bit of a challenge. The cap was frozen on, and it took a tap with a hammer on the LP port handle to break it free. Note too, that this handle is aluminum, so it will deform before the brass cap does.
IMG_20190404_090038759.jpg
If that hadn't worked, a tap on the cap itself with a hammer often breaks the crystalline verdigris that is locking it shut, at the cost of a small mark on the LP port plug that you use to take the light hammer blow. Alternatively, a big whack with a non-metallic mallet that won't leave a mark but will deliver a blow may have the same effect of breaking up those crystals that have locked the cap in place.
If that handn't worked, I would have soaked the entire reg in the ultrasonic for 20 min and tried again.

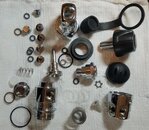
As soon as we took her apart, it became clear that as flawless as the outside appeared in the eBay pictures, this reg hadn’t seen service in awhile, and had clearly been put away wet.
IMG_20190404_090054166.jpg
IMG_20190404_090116268.jpg
IMG_20190404_090132025.jpg

In fact, looking at the verdigris inside the HP port, it seems likely that this first stage had been completely flooded at one point in time.
IMG_20190404_090202177.jpg
With this much verdigris accumulation, we’re going to see chrome loss. No doubt about it. But if the inside of the reg body is not scratched or pitted, we can fix the rest.

Upon removing, wiping down and inspecting the piston, it’s clear that part, if not all of our problem indeed lies right at the sealing area between the piston end and the cone seat.
_IMG_000000_000000.jpg
WIN_20190401_18_09_09_Pro.jpg
IMG_20190404_104423020.jpg

As you can see with this piston, there is frank pitting adjacent to the curve of the blunt end. This is very common, and is likely due to a combination of grit, salt crystals and tank dust that gets blown against the edge of the piston as high pressure air flow races around the corner of the piston’s edge, as gas flow proceeds down the shaft of the piston to the Intermediate Pressure chamber.

Continued in the next post


Continued from previous post


Here is another piston blunt end from another reg, showing vertical scratches on the curvature right where the piston seals against the conical seat.
IMG_20190404_090606242.jpg
These scratches probably came from the piston falling over on the workbench, and being dragged briefly against a hard surface as it was picked up by the technician. It takes very little force to disturb the sealing area. Treat your piston like gold!

Getting back to our disassembled reg before cleaning, the body of the reg appears to be in good condition, with no noted scratches near the land where the high pressure o-ring goes. Similarly, the land for the piston head, just inside the top edge of the reg body, appears smooth with only minor chrome loss where the piston head o-ring rides. For my prejudices about unsealed piston regs and what happens to the piston land if the reg isn't meticulously rinsed after diving, see Piston or diaphragm
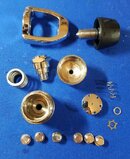
Our first task is to separate out the parts we can’t ultrasound. Most manufacturers say that plastic parts shouldn’t get ultrasonically cleaned. They go in hot soapy water with Dawn diswashing detergent and get a thorough rinse afterward.
For the metal parts, an ultrasonic cleaner is best. But they run $200 from China, and generally last only about a year, or $600 for a good used machine made in the U.S. But there’s an alternative! If you can get your LDS to order it for you, Global Scuba Manufacturing of Texas, LLC (GSM) has a magical phosphoric acid cleaner that is almost as good as a $600 ultrasonic cleaner. It’s called 43190 (quart) and 43191 (gallon) Regulator Cleaner Solvent. It’s a “food grade acid” cleaner (e.g., probably phosphoric acid) that is simply amazing at cleaning verdigris.

So for this regulator, we're going to do both! All the metal parts go in a quart plastic yogurt container full of 1:4 dilution GSM 43191.
IMG_20190404_090248769.jpg
And fifteen minutes later, after a clean water wash, you’ve done 90% of what an ultrasonic could have accomplished. If you have no U/S, then a soft toothbrush and some Dawn detergent before you throw the parts in 43191 will do the trick.
20190401_184406.jpg
Now me, I threw the yoke knob in the 43191 with the metal parts. After all, the threads of that knob see a lot of sea water. But if you want to go at it with a toothbrush and make a jig to hang the knob and soak only the metal threads in solvent, go for it! But in my experience, plastic parts that don’t see stress (unlike click-on exhaust tee’s or second stage cases) will do just fine in GSM’s solvent. You can even dilute it to 1:8 if you want a little extra safety. Note: GSM 43191 should NOT be used in your U/S cleaner for “extra power”.

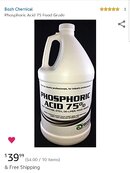
If you can't get access to GSM products, an alternative soaking solution can be made of 7.5% phosphoric acid with a squirt of Dawn detergent, by diluting 75% food grade phosphoric acid from Amazon in a ratio of 1:9 with distilled water.
_IMG_000000_000000 1.jpg

Continued in the next post


Continued from previous post


After 15 minutes in 43191 and thorough rinsing, the metal parts go in the ultrasonic cleaner for another 10-20 minutes of treatment with warmed U/S cleaning solution. If you don’t have access to Lawrence Factor Wash, Tumble Juice or GSM’s 42100-OX oxygen safe ultrasonic cleaner solution, ultrasonic cleaning in warmed vinegar diluted 1:2 - 1:4 will do very well. Alternatively, you can further dilute your homemade phosphoric acid cleaner 1:1 (to yield 3.75%) and use it warmed in your U/S cleaner.

When treating the piston, protect it from ANY contact with other metallic parts. This is the single most important step you can take. I solve the problem by using plastic pill bottles into which I have drilled multiple holes. This allows flow of fluid through the container, as well as allowing sound waves to penetrate past the buffering plastic walls of the bottle itself, while preventing any damaging vibratory contact with another metal part. All sensitive parts like this should be in individual containers by themselves.
20190401_182557 1.jpg
After U/S treatment followed by thorough washing and drying comes repeated inspection as you slowly polish out defects.
20190401_233942.jpg
For inspection, you really need either a $130 eBay Chinese POS binocular dissecting microscope (make sure to look for 10x to 30x):
10X-30X Widefield Forward Stereo Microscope Top Light WF Inspection Dissecting | eBay
s-l225.jpg
or a $40 USB microscope with a stand, that has close focus, which you can attach to your laptop.
1600X Digital Microscope Endoscope USB Camera Portable with Stand | eBay
s-l226.jpg
A visual binocular microscope is much better (despite the imaginary advantage of "1600X"), but the cost is more than triple. And whatever you do, 3x-10x loupes or jewelry magnifying glasses just don't quite cut it.
Having identified the likely cause of this regulator’s IP creep: piston wear, we need to repeatedly inspect as we mitigate the problem by hand polishing.

Continued in the next post


Continued from previous post


To restore the blunt (sealing) end of the piston shaft, one must remove the metal above the level of the pits, but match the piston end's existing curvature. Any flat spots that are made during polishing will absolutely not seal, and in fact create a leak that worsens IP creep. To polish this piston to perfection requires only two things: patience and constant motion. By that I mean taking off only small amounts of metal at a time as you polish, and never pausing in any one position while polishing.

In the photo below you will note that a 5/32” ball-end hex key fits perfectly inside the piston shaft. It is important to choose as close a match to the internal diameter of the piston shaft as possible, because you are going to spin the piston around the hex key, and you don’t want the piston to rattle as it spins, creating an irregular blunt edge.
20190404_195651.jpg

Once you have your tool to spin the piston, you need a polishing medium. My choice is Micromesh. It is available on eBay from a variety of suppliers, but it is important to choose a cloth backed product, and not one on a firmer pad or foam backing. One needs to be able to shape the Micromesh around the area to be polished. Grits from 1,800 to 12,000 should be purchased.
MICRO-MESH Sanding, Finishing & Polishing Sheets 3" x 4"- 9 Grades MADE IN USA | eBay
s-l227.jpg
The hex key is inserted fully through the piston, and the ball-end is rested on your first choice of Micromesh sandpaper grit, on a firm surface. Do NOT press the piston against the Micromesh.
Start by placing the ball end of the hex key on the Micromesh pad. The important thing is to let the piston's own light weight serve as the polishing pressure. With the hex key in position, let the piston gently slide down to the Micromesh and get ready to spin the piston on the hex key shaft.
IMG_20190404_090402175.jpg

The pads in the photo above are 4000, 6000, 8000 and 12000 grit Micromesh.
I rarely start with coarser than 4,000 grit, with the exception of when a deep nick is found in the piston end from prior mishandling. Nicks from screwdrivers, dropped pistons and other technician misconduct will cause heartbreaking defects in the sealing edge. The only solution is to polish off the entire blunt end of the piston down to the level of the bottom of the pit/nick/defect. It sounds harder than it really is. All it takes is between 5 and 30 minutes of patience, at worst. One alternative is a $60 new piston, but only if it is still available, and only if your shop will sell you the part to install yourself, instead of with a $30 service charge.
Next, spin the piston by flicking your finger against the piston head while simultaneously lifting and lowering the outer end of the hex key to constantly change the angle of the piston as it brushes against the Micromesh. This will preserve the rounded blunt end, without adding a flat that won't seal against the cone of the seat.
Here is what it looks like. This little video is the key to this entire thread:
Constant movement (alteration of the hex key's angle relative to the sandpaper), is the critical step in maintaining the original contour of the blunt end piston. Any pause while spinning will create a flat that will leak.
Once you have buffed off good metal down to the level of the bottom of any pit or scratch (with 4000 grit or perhaps coarser), you need to polish what's left to a mirror finish, while always maintaining the same curved profile of the piston's end as you started with (using 6000, 8000 and 12000 grit Micromesh).
IMG_20190404_090622431.jpg

Continued in the next post


Continued from previous post


Having polished the piston end, you also need to devote a little attention to the shaft. Inspect the shaft under the microscope, looking for any vertical scratches from piston insertion or removal at an angle, that may serve as pathways for leaking high pressure air. Keep in mind that piston shaft defects will not result in IP creep, but rather air bubbling from the ambient chamber holes when the reg is pressurized and submerged.

So when you get a reg for testing, make sure to do a submerged check for bubbles in addition to an IP check. If the ambient chamber bubbles, tilt the first stage while submerged, first with the LP ports up, and then with the HP end up. See if you can determine whether the bubbles come from the piston head end (piston head oring or land defect), or from the HP end (piston shaft oring or land defect). If the defect is on the HP oring land, your first stage is likely toast. Any other problem you can fix with new orings or polishing.

In any case, with this regulator, while grasping the shaft of the piston wrapped in Micromesh, twist it firmly with successively lighter grades of cloth until it is smooth under the microscope:
20190404_120212.jpg
It is rare that you need grit coarser than 4,000 for the piston shaft. I take it all the way to 12,000 grit. It is sometimes argued that leaving the shaft satiny traps lubricant better. But any benefit from lube trapped in the coarser finish of a satin piston shaft will last only until the lube has been wiped away. I believe that a better HP o-ring seal will occur against a mirror finish, and I polish my piston shafts as smooth as I can get them. In any case, Atomic's HP o-ring is Teflon impregnated.

EDIT: My good friend @couv has taught me that I'm wrong about polishing the piston shaft to a mirror finish. He comes from a long career dealing with this very issue in aircraft hydraulic pistons, and points out that a mirror finish will increase friction. The easiest way to think about it is that a drunk driving too fast around the corner on a cobblestone street will skid. The same drunk on a smooth road will roll his vehicle.
So maybe take the shaft to 4,000 grit in removing any scoring, and leave it at that. Your HP shaft o-ring will thank you.

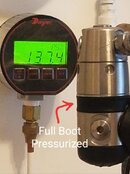
Only now is the regulator ready for reassembly. After reassembly per the Service Manual (including proper torque of the HP seat retainer, the turret bolt (if any) and the yoke retainer), it is time to put the reg back on an IP gauge. Keep in mind that you have microscopically shortened your piston shaft. That means that to reach the seat, the piston/spring has to compress slightly more. Typically you won't see more than 1-2 psi IP rise. But if you take out a deep nick, you may have to remove one or more shims to prevent the spring from compressing so much that IP rises out of specification.
20190404_115235.jpg
There is nothing like the crisp lockup of a previously leaking regulator to give you confidence in your repair skills! In this case, the brief 2 psi of creep that you saw before lockup is typical of a new seat. The lockup becomes more crisp after a few thousand cycles, and IP typically rises 2 psi as the sealing edge buries itself slightly deeper into the seat, with slightly more spring compression as a result.

But how to prevent the original problem from happening again? This reg was perhaps the victim of a rusty tank, with tiny particles of iron or aluminum oxide getting past the sintered metal filter to impact the piston. And it was clearly flooded and not dried out or serviced. Though the piston land was smooth, my prejudice is still to environmentally seal the regulator so that water never gets inside again. But in any case, the bottom line is still meticulous care after a dive.

Watch for a thread coming soon on "How to environmentally seal your piston regulator."20181217_165141.jpg
 
There was another thread on this years ago.
 
will be giving this a go once my now ordered micro mesh comes in. the last rebuild suffered from a creep initially but did lock up eventually though on the high side. I had been monitoring the IP but it started dribbling out of her 2nd on it's last dive. IP at this point was creeping over 152 but thankfully slow enough that her respiration rate made it a non issue for that last dive. Pulled it apart and sure enough, there's radial scratches on the sealing surface and tiny 'burrs' on the seat. Rebuild didn't quite make it to 2yrs/200 dives but again, it started off a tad gimpy. Hopefully the future polishing will give it some longer legs.
 

Back
Top Bottom