Scubapro regulator DIY

Please register or login

Welcome to ScubaBoard, the world's largest scuba diving community. Registration is not required to read the forums, but we encourage you to join. Joining has its benefits and enables you to participate in the discussions.

Benefits of registering include

  • Ability to post and comment on topics and discussions.
  • A Free photo gallery to share your dive photos with the world.
  • You can make this box go away

Joining is quick and easy. Log in or Register now!

Kupu

ScubaBoard Supporter
Messages
1,279
Reaction score
1,007
Location
ㅤUSA
# of dives
1000 - 2499
I enjoy picking up used regulators (mostly Scubapro), a hobby allowing me to play with and compare various regulators as well as picking up gear at a sweet price. The fun began years ago when I became interested in regulator discussion here on Scubaboard, and continues with the continued influence and information shared by many here. Thank you!

I will be working thru a few regulators over the next couple months, and hope to contribute a small bit to this board and the DIY cause. A freebie SP G260 was this evenings project, a recent score that looks 95% new cosmetically but was breathing poorly.

Disassembly went very smooth due to the newness of the regulator and lack of saltwater use. A nice change from some older second stages, where certain parts (eg the orifice) can be a bit stuck from salt residue, corrosion, and age.

Reassembled after cleaning, replacing poppet seat, and re lubing the orings after inspection. The fine tuning screw adjustment added to the adjustment knob is very simple, requiring only a hex wrench and adding almost no time to the process. Overall, I would rate the G260 rebuild work as being the same as a G250.

The end result is a stable cracking pressure of .75, very pleased with the regulator. I have been a bit turned off by the relative complexity dealing with the fine tuning screw of S600/G500 in the past, but have to say I like the version on the G260, fine tuning was so simple and seemed to make the final adjustment a bit easier. Time will tell on overall satisfaction, it should get a lake test run sometime next week.
 
Tools used on this project came to about $120, but could be done with less.
  • slotted orifice driver $21
  • brass oring picks $10
  • orifice extractor tool $6
  • small flathead screwdriver $3
  • needle nose pliers $5
  • aluminum scubapro multitool $41
  • hex wrench set $10
  • magnehelic with DIY mouthpiece $20
20190710_192949.jpg
20190710_210910.jpg
 
Any idea why it was breathing poorly to begin with?
 
Any idea why it was breathing poorly to begin with?
Inside of the case was noticeable amount of thick brown build up. Hoping it was lake gunk or similar, but it cleaned out easy. The air barrel was quite clean inside. The poor breathing was mainly a result of previously being tuned with high cracking effort. A new seat and lighter tuning cut the cracking effort almost in half.
 
After going thru the G260, I decided to break down and clean my wife's S600. My main goal was to compare the process. Having rebuilt several versions of the S600 previously, I have grown to dislike working it based on the the relative complexity and time taken to get it tuned. The S600 worked on today is shown on diagram version 6/10 rev. A. The result, I hope to convert her to the G260 as it is friendlier to DIY with expected matching performance.

I find the G260 much more enjoyable and easier to work on. A few thoughts and comparisons:
  • Removal and installation of the G260 one piece air barrel assembly (and no retaining clip) simpler and easier vs the S600 assembly.
  • Going back to tweak the tuning on the G260 easier since access to the knob assembly adjustment screw on G260 is a pop in cap that is easy to remove and reinstall as needed vs S600 cover decal that takes a bit of work to remove and generally needs to replaced each time it comes off
  • The in knob adjustment screw on the G260 is much simpler and DIY friendly design. My #1 annoyance when dealing with the S600 is the adjustment screw.
  • I prefer the G260 cover assembly design, which also has the bonus of a built in seat saver function. We have had issue involving the decorative metal frame on the cover of an earlier version S600 being snagged on the edge and bent out of shape.
  • Benefit (IMO) of G260 metal air barrel vs plastic on some S600 versions
  • 7 oz weight of S600 (w metal air barrel), 9 oz weight G260. S600 very slightly smaller in overall size.
 
I went back and played with the G260 adjustment screw, but leaving the orifice alone, and was able to bring the cracking pressure down to .6, up to maximum of .8 when inhaling as much air as possible. No freeflows despite repeatedly pressing the purge all the way down. A personal best for lowest cracking effort, just for fun.

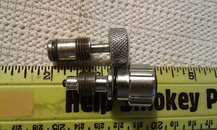
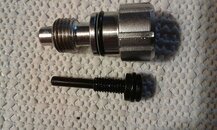
Playing around with the idea behind G260 adjustment knob screw, I wondered if it could be retrofitted into a G250/156 etc. The knob can be screwed into the 156 barrel, but it is not compatible enough to work. The location of the threads prevents the G260 knob from reaching deep enough to make contact with the 156 spring pad, about 1/4 inch difference. Not that it is at all practical, but it would be interesting to machine or print a copy of the G260 knob with dimensions allowing use on G250, and see how the two versions compared when tuning.
20190712_120645.jpg 20190712_120853.jpg
 
Correction, I tried the G260 knob on a 109, not 156. The idea has been stuck in my head and I realized that replacing the 109 spring pad with a balance chamber will add length to the 109 poppet assembly and allow contact with the G260 knob. Not an option when using the the shorter spring of the 156, but should be easy to make a spacer to set between the 156 balance chamber and adjustment knob.

Only way to get this out of my head will be to give it a try next time I get a little bit of free time. It would be really neat to have it work and see a measurable difference...a matter of curiosity.
 
It's likely that a cracking pressure of .6-.75 will not be stable underwater. You're pushing the limits of case fault geometry in that range.
Thank you, a very good point that I had forgotten. I will have to adjust back to 1.0 - 1.1 due to case fault geometry.

That reminds me of why there is a small box of D350, Air1, etc and parts sitting around the house. The old threads discussing case fault geometry are what got me interested in the D series design. Life has kept me mostly out of the water for a few years, and collecting regulators has helped dull the pain of being out of the water. Times are changing and soon I should be able to get some use out of the collection.
 
It's good that you have some of the old center balanced 2nd stages; I suspect you understand that the coaxial exhaust valve in the D series makes them more stable with very low cracking pressures. Maybe you should look for a converted pilot, those are more-or-less D series regs in a metal case.
 
https://www.shearwater.com/products/peregrine/

Back
Top Bottom