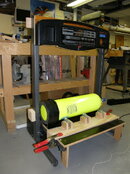
Attached are Pictures and a description of my DIY tank tumbler I built from a treadmill.
I had the opportunity to buy some Steel 72s, some of which had a little rust. Being a cheap SOB, I didnt want to pay for someone to tumble them or buy a tumbler. After a little research I decided to build one myself.
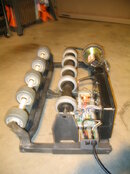
I got the idea of using skateboard parts from a picture on DIY. Not having any skateboards, I built a non-motorized prototype to test the concept of using inline skate wheels. They have excellent bearings that will handle a lot of weight and I had a spare set that were bought for some skates we didnt even have anymore. It worked great while cleaning an AL80 for nitrox.
Somewhere along the way, I got the idea that a treadmill motor would work well so I put an ad on CL for a working treadmill that I would be happy to take off your hands. I got quite a few responses. It seems that a lot of people use treadmills as clothes hangers.
I disassembled it and was going to use the motor and controller but since the frame was already built and had a drive roller I decided to try and adapt it. The problem was that the drive roller was too low in the frame to be used directly so I decided to use it to drive the skate wheels.
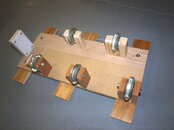
I suck at welding and dont have much in metal parts around the house but Im a fair woodworker and have all kinds of scrap wood lying around. Therefore the brackets are made of wood. Total cost of the project was about $4 in bolts.
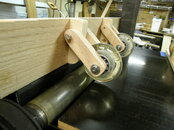
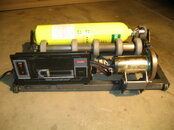
After some disassembly and cutting off the ramp to a workable length, I added skate wheels on fixed brackets above the drive roller. It all worked well until I tried to put the front cover back on. With the cover attached, the board that mounted the wheels had to be raised slightly and the wheels didnt drive well. After struggling with slotted mounting holes and other fiascos, my son looked at it and immediately came up with a hinge solution. (I guess that $40k / year for college might work out.)
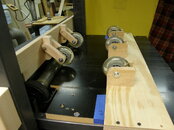
The free wheels are mounted on a separate board that can be positioned for tank size. I have marks for 4 inch. 7 inch and 8 inch diameter tanks. I havent decided if I will bolt it down or just use clamps to position it. I hope that the oak mounts will hold up when I drop a tank on them. Time will tell.
The speed is adjustable and uses the original control panel that was mounted to a board attached to the uprights. 1.3 mph equals 60 RPM on an AL80.
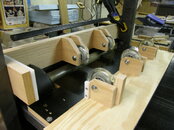
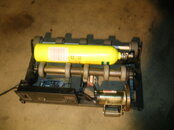
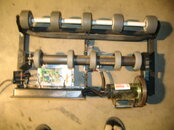
Pic 2 shows the fixed wheel mounts that were replaced on the final version as shown in the other pix.
The last Pic is the original concept.
I had the opportunity to buy some Steel 72s, some of which had a little rust. Being a cheap SOB, I didnt want to pay for someone to tumble them or buy a tumbler. After a little research I decided to build one myself.
I got the idea of using skateboard parts from a picture on DIY. Not having any skateboards, I built a non-motorized prototype to test the concept of using inline skate wheels. They have excellent bearings that will handle a lot of weight and I had a spare set that were bought for some skates we didnt even have anymore. It worked great while cleaning an AL80 for nitrox.
Somewhere along the way, I got the idea that a treadmill motor would work well so I put an ad on CL for a working treadmill that I would be happy to take off your hands. I got quite a few responses. It seems that a lot of people use treadmills as clothes hangers.
I disassembled it and was going to use the motor and controller but since the frame was already built and had a drive roller I decided to try and adapt it. The problem was that the drive roller was too low in the frame to be used directly so I decided to use it to drive the skate wheels.
I suck at welding and dont have much in metal parts around the house but Im a fair woodworker and have all kinds of scrap wood lying around. Therefore the brackets are made of wood. Total cost of the project was about $4 in bolts.
After some disassembly and cutting off the ramp to a workable length, I added skate wheels on fixed brackets above the drive roller. It all worked well until I tried to put the front cover back on. With the cover attached, the board that mounted the wheels had to be raised slightly and the wheels didnt drive well. After struggling with slotted mounting holes and other fiascos, my son looked at it and immediately came up with a hinge solution. (I guess that $40k / year for college might work out.)
The free wheels are mounted on a separate board that can be positioned for tank size. I have marks for 4 inch. 7 inch and 8 inch diameter tanks. I havent decided if I will bolt it down or just use clamps to position it. I hope that the oak mounts will hold up when I drop a tank on them. Time will tell.
The speed is adjustable and uses the original control panel that was mounted to a board attached to the uprights. 1.3 mph equals 60 RPM on an AL80.
Pic 2 shows the fixed wheel mounts that were replaced on the final version as shown in the other pix.
The last Pic is the original concept.