3D printing...

Please register or login

Welcome to ScubaBoard, the world's largest scuba diving community. Registration is not required to read the forums, but we encourage you to join. Joining has its benefits and enables you to participate in the discussions.

Benefits of registering include

  • Ability to post and comment on topics and discussions.
  • A Free photo gallery to share your dive photos with the world.
  • You can make this box go away

Joining is quick and easy. Log in or Register now!

OK, I think the issue is with this red PLA. I have it down to 300C, but it just doesn't look crisp. All the other filaments look fine. I hadn't used this brand before and will stick with Hatchbox.


What's the brand?

I think your in FL if I'm not mistaken. I get my filament locally at a place called Microcenter. Usually $15-$19 and it works pretty good.

There's better stuff, but this is cheap and works for what I do. I've also read good things about Hatchbox, but for me would be a little more expensive.
 
What's the brand?
3D Best-Q. I like the fact that when I order from Amazon, it just shows up at the door. Hatchbox is a bit more expensive, but I want my prints to last.

OK, I'm supposed to be diving today, but leg issues are getting in the way. So, I might get back into the CAD and see what's up. In any event, I started printing my "signature" battery bulk box last night and it's really, really looking good. This was the second thing I created in CAD and it's good to see it emerge. It will accommodate 24 batteries.

full?d=1566037349.jpg


full?d=1566037349.jpg


Half way through the print!

full?d=1549033094.png


full?d=1549033094.png
 
So, after the 
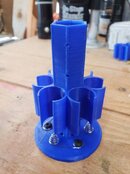
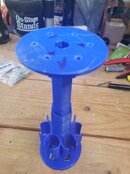
tragic misprint of my 4S3P Battery Holder (Not to be confused with the box printing happily in the back ground), I knew I had to get into the CAD files and check my dimensions. This required remembering where I created them and how to actually use that program. All this angst! I was supposed to dive today, but my healing leg has another plan, so here I sit. With time on my hands and a failed print. I guess I'm going to have to dig in, so might as well get it over with... and here I go.

full-d-1565883890-jpg.534919.jpg

I remember designing the files to press together but these clearly won't. No, I didn't allow any clearance, but this is plastic, right? If it doesn't fit, just force it! I am using www.Onshape.com and it took a few moments to get reoriented to using it this am. Wow, but the initial drawing I created was incredibly complex and detailed... at least for me. There was about a 1.5mm issue with the actual print (in the Red PLA that has issues). Thinking I might have made a mistake in the drawings I had to figure out how to measure but everything came out to be 18mm. My first thought was to modify the stepped base. Modifying one file should be easier than two, right? Nope. Multiple extrusions had locked that in, so I went to the two simpler files and enlarged the opening on each by 0.05 mm (0.002") for clearance sake. I also added camfers to everything to make it even easier to assemble. I'm going to try and print these in ABS when the battery box finishes later this am. One part at a time though. I might still have to adjust the fit a bit.

So, my fear of CAD is still there and still unfounded. I was pleased that after all these months, I retained enough to still get things done. The one thing that still sits with me today is how well Onshape was presented in their tutorials. Sitting down on a Sunday and having a working file by that afternoon still blows me away. I can't remember how many times I tried to figure out CAD and they made it easy. Way cool.

So the ugly red filament really has an issue and didn't maintain its dimensions. It might be temperature related, but the other filaments look fine.
 
Done! My battery box has finished printing! :D :D :D The top's wall has delaminated a bit, but she looks cool. Pretty exciting for me. My first Concept=>CAD=>Print finish! It was also my first contribution to ThingiVerse: Battery Storage for 18650 Batteries by NetDoc

full?d=1566052535.jpg


full?d=1566052535.jpg


full?d=1566052535.jpg


23 18650s and a single AA, just to show you can. :D :D :D
 
I'm getting closer. The problem with the print is the "bead" on the corners and that while I have the ODs diealed in, the IDs are not there. Here's a close up of the bead I'm talking about...

full?d=1566089430.jpg

I took the time to file the beads flat and it was a true force fit. It was too hard soI went back in and am ow concentrating on the stepped base. It's looking great out of print, so I tweaked it down to 17mm and that allows a real easy fit for the coupler I printed. I'm going to increase it only 0.1mm and print the two resized bat clips (they're the same ID as the coupler). I'll know something in the morning.

full?d=1566089430.jpg


full?d=1566089430.jpg


In that middle picture, it almost looks like the top edge of the smaller piece is curving inwards. Or is that just an optical illusion?
 
It's a forced perspective issue. They are perfectly straight. I think I am done modifying the files. I printed out a stepped base that was just 0.1mm wider and the fit is perfect. No flexion, not that easy to pull apart and when they finally get glued together after the hardware is installed, it will be solid. Here's a quick pic of the assembled pieces...

full?d=1566123744.jpg

As an after thought here, and I'm only spitballing, maybe it's time to see if this fits into my dive light canister!!! :D :D :D Then, I'll wire it up. I have to say this is pretty cool. While seeing a final print battery box, this battery holder was my first ever CAD design. I've tried to be patient as I worked through the printing issue with my Tornado and I'm glad it was such a simple oversight in their initial build that was the problem. Now that I understand the process, it makes simple sense to me. Now when I change filaments, I simply release the pressure on the feed roller and pull gently, even cold. To install a new one, all I have to do is to make the initial feed and then gently feed in filament until it stops. No need to prime it either. The little smear the printer does at the beginning is more than enough to clear any old filament out and get the new one ready. I'm almost ready to make my second contribution to thingiverse. I want a fully functional unit and so I want one more stepped base of the final thickness before I start wiring.
 
I have the battery springs. I have some 8-32 SS pan head screws and I already tapped the holes in the flanges. What I don't have is sheet or foil copper to connect it all. How thick of copper do I actually need? A 10W head will consume less than an an amp, and that's over three legs. The assembly fits fine into the case, but clearances are tight.

6DYq21-20190818_071451.jpg

I think I have just enough room to put the top part the light head plugs into if I drill two holes in the upper flange. I could actually print the top and bottom flanges wider to keep from bouncing around.

Here's the holder fully populated with batteries, but no hardware. These are the longest batteries I have, so if they fit, all the others will fit. :D :D :D Just enough room for the hardware, I think.

All the other stuff I need will arrive by Tuesday.
 
My 4S3P battery holder for an Underwater Can light is progressing right along. I made a number of mods to the files to get them fitting tighter and to allow me to lock them together. For that I had to increase my CAD skills, which was fun and last night I ran a 10 hour print with 3 walls and 99% infill. This morning I started assembling:

full?d=1567088898.jpg


Bottom battery contancts installed. Clips and connector in place with holes aligning.
full?d=1567088898.jpg


Upper flange showing 4mm holes for wire mangement and 6-32 tapped holes.
full?d=1567088898.jpg


Alignment is critical for the 1.75mm holes to align and to get the positives with the negatives.


Attachments

  • 4yxXc2-20190829_080142.jpg
    4yxXc2-20190829_080142.jpg
    61.6 KB · Views: 72
  • 4yxXc3-20190829_080452.jpg
    4yxXc3-20190829_080452.jpg
    76.8 KB · Views: 75
  • 4yxXc1-20190829_080529.jpg
    4yxXc1-20190829_080529.jpg
    82.9 KB · Views: 72
Looking better, although I'm still not liking your layer resolution. It seems really rough compared to what it should be. Although if it's functional it doesn't matter.

On another note, got the JGAurora A5S all set up and running test prints and such. Aside from some minor annoyances it's working out pretty well.
 
https://www.shearwater.com/products/swift/

Back
Top Bottom