
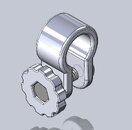
If you really want it to be durable, use your printed part to make a silicone mold then pour cast it out of urethane.I designed and printed a hard-goodman handle for my Brynite DIV08.
Looking forward to bring it to a divesite and see how it works. On land i like it a lot. Fits very good and feels great.
It is printed with PLA at the moment. When it works out nice i will make a new one in PET-G which should hold up better in the water.

You are using an out of date browser. It may not display this or other websites correctly.
You should upgrade or use an alternative browser.
You should upgrade or use an alternative browser.
3D printing...
- Thread starter The Chairman
- Start date
Please register or login

Welcome to ScubaBoard, the world's largest scuba diving community. Registration is not required to read the forums, but we encourage you to join. Joining has its benefits and enables you to participate in the discussions.
Benefits of registering include
- Ability to post and comment on topics and discussions.
- A Free photo gallery to share your dive photos with the world.
- You can make this box go away
Pilotmaverick
Registered
I will first try it out with PET-G and see how it holds. It feels super sturdy so I dont think there will be the need to cast it in urethane.
AevnsGrandpa
Contributor
Neat to see this thread. I have been 3d printing for almost a year now (Creality Ender 3) and am always looking to find or design useful things.
For those who have done some things that you use underwater, will PLA be Ok or should you go for PETG or ABS?
Jeff
For those who have done some things that you use underwater, will PLA be Ok or should you go for PETG or ABS?
Jeff
I've been printing BCD flanges with ABS 100 % infill and 0,1 mm layer height with good results. I've not printed still with PETG. Is something I have pending.Neat to see this thread. I have been 3d printing for almost a year now (Creality Ender 3) and am always looking to find or design useful things.
For those who have done some things that you use underwater, will PLA be Ok or should you go for PETG or ABS?
Jeff
ABS is tricky to keep adhered to the print base as it contracts a lot when it colds down. I was told that PETG has not that very problem.
Galt
Registered
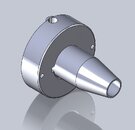
I've been printing a couple accessories for my TG5 camera setup. I will post some pictures later of the actual prints but here are a couple screenshots. I made an adapter to hold a DGX video beam 600 light onto a locline YS adapter, and I have also been designing a poor man's snoot to fit my Inon S2000 strobe.
Attachments
OP
The Chairman
Chairman of the Board
I might regret this, but what's a snoot?I have also been designing a poor man's snoot to fit my Inon S2000 strobe.

As some of you know, I broke my leg almost three weeks ago. It's a pain... and I'm not talking about the physical pain. I have been so frustrated that I can't go out in my workshop and create. But, there's a Tevo Tornado sitting over there that I got really frustrated with a couple of months ago and abandoned it to take care of other pressing matters.
But it's just sitting there. There's a nice comfy chair right beside it. The problem I've been having has been the print not adhering to the bed.
I know, I know that the 'traditional' way of adjusting the bed is a piece of paper. I hate that. I've worked in the automotive trade and machine shops all my life. I determined that the average piece of paper is about 0.004" so I got out my 10" set of feeler gauges and took that one out. As I move the table backward (Y axis), I hear a kind of moan. Wow. I hear it every time I do it. Off comes the bed, and I check the play. Wow, it's tight and I see a bit of black dust. That can't be good. I loosen all three bearings on the left and carefully clean everything. I search youtube and there's really no great video that gives me a precise way of doing it. As it sits, if I move any of the bearings, the plate moves. I loosen all three bearings on the left and adjust the middle one first. I tightened it just until the wheel wouldn't move without moving the plate and backed it off a skootch. I did that for the other two and made sure it moved without groaning.
I have this on a table right by the riser I have my color laser printer on. I have the oversize knobs on the adjusters which makes this easier, but I'm still having to bend way over to see what I'm doing. It's just not working for me. I have to say that my frustration level is already high with the broken leg. It's just not working for me.
Flash. Why not switch places with the color laser printer? I get my daughter to help... I still have a broken leg you know... and now the bed is right at eye level as I'm sitting in my chair. Kewl. I can clearly see a glob of plastic on the end of the nozzle. 2 phreakin' phunni! I heat up the end, pull off the glob and then get back to adjusting the bed... but this time I'm going to use the 0.003" feeler gauge. What a difference this makes! I can clearly see the tiny gap under the nozzle and with the help of the feeler gauge, I get the bed level quickly. I keep leveling until I can go around the four spots without having to make a single adjustment. I just started printing a cap for the second stage and it's sticking. It's printing. Kewl.
OP
The Chairman
Chairman of the Board
It's been six weeks since we've had an update. My broken leg certainly has impeded my progress. I was finally able to take my printer into the Gainesville Hackerspace and got some help from Kamin. I got there early and had just hooked it all up when he arrived.
We got right to work and there were times I had to swallow my pride, and other times where my swallowed pride was able to feel a bit vindicated. We re-calibrated. We diagnosed. We, and by we, I mean Kamin. The issue has been clogged nozzles, which impeded the flow of the filament. After playing with a sacrificial filament, Kamin decided we needed to pull the heater block apart. It was there we found the problem: the tube which guides the bourdon tube to the nozzle did not fit flush with the nozzle. This allowed the filament to ooze into the block and goop up the works. We tightened the tube with a 10mm wrench (pliers are discouraged around my gear), re-intalled the nozzle and checked it. It seemed to be poifect. We also upped the temp a bit and printed the cube on the SD card Tevo provided. WOW!!! The "after" cube is on the left and it looks great!

My injury swelled up last night to alarming proportions, so I took it rather easy today. I moved the printer in just before noon and set it. On Kamin's recommendation, I changed the bed gap from o.003" to o.005" (to eliminate elephant foot), upped the temp on Cura to 230C and made sure printing height was kept to o.1mm. That's making for long print times, but the results are awe-awe-awesome.
So, I printed the 20mm XYZ cube and I was only %2 off and it looked as good. Notice that there is no elephant foot. Damn, this is cool!

So now it's time to print something actually useful. I designed a signature battery box with NetDoc on the cover. The CAD I used did not allow me to design it upside down, so I made the Rookie mistake and set it to print that way and no, I didn't include supports. I'm sure it will fail, but I want to see it happen. OK, it failed!

OK, I'm about to do a blog with Scuba Radio, I cancelled the print and I think I'm going to print the battery holder for my dive lights first. It's only a 14 hour print, so I'll see it tomorrow morning. But the printer is noisy, so I'll keep it off until I done with Greg. Good stuff though. I'm pumped.
We got right to work and there were times I had to swallow my pride, and other times where my swallowed pride was able to feel a bit vindicated. We re-calibrated. We diagnosed. We, and by we, I mean Kamin. The issue has been clogged nozzles, which impeded the flow of the filament. After playing with a sacrificial filament, Kamin decided we needed to pull the heater block apart. It was there we found the problem: the tube which guides the bourdon tube to the nozzle did not fit flush with the nozzle. This allowed the filament to ooze into the block and goop up the works. We tightened the tube with a 10mm wrench (pliers are discouraged around my gear), re-intalled the nozzle and checked it. It seemed to be poifect. We also upped the temp a bit and printed the cube on the SD card Tevo provided. WOW!!! The "after" cube is on the left and it looks great!
So, I printed the 20mm XYZ cube and I was only %2 off and it looked as good. Notice that there is no elephant foot. Damn, this is cool!
So now it's time to print something actually useful. I designed a signature battery box with NetDoc on the cover. The CAD I used did not allow me to design it upside down, so I made the Rookie mistake and set it to print that way and no, I didn't include supports. I'm sure it will fail, but I want to see it happen. OK, it failed!
Neat to see this thread. I have been 3d printing for almost a year now (Creality Ender 3) and am always looking to find or design useful things.
For those who have done some things that you use underwater, will PLA be Ok or should you go for PETG or ABS?
Jeff
I also have an Ender 3, what an easy printer to use right? I have printed a few things in PLA. A goodman handle and a holder for my long hose in place of a canister light. Both have held up great after a few dives. PLA does not like heat though, so it can't sit in a hot car or out in the sun too long. I left my Goodman handle in the car for a day and it became warped, and that's with 70% infill. Luckily I flipped it over and it warped back.
I've been printing BCD flanges with ABS 100 % infill and 0,1 mm layer height with good results. I've not printed still with PETG. Is something I have pending.
ABS is tricky to keep adhered to the print base as it contracts a lot when it colds down. I was told that PETG has not that very problem.
I like PETG a lot. Not as hard to do as ABS, but also not as durable. It's more durable than PLA. The distance between the hot end and the bed has to be pretty large, almost to where it "falls" onto the bed. I have used the clear stuff and it's awesome to watch it ooze onto the build plate. It is VERY sticky. I use glue stick (I don't want hairspray overspray everywhere, I can see that being an issue down the road). Kids elmer glue stick, nice thin layer and it makes getting the model off a piece of cake. No cabinet needed either (as opposed to ABS)
Hope that helps...
Direct drive print head for the winIt's been six weeks since we've had an update. My broken leg certainly has impeded my progress. I was finally able to take my printer into the Gainesville Hackerspace and got some help from Kamin. I got there early and had just hooked it all up when he arrived.
We got right to work and there were times I had to swallow my pride, and other times where my swallowed pride was able to feel a bit vindicated. We re-calibrated. We diagnosed. We, and by we, I mean Kamin. The issue has been clogged nozzles, which impeded the flow of the filament. After playing with a sacrificial filament, Kamin decided we needed to pull the heater block apart. It was there we found the problem: the tube which guides the bourdon tube to the nozzle did not fit flush with the nozzle. This allowed the filament to ooze into the block and goop up the works. We tightened the tube with a 10mm wrench (pliers are discouraged around my gear), re-intalled the nozzle and checked it. It seemed to be poifect. We also upped the temp a bit and printed the cube on the SD card Tevo provided. WOW!!! The "after" cube is on the left and it looks great!
My injury swelled up last night to alarming proportions, so I took it rather easy today. I moved the printer in just before noon and set it. On Kamin's recommendation, I changed the bed gap from o.003" to o.005" (to eliminate elephant foot), upped the temp on Cura to 230C and made sure printing height was kept to o.1mm. That's making for long print times, but the results are awe-awe-awesome.
So, I printed the 20mm XYZ cube and I was only %2 off and it looked as good. Notice that there is no elephant foot. Damn, this is cool!

So now it's time to print something actually useful. I designed a signature battery box with NetDoc on the cover. The CAD I used did not allow me to design it upside down, so I made the Rookie mistake and set it to print that way and no, I didn't include supports. I'm sure it will fail, but I want to see it happen. OK, it failed!
OK, I'm about to do a blog with Scuba Radio, I cancelled the print and I think I'm going to print the battery holder for my dive lights first. It's only a 14 hour print, so I'll see it tomorrow morning. But the printer is noisy, so I'll keep it off until I done with Greg. Good stuff though. I'm pumped.
I swapped out my 0.5mm Taz 6 nozzle for an E3d 0.4mm hardened nozzle and kept failing prints until I realized I never changed the nozzle size in the slicer...
Oops
Printing an adapter for a valve for our water plant now... Who would have thought it would one day be cheaper and more efficient to design and print am adapter in your living room...
Similar threads
- Replies
- 28
- Views
- 1,470
- Replies
- 15
- Views
- 1,435
- Replies
- 0
- Views
- 971
- Replies
- 20
- Views
- 3,735
