


applecorps
Contributor
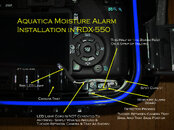
If it helps anyone else, you can fit an Aquatica Moisture Detector in the RDX-550D housing with a t2i camera inside. It's tight but it works!


Installation Tips:
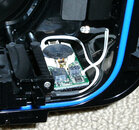
1) Cut the self-adhesive velcro strip to only 1/2 the width of the moisture detection board. Adhere it to the bottom of the housing snug up against the side of the camera tray area so that the other half can rest lower against the bottom of the housing and fits out of the way of the camera when being positioned into the housing.
2) Brush on just a touch of super glue or plastic cement to a very small spot along the moisture sensor wire - just enough to keep it resting along the side of the moisture sensor board and in a position to rest along the bottom of the housing just below the level of the camera tray.
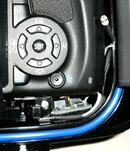
3) Brush on just a touch of super glue or plastic cement to a very small spot along the LED light wire - just enough to keep the wire out of the way of the camera when loading the camera.
4) Hold the LED light out of the way of the camera when loading the camera and then bend the wire so that the light is held just behind the camera and just above the 4-way arrow control buttons - that way, the red flashing LED light can be noticed through the smaller control buttons as well as through the viewfinder.
Installation Tips:
1) Cut the self-adhesive velcro strip to only 1/2 the width of the moisture detection board. Adhere it to the bottom of the housing snug up against the side of the camera tray area so that the other half can rest lower against the bottom of the housing and fits out of the way of the camera when being positioned into the housing.
2) Brush on just a touch of super glue or plastic cement to a very small spot along the moisture sensor wire - just enough to keep it resting along the side of the moisture sensor board and in a position to rest along the bottom of the housing just below the level of the camera tray.
3) Brush on just a touch of super glue or plastic cement to a very small spot along the LED light wire - just enough to keep the wire out of the way of the camera when loading the camera.
4) Hold the LED light out of the way of the camera when loading the camera and then bend the wire so that the light is held just behind the camera and just above the 4-way arrow control buttons - that way, the red flashing LED light can be noticed through the smaller control buttons as well as through the viewfinder.

")
