DIY Regulator Maintenance Discussion: MARES

Please register or login

Welcome to ScubaBoard, the world's largest scuba diving community. Registration is not required to read the forums, but we encourage you to join. Joining has its benefits and enables you to participate in the discussions.

Benefits of registering include

  • Ability to post and comment on topics and discussions.
  • A Free photo gallery to share your dive photos with the world.
  • You can make this box go away

Joining is quick and easy. Log in or Register now!

I make and sell a HP assembly tool for USD/AL regs that I think would also work for the MR-12. Basically, you set the tool on top of the reg, drop the seat, spring, balance chamber, upper spring, filter and clip into the tool, press it all down with a plunger and it clicks into place. If you are pressing all that stuff down by hand and holding the clip with pliers, this tool will be a godsend to you.

I am just outside of Apeks so we are not far apart. I will PM you so we can set up something.

Mr herman
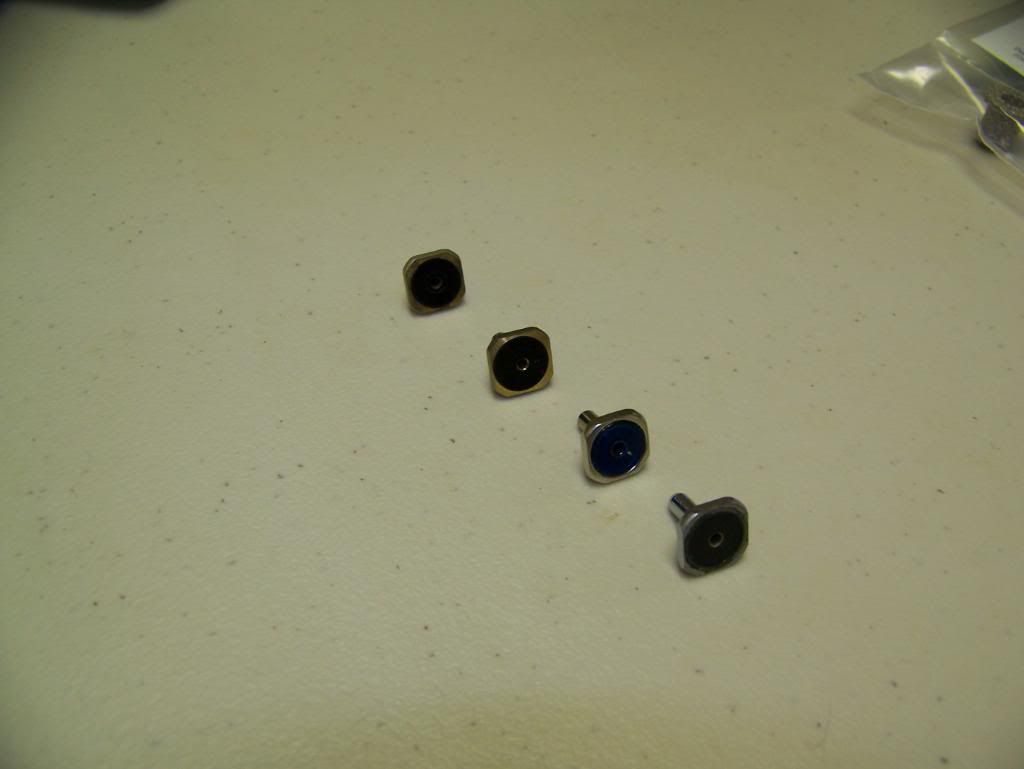
you said you can make the hp seat?I meet some problem in rebuild my hp seat.my 1st stage was made in 2003,the hp seat seal material has completely rot(the black things in the picture below) ,i have removed the old rot seal,I bought PU board, cut to fit the gap of the hp seat,my question is ,the PU is very soft,how to fix it in the hp seat gap?must I need some glues ? my 1st regulator is apollo a320.the official web introduced the hp seal material is PU.much appriciate.
100_3081.jpg
 
Welcome to the board.
What I make is a HP assembly tool- a tool to make the assembly of the HP assembly easier.
I have experimented with making HP seats for old regulators that you can no longer buy replacements for so I do have some experience with making seats. The material needs to be close to the same durometer (hardness) as the original materal. The material that I have found that is the best match for the original factorty material is nylon. The problem is cutting it to the correct diameter and bonding (gluing) it to the main body. I have not found a good adhesive for this, nylon does not bond well with most adhesives. Unless you are restoring an old obsolite reg, my best suggestion is to purchase replacement HP parts for the regulator. Making them is going to be difficult at best with poor results unless you can find a good adhesive for nylon.
 
Hello. Great info. I have a question directly pertaining to the poppet stem and spring mentioned above. How long are they? I measure my spring to be ~17mm and the stem to be ~27mm. Long story, but there is a possibility that these parts for my Axis Octopus are not the correct parts.

Does anybody have these parts lying around that they can measure and confirm?
 
For the purpose of servicing, part list and fun, is the Rover 2nd stage the same as the Axis 2nd stage? Or is it a completely different beast?
 
I have a MR42T first stage with Abyss second. I'm curious as to what should be the IP drop during inhalation. I connect my IP gauge to the "DFC" LP port which is where the primary second is supposed to go, and for this measurement, I connect my second to any other LP port.

I have a very static IP of about 143 psi, but when I inhale on the second stage or press the purge button just a little, the IP drops a good 20 psi. The second seems to "crack" okay on the surface (haven't used it for a few months now), and has about 25 dives on it since I bought it new in Oct. 2013.

Is this 20 psi IP drop about right?
 
20 psi is a little high side although when you purge a reg, the drop will be higher than you would expect when normal breathing.....you simply can't inhale that much so I don't worry about one that is just doing it on a high volume purge. There are a number of things that can cause excessive IP swing. Some are tank related, it could be as simple as a partly closed tank valve but other tank related issues can cause the IP to swing excessively. A valve with a less than optimal flow path (the valve can's flow as much gas as your reg can) or issues within the valve like a clogged, damaged or an excessivly small dip tube in the tank can all cause an IP swing. You may or may not see a corresponding drop on your HP gauge with these issues depending on how much the drop is. It is unlikely you will see a HP drop on a digital gauge as their sample rates are not typically fast enough to catch a quick drop and rebound.
Reg issues can also cause a widely swinging IP, a clogged or otherwise damaged filter is the first suspect. Then some regs just don't seem to be as stable as others due to manufacturing variences.
I wouild try a couple of different tanks to see if the tank was the issue. If they don't seem to be the culprit, I would monitor it reg until it's next service to see if it changes during that time and esp if it changes after the next service. If it remains the same, I would call it normal for that reg. Bottom line is, with a good second stage you will never notice that much varience anyway.
 
I was wondering if someone could be of assistance. I am looking for an exploded view of the Mares R2 DFC 1st stage and Axis Second stage? I have looked on the forum and Interweb but the Mares Dealer Manuals that I find all do not have that section in although reference is made to it. This includes the manual an earlier poster has a link to. They all jump from F3-11 to F6-7. The diagrams are supposed to be in F6-1 and on.

It would really be appreciated if someone could help.

Thanks
 
OK, dragging this thread back up because I have parts questions, but first I found this link which hopefully takes you to a really fancy spreadsheet with pictures that appears to be the complete 2011 dealer parts ordering catalog including complete tool listings from Mares so you can finally know exactly what stupid stuff like "wrench B-13" (10mm allen apparently) or any other odd bit that is referenced in the pdf rebuild instructions from other sites actually looks like:

http://www.google.com/url?sa=t&rct=...8bCGoVqOAqA7OHIgmgyMaSw&bvm=bv.68445247,d.aWw

I was actually hunting around for a 1st stage diaphragm for my MR22 2000 when I found that.
I have managed to find the rebuild kits for my MR22, the abyss 2nd, the proton octo and the tri material 1st stage HP seat with matched poppet all sold genuine new (I think) from northeast scuba supply for cheap enough that I am not going to scrounge together generic kits, but the damn diaphragm is still giving me trouble. Oddly enough I found a 2nd stage diaphragm fairly easy though I don't expect I will need that, (or maybe I will, how long do they last?)
EDITED: Too bad I don't live in the EU, here is the part I need:
http://www.scubastore.com/scuba-diving/mares-diaphragm--1stage/3671/p

What is the packaged shelf life of any reg parts? After hearing stories of the new tri material hp seats going something like 5 years in service unlike the old ones, I may just order enough to do everything twice when I finally find the stuff and hopefully be set for the next 10 years if the stuff won't degrade significantly or anything.
I wonder if I could get a dive shop to sell me a few diaphragms for cash if I tell them that I just want them to experiment on the material and not to use in a reg.

Another interesting dilemma is I am considering buying tanks soon, and I would switch to DIN for various reasons at that time, so it makes me wonder if I should just get the DIN conversion for the MR22 now and get the DIN rebuild kit (as opposed to the INT rebuild kit) or if the conversion kit comes with all new parts in that area so I could just rebuild the yoke parts now and add the new DIN parts on later.

I am also considering the dry CWD kit but I don't know if the dry kit is good or the more expensive and likely more bothersome silicone kit would be preferred. I doubt I even really need it with this reg since I don't ice dive, but I will be diving in lake superior so it certainly couldn't hurt.
Should that be done before the rebuild? If I were to rebuild it after that would I require extra parts not included in the regular kit?
 
Last edited:
https://www.shearwater.com/products/teric/

Back
Top Bottom