Deep South Divers
Contributor
The subject has come up a lot... So here's how.
Thanks to buddhasummer for sharing these awesome instructions and allowing me to post them here.
Some detail on these gloves: The SHOWA 720 is the latest and greatest "smurf" style glove. It is thinner, stretchier, warmer, and tougher than the 660 or 620. It's also easier to load on rings since it stretches more - so that's the recommended glove to use when looking for a tougher, more trustworthy alternative to latex drygloves. All pictures below show a SHOWA 720.
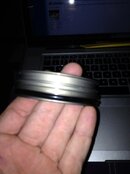
Step 1
Take the ring as shown in the picture below:
View attachment 507171
Step 2
Grab your cotton backed glove (or acrylic in the case of the 720s) and place the retaining o-ring the one that slips in the empty grove above and place it approximately two inches down from the edge of the cuff of the glove. This will vary depending on the size of the glove.
View attachment 507172
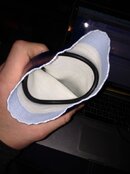
Step 3
Fold over the excess material of the cuff over the o-ring as shown in the attached pictures below:
View attachment 507167
View attachment 507168
Step 4
Grab the glove with both hands and then stuff the ring into the glove. If you have ever changed a motorcycle tire you will understand what I mean. basically take the cuff and place it against the o-ring and use both hands to pull the o-ring(which the glove is still around) up and over the ring. Once it seats in the grove you are pretty much done. See the pics below:
View attachment 507169
View attachment 507170
Step 5
Once the glove is installed how you want it on the ring and adjust properly for length and wrinkles removed. Note: The wrinkles/folds/kinks in the gloves can be a royal pain in the arse. My GF's gloves barely pull over the ring system as her hands are tiny but my xxl hands are a royal pain in the butt sometimes and can take a few minutes to get the gloves situated just right. Anyways you then end up with the glove looking like below. All that is left is to install the protection ring and the securing o-ring, see attached pics:
View attachment 507170
View attachment 507165
View attachment 507166
Now a word on cotton backed (or acrylic backed) gloves, there are two different types:
Type 1;
The cotton (or acrylic) is a continuously knitted or woven glove, meaning no seams, these are ideal as the seams do not interfere with the installation of the o-rings.
Type 2
These are gloves that the cotton backing (or acrylic backing) was originally stitched together and flipped inside out prior to dipping them into the rubbery nitrile (720) or PVC (660 and 620) for coating. The seam will cause leaks on the gloves with these systems. What I do is flip the gloves inside out and where the o-ring should sit, I go get a very sharp set of scissors and cut the seam off the cotton backing right down to the rubbery coating. NO this does not cause the glove to leak, it simply is removing the fabric backing in that area which does not cause a ridge in the gloves over the o-ring.
Hopefully that all made sense.
Thanks to buddhasummer for sharing these awesome instructions and allowing me to post them here.
Some detail on these gloves: The SHOWA 720 is the latest and greatest "smurf" style glove. It is thinner, stretchier, warmer, and tougher than the 660 or 620. It's also easier to load on rings since it stretches more - so that's the recommended glove to use when looking for a tougher, more trustworthy alternative to latex drygloves. All pictures below show a SHOWA 720.
Step 1
Take the ring as shown in the picture below:
View attachment 507171
Step 2
Grab your cotton backed glove (or acrylic in the case of the 720s) and place the retaining o-ring the one that slips in the empty grove above and place it approximately two inches down from the edge of the cuff of the glove. This will vary depending on the size of the glove.
View attachment 507172
Step 3
Fold over the excess material of the cuff over the o-ring as shown in the attached pictures below:
View attachment 507167
View attachment 507168
Step 4
Grab the glove with both hands and then stuff the ring into the glove. If you have ever changed a motorcycle tire you will understand what I mean. basically take the cuff and place it against the o-ring and use both hands to pull the o-ring(which the glove is still around) up and over the ring. Once it seats in the grove you are pretty much done. See the pics below:
View attachment 507169
View attachment 507170
Step 5
Once the glove is installed how you want it on the ring and adjust properly for length and wrinkles removed. Note: The wrinkles/folds/kinks in the gloves can be a royal pain in the arse. My GF's gloves barely pull over the ring system as her hands are tiny but my xxl hands are a royal pain in the butt sometimes and can take a few minutes to get the gloves situated just right. Anyways you then end up with the glove looking like below. All that is left is to install the protection ring and the securing o-ring, see attached pics:
View attachment 507170
View attachment 507165
View attachment 507166
Now a word on cotton backed (or acrylic backed) gloves, there are two different types:
Type 1;
The cotton (or acrylic) is a continuously knitted or woven glove, meaning no seams, these are ideal as the seams do not interfere with the installation of the o-rings.
Type 2
These are gloves that the cotton backing (or acrylic backing) was originally stitched together and flipped inside out prior to dipping them into the rubbery nitrile (720) or PVC (660 and 620) for coating. The seam will cause leaks on the gloves with these systems. What I do is flip the gloves inside out and where the o-ring should sit, I go get a very sharp set of scissors and cut the seam off the cotton backing right down to the rubbery coating. NO this does not cause the glove to leak, it simply is removing the fabric backing in that area which does not cause a ridge in the gloves over the o-ring.
Hopefully that all made sense.