- Messages
- 7,660
- Reaction score
- 4,717
- # of dives
- 200 - 499
The P-Valve in my first drysuit was installed by a diveshop.
It leaked like a sieve, they fixed it no charge. They first tried to seal the balancing port, (so much for a balanced P-Valve) then realized that it was water coming in through the not totally compressed neoprene. They fixed it.
Got a new drysuit a little while ago. Neoprene. The Jedi master, herself, of properly attached drysuit pockets came to mind. Taught by the best. Same thing, no?
First make a neat hole in the inner thigh of the intended leg of your drysuit. The hole should be just a tiny bit smaller than the part of the P-Valve that penetrates the suit. Disassemble the P-valve and measure it. Lots of ways to make a neat hole, pick one.
Did my homework. [URL]http://www.scubaboard.com/forums/do-it-yourself-diy/22018-p-valve-plans-post231072.html#post231072[/URL]
Neoprene cement or Aquaseal? This is funny: [URL]http://www.scubaboard.com/forums/repairing-your-own-gear/66846-drysuit-repair-materials-post1611977.html#post1611977[/URL]
Neoprene cement is an adhesive, Aquaseal is a SEALANT. Pick the correct tool for the job.
Strategy: Make the drysuit area surrounding the P-Valve hole completely impervious to water. Glue the two rubber washers to this area (I like the DiveRight P-Valve) and then allow the O-rings to make the seal to the washers so that the valve is both removable and able to be easily repositioned.
Here is where having the time to do this as a "one-off" is invaluable. Shops need to get this done quickly as their time is money.
We begin.
OK, both sides of the suit are the same. I started with the outside, then for some inexplicable reason, began to take pictures.
Trident Neoprene Cement (Item# LP31) works really well for sealing the inside or outside. Site prep is EVERYTHING! Use duct tape to protect the immediate area and newspaper to cover the trail from the can of neoprene cement to the target. It is thin and drippy, forget trying to clean up an indiscretion...
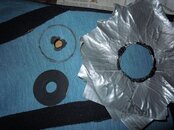
Use the rubber washer to draw a circle around the intended area. Next, mask the circle off properly with duct tape:

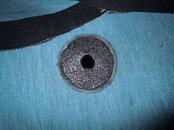
Newspaper in place, paint a thin coat on the exposed area. A hairdryer will speed things up dramatically without any downside. Recoat in less than a minute if using a dryer. It will take somewhere around ten coats to get to a "shiny" surface. This is most important, it should look like this:

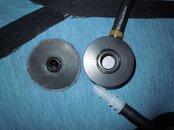
Paint one coat of neoprene cement on a gasket, dry well, and then CAREFULLY stick together. You only get one shot at this, so take your time. Now you have this:

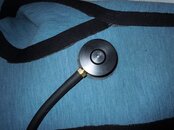
So with a rubber washer glued to both sides of the suit and a properly sized hole, you just make sure the O-Rings stay in place and assemble. You will end up with this:

Ahhhh...
It leaked like a sieve, they fixed it no charge. They first tried to seal the balancing port, (so much for a balanced P-Valve) then realized that it was water coming in through the not totally compressed neoprene. They fixed it.
Got a new drysuit a little while ago. Neoprene. The Jedi master, herself, of properly attached drysuit pockets came to mind. Taught by the best. Same thing, no?
First make a neat hole in the inner thigh of the intended leg of your drysuit. The hole should be just a tiny bit smaller than the part of the P-Valve that penetrates the suit. Disassemble the P-valve and measure it. Lots of ways to make a neat hole, pick one.
Did my homework. [URL]http://www.scubaboard.com/forums/do-it-yourself-diy/22018-p-valve-plans-post231072.html#post231072[/URL]
Neoprene cement or Aquaseal? This is funny: [URL]http://www.scubaboard.com/forums/repairing-your-own-gear/66846-drysuit-repair-materials-post1611977.html#post1611977[/URL]
Neoprene cement is an adhesive, Aquaseal is a SEALANT. Pick the correct tool for the job.
Strategy: Make the drysuit area surrounding the P-Valve hole completely impervious to water. Glue the two rubber washers to this area (I like the DiveRight P-Valve) and then allow the O-rings to make the seal to the washers so that the valve is both removable and able to be easily repositioned.
Here is where having the time to do this as a "one-off" is invaluable. Shops need to get this done quickly as their time is money.
We begin.
OK, both sides of the suit are the same. I started with the outside, then for some inexplicable reason, began to take pictures.
Trident Neoprene Cement (Item# LP31) works really well for sealing the inside or outside. Site prep is EVERYTHING! Use duct tape to protect the immediate area and newspaper to cover the trail from the can of neoprene cement to the target. It is thin and drippy, forget trying to clean up an indiscretion...
Use the rubber washer to draw a circle around the intended area. Next, mask the circle off properly with duct tape:

Newspaper in place, paint a thin coat on the exposed area. A hairdryer will speed things up dramatically without any downside. Recoat in less than a minute if using a dryer. It will take somewhere around ten coats to get to a "shiny" surface. This is most important, it should look like this:

Paint one coat of neoprene cement on a gasket, dry well, and then CAREFULLY stick together. You only get one shot at this, so take your time. Now you have this:

So with a rubber washer glued to both sides of the suit and a properly sized hole, you just make sure the O-Rings stay in place and assemble. You will end up with this:

Ahhhh...


