You are using an out of date browser. It may not display this or other websites correctly.
You should upgrade or use an alternative browser.
You should upgrade or use an alternative browser.
ScubaPro D350 Adjustment (and soon to be overhaul)
- Thread starter aalbert
- Start date
Please register or login
Welcome to ScubaBoard, the world's largest scuba diving community. Registration is not required to read the forums, but we encourage you to join. Joining has its benefits and enables you to participate in the discussions.
Benefits of registering include
- Ability to post and comment on topics and discussions.
- A Free photo gallery to share your dive photos with the world.
- You can make this box go away
Scubagaskets
Contributor
Just noticed that VDH has part number 11-015-015 in stock, for DIY poppet refurb - Store | Vintage Double Hose
Just noticed that VDH has part number 11-015-015 in stock, for DIY poppet refurb - Store | Vintage Double Hose
The D350 I have for future rebuild has a poppet with plastic stem vs the metal stem version shown in your photos of D400. It also lacks the nut on top, at first glance I am not seeing an easy way to replace the seat on the plastic stem version.
Having the option to replace the poppet seat would be great, earlier this year rsingler started a thread about attempts at DIY seat production.
Attachments
PM me.
I have poppets.
I have poppets.
Mail call this week brought the McMaster order as well as the poppet seats from VDH (though I will probably put them in the spare parts selection, while whole poppets can be sourced).
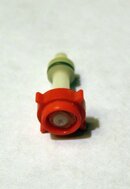
My son's D350 was originally equipped with a plastic poppet, which came back with it when I had it serviced.. I have pictured it below with the poppet that came out of the D400, along with the replacement seats (pic of each side).

For the D400 valve body, I replaced the o-rings with the McMaster ones I had purchased - installing a 90 durometer o-ring on the bottom, and 75 on the top (it has a rounded edge on the air inlet tube, so as per rsingler's thread I went with the softer o-ring).. Still had an ever so slight leak without the top cap on, but once I put that on, it seemed to headspace things properly (push down on things) -- going to let it sit overnight, and manipulate it again the morning to see if I can detect any leak.
My son's D350 was originally equipped with a plastic poppet, which came back with it when I had it serviced.. I have pictured it below with the poppet that came out of the D400, along with the replacement seats (pic of each side).
For the D400 valve body, I replaced the o-rings with the McMaster ones I had purchased - installing a 90 durometer o-ring on the bottom, and 75 on the top (it has a rounded edge on the air inlet tube, so as per rsingler's thread I went with the softer o-ring).. Still had an ever so slight leak without the top cap on, but once I put that on, it seemed to headspace things properly (push down on things) -- going to let it sit overnight, and manipulate it again the morning to see if I can detect any leak.
That's a real good point.Still had an ever so slight leak without the top cap on, but once I put that on, it seemed to headspace things properly (push down on things)
It's tempting to try to tune the reg by holding your hand over the aspirator assembly and breathing as you gradually turn the adjuster disc in between breaths.
But keep in mind that the valve assembly wants to pop out when pressurized. The top cap indeed provides a headspace compression.
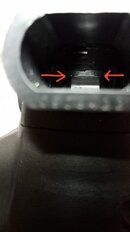
So if you tune it this way, and also after you screw in the top cap after final assembly, make sure there is zero space between the orifice assembly and the inlet tube when looking thru the mouthpiece:

It survived the night being pressurized, so I went ahead and cleaned up the rubber purge cover with some Marine Aerospace 303 UV protector (hopefully that will keep it from always leaving black marks on my hand after handling), soaked it in warm soapy water, and reassembled.
Verified that the headspace was tight, and will make a mental note to show more patience next time and pressurize only when fully together. Going to start looking at my other 2 D series to see what poppets they already have, etc. so I can start collecting parts for them.


Verified that the headspace was tight, and will make a mental note to show more patience next time and pressurize only when fully together. Going to start looking at my other 2 D series to see what poppets they already have, etc. so I can start collecting parts for them.
Similar threads
- Replies
- 2
- Views
- 609
- Replies
- 94
- Views
- 4,163
Trip Report
Blue Lagoon Resort on route to Bikini - Part 1
- Replies
- 3
- Views
- 905


