Greetings. After searching online with no results I decided to make my own external filter for my Contour waterproof case. As I usually write up the procedures for some of my other "ideas", I did for this also and felt it was worth sharing here. The text is a little long for a post, but it is just paste from the original document. For the many of you that are well versed in the use of colour correction filters, please go easy on me, but feel free to correct any erroneous statements.
Click on any thumbnail image for a closer look.
Contour Waterproof Case Wet Filter Modification
 For many the introduction of relatively inexpensive and small POV cameras allow us to step just inside the door of underwater video allowing us to capture a small part of our underwater adventures to share with family & friends. How disappointing to find the video colour all washed out in dull blue tones. As all divers know, the water filters out colour starting at the red end of the spectrum, progressing to blue as the depth increases. In less than ten feet this is not too significant, but the deeper you go, the more pronounced this effect becomes.
The best solution to this is to bring light along on your dive as well. Unfortunately a decent video light source can easily exceed the original cost of the camera. The light and it's mount system also adds considerably to the bulk of your new video system. So much for that cheap new camera that you can put in your BC pocket.
Fortunately the second best solution is much more affordable and compact. Filters can appear to restore some of that lost colour and contrast. Red filters are commonly used in clear blue seawater while magenta will help in murky green waters. This is a very simplified statement and as much in depth information as you care to read is available via a simple Google search. However I should add here that these filters reduce the amount of light passing through and don't replace already lost colour, but when diving in less than 60' with lots of ambient light they can make your video appear much more as you remember it.
A third solution is post-processing of your digital video file. A time consuming and technical process that many would rather not get into.
These filters can be simple as a piece of red plastic installed over the lens or a threaded glass filter.
If you have decided to go with the GoPro, there seems to be multiple solutions for an external filter however, one of the few weak points about the Contour waterproof cases is the lack of an external filter option. This is not meant to be a discussion of Contour vrs. GoPro, as each user has his own reasons for choosing one over the other. Personally I far prefer the Contour, however I can still appreciate some of the features of the GoPro.
The only ready to use red filter available for the contour is the small 1 red disc available from StuntCams along with their extremely ($42) overpriced shipping. After an email explaining that the disc weighs less than the stamp that will carry it all the way to me in Canada, they agreed to charge me a mere $15 for that service... how gracious. I was hoping this would be an easy solution, however proper use of this disc requires installation between the cameras lens and the protective plastic lens. This requires removal of the lens ring(and that really tiny easy-to-lose screw) that is not something you want to do on a beach or boat if it can be avoided. Not installing it in place correctly usually results in it falling out of place as static cling only seems to work to hold it in the correct place when you are trying to pull it off.
A better solution is to buy the larger square filter available for the GoPro and cut a 1.5 diameter circle from it which can then be easily installed inside the waterproof case port. This is probably the best, simplest solution for most. Unfortunately this can't be removed underwater. In less than 10' there is still allot of red light present in the water and the use of a filter will make your video saturated in reds.
So the next option would be a 'wet' filter, which is an externally mounted filter. This allows the filter to be removed when in shallow water and replaced as depth increases. This in itself is not necessarily enough to justify this, however some users will not even open their waterproof case until after a thorough rinse in freshwater then completely drying first. This is probably wise advice that I don't always adhere to. However it could be somewhat inconvenient if some surface shots are desired at the beginning or end of a dive.
Since this is not an option that Contour makes available for their waterproof case, I took it upon myself to come up with a DIY solution.
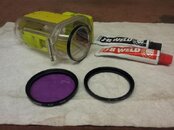
I was looking through some of my old filters from my old 35mm Nikon F70 when I found a florescent light correction filter. In the days before digital photography, filters were used to remove the greenish hue resulting from the florescent tubes of the day. Digital cameras today can easily adjust the white balance to compensate for the various colours of florescent lights so this filter is no longer required with my D90. But the filter is a magenta colour, very similar to the filter sold for green water. Great, now to find a way to mount it. The Nikon filter thread size is 52mm, but the OD of the case is 45mm. Online catalogues of step-up rings only list ID-ID sizes, so I went down to my local camera store with case and filter in hand and while the sales girl was totally baffled as to what I was trying to do, she finally opened up a drawer of old stuff and the only one she had was almost perfect. It is a 49mm-52mm step-up ring. This has an ID of 46 mm so has about 1mm of play over the outer black ring on the waterproof case. Easy to fill with a .5mm layer of epoxy. Now if I was ordering a step-up ring I may have ordered a 48mm-52mm ring and used a glue such as Crazy Glue or my favourite, LocTite 404. A complete selection of step-up rings can be found here Don't buy double the camera filters use camer filter stepping (filter adapter) rings You should be able to find a ring to fit any filters that you may already own. If you don't already own any, 52mm is a good size as it is a very common Nikon lens size and it is large enough to prevent vignetting at the edges, but not so large as to extend far beyond the edges of the case resulting in an very un-streamlined case as well as being more vulnerable to damage. I didn't have any existing red/cyan filters, so I've ordered one which I will try for clear blue waters(not much of that around here!)
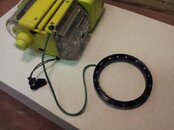
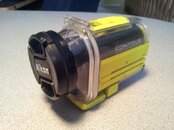
 The outer black ring on the contour waterproof case is just a snug friction fit and can be easily removed with a fingernail. Remove it.
 Mix up a 50/50 mix of chosen epoxy (I used JB Weld, avoid 5min epoxies as they are only good for about that long). Very carefully use a small spatula (cheap plastic knife) to spread a thin layer of epoxy on the inside of the small step only. If you don't have a steady hand, you'd better put tape over the ID threads.

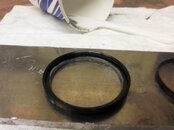
 On a flat smooth surface (I used a scrap piece of aluminium) lay your step up ring with the epoxy with the step-up portion up. Carefully slide the plastic ring that you removed from the case into the the small ID of the step-up ring until it is flat with front facing up. This matters as there are some very hard to see but small engagement tabs that appear to be directional (just mark the front before removal). The plastic ring will protrude approx. 1mm into the step-up portion, don't worry about that, it is more important that it sits flat and square. Leave it to partially cure.
 After an appropriate amount of time (about 2.5-3 hours for JB Weld) when epoxy is no longer going run, yet still soft enough to work, peel it off the flat surface and clean it. Thoroughly scrape off any excess epoxy at this point and use a degreaser type of solvent (SlapShot or BrakeClean) to remove excess traces of epoxy.
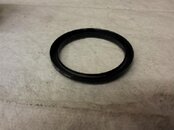
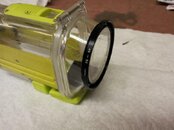
Fit the plastic ring/step-up ring onto the case to ensure that it will cure in a perfect fit to the case. It is a snug fit and epoxy is still soft so use care to ensure the 2 pieces don't separate while putting onto the case. Once ring is in place on the case, ensure it is still square and that no excess epoxy is in contact with the case. Leave it for at least 12 hours or as required by your choice of epoxy.
 Once it is fully cured it should be able to be installed and removed with little effort but still be a very secure fit. Alternatively the plastic ring could be bonded permanently and the filter can be screwed on/off but trying to line up those fine threads underwater doesn't sound to appealing to me.
 This also will allow use of any existing lens cap to protect when not in use.
After doing this it would be a shame to drop it while diving, so a leash is required. I found some strong braided line in a tackle shop. There is just enough room for a .0625 hole to be drilled in the flange without interfering with the threads. I drilled 2 holes, with the leash coming through and back again. The end was finished by melting the line with a flame to form a small ball.
While drilling these holes, it occurred to me that more holes would solve another issue. I figured that I would have to remove & replace the filter once submerged in order to flood the space between the filter and case, Otherwise it would slowly fill as water leaked in resulting in a rising waterline and bubbles distorting the video. I did read on another manufactures site a warning of possible implosion of the filter if it wasn't flooded. Not sure how likely that is,however it is easily avoided simply by drilling holes around the perimeter of the flange to vent this space.
 I am quite pleased with the result, but I'll readily admit that with out the DIY spirit, it would simply be better to cut a disc to put inside the case and forgo any shallow water video.
I haven't tested this yet as the lakes are frozen here (not an ice-diver... yet) but I will head to the pool in a week or so and I plan on doing some Mexican diving in March. I'll add a performance update then.
Thanks for reading and I hope someone finds some value in this for their own Contour videos.
Click on any thumbnail image for a closer look.
Contour Waterproof Case Wet Filter Modification
The best solution to this is to bring light along on your dive as well. Unfortunately a decent video light source can easily exceed the original cost of the camera. The light and it's mount system also adds considerably to the bulk of your new video system. So much for that cheap new camera that you can put in your BC pocket.
Fortunately the second best solution is much more affordable and compact. Filters can appear to restore some of that lost colour and contrast. Red filters are commonly used in clear blue seawater while magenta will help in murky green waters. This is a very simplified statement and as much in depth information as you care to read is available via a simple Google search. However I should add here that these filters reduce the amount of light passing through and don't replace already lost colour, but when diving in less than 60' with lots of ambient light they can make your video appear much more as you remember it.
A third solution is post-processing of your digital video file. A time consuming and technical process that many would rather not get into.
These filters can be simple as a piece of red plastic installed over the lens or a threaded glass filter.
If you have decided to go with the GoPro, there seems to be multiple solutions for an external filter however, one of the few weak points about the Contour waterproof cases is the lack of an external filter option. This is not meant to be a discussion of Contour vrs. GoPro, as each user has his own reasons for choosing one over the other. Personally I far prefer the Contour, however I can still appreciate some of the features of the GoPro.
The only ready to use red filter available for the contour is the small 1 red disc available from StuntCams along with their extremely ($42) overpriced shipping. After an email explaining that the disc weighs less than the stamp that will carry it all the way to me in Canada, they agreed to charge me a mere $15 for that service... how gracious. I was hoping this would be an easy solution, however proper use of this disc requires installation between the cameras lens and the protective plastic lens. This requires removal of the lens ring(and that really tiny easy-to-lose screw) that is not something you want to do on a beach or boat if it can be avoided. Not installing it in place correctly usually results in it falling out of place as static cling only seems to work to hold it in the correct place when you are trying to pull it off.
A better solution is to buy the larger square filter available for the GoPro and cut a 1.5 diameter circle from it which can then be easily installed inside the waterproof case port. This is probably the best, simplest solution for most. Unfortunately this can't be removed underwater. In less than 10' there is still allot of red light present in the water and the use of a filter will make your video saturated in reds.
So the next option would be a 'wet' filter, which is an externally mounted filter. This allows the filter to be removed when in shallow water and replaced as depth increases. This in itself is not necessarily enough to justify this, however some users will not even open their waterproof case until after a thorough rinse in freshwater then completely drying first. This is probably wise advice that I don't always adhere to. However it could be somewhat inconvenient if some surface shots are desired at the beginning or end of a dive.
Since this is not an option that Contour makes available for their waterproof case, I took it upon myself to come up with a DIY solution.
I was looking through some of my old filters from my old 35mm Nikon F70 when I found a florescent light correction filter. In the days before digital photography, filters were used to remove the greenish hue resulting from the florescent tubes of the day. Digital cameras today can easily adjust the white balance to compensate for the various colours of florescent lights so this filter is no longer required with my D90. But the filter is a magenta colour, very similar to the filter sold for green water. Great, now to find a way to mount it. The Nikon filter thread size is 52mm, but the OD of the case is 45mm. Online catalogues of step-up rings only list ID-ID sizes, so I went down to my local camera store with case and filter in hand and while the sales girl was totally baffled as to what I was trying to do, she finally opened up a drawer of old stuff and the only one she had was almost perfect. It is a 49mm-52mm step-up ring. This has an ID of 46 mm so has about 1mm of play over the outer black ring on the waterproof case. Easy to fill with a .5mm layer of epoxy. Now if I was ordering a step-up ring I may have ordered a 48mm-52mm ring and used a glue such as Crazy Glue or my favourite, LocTite 404. A complete selection of step-up rings can be found here Don't buy double the camera filters use camer filter stepping (filter adapter) rings You should be able to find a ring to fit any filters that you may already own. If you don't already own any, 52mm is a good size as it is a very common Nikon lens size and it is large enough to prevent vignetting at the edges, but not so large as to extend far beyond the edges of the case resulting in an very un-streamlined case as well as being more vulnerable to damage. I didn't have any existing red/cyan filters, so I've ordered one which I will try for clear blue waters(not much of that around here!)
Fit the plastic ring/step-up ring onto the case to ensure that it will cure in a perfect fit to the case. It is a snug fit and epoxy is still soft so use care to ensure the 2 pieces don't separate while putting onto the case. Once ring is in place on the case, ensure it is still square and that no excess epoxy is in contact with the case. Leave it for at least 12 hours or as required by your choice of epoxy.
After doing this it would be a shame to drop it while diving, so a leash is required. I found some strong braided line in a tackle shop. There is just enough room for a .0625 hole to be drilled in the flange without interfering with the threads. I drilled 2 holes, with the leash coming through and back again. The end was finished by melting the line with a flame to form a small ball.
While drilling these holes, it occurred to me that more holes would solve another issue. I figured that I would have to remove & replace the filter once submerged in order to flood the space between the filter and case, Otherwise it would slowly fill as water leaked in resulting in a rising waterline and bubbles distorting the video. I did read on another manufactures site a warning of possible implosion of the filter if it wasn't flooded. Not sure how likely that is,however it is easily avoided simply by drilling holes around the perimeter of the flange to vent this space.
I haven't tested this yet as the lakes are frozen here (not an ice-diver... yet) but I will head to the pool in a week or so and I plan on doing some Mexican diving in March. I'll add a performance update then.
Thanks for reading and I hope someone finds some value in this for their own Contour videos.