For anyone coming later, here's what I ordered, for how much, and why:
Item|$|What|Why
OA-ECII|$100|El Cheapo II kit|The basic kit.
OA-04-02|$35|BC flow restrictor
with cap
|To connect to your LP inflator.
OA-05-02|$4.50|Sensor saver|To make your sensor last much longer.
OA-ECII-10T|$12|10-Turn Pot|This makes it *so* much nicer to calibrate.
The kit is obvious, since that's what you're ordering. You want the BC flow restrictor *with cap* so it'll snap onto the sensor in the EC2. The sensor saver is a nice machined metal screw-on cap that seals the sensor (with much less oxygen inside than even the tightest zip-top bag). If you're going to use it every day, you don't need the cap, but if you're going to use it once a week or two (or less), your sensor will last much longer with the cap.
Now, as for the 10-turn pot... Is it a "luxury" item? Sure it is. What good does it do? With the standard pot (which is in the sealed EC2 bag with the other parts), you have about 270 degrees range of motion from one end of the calibration scale to the other. With the 10-turn pot, you have basically
3600 degrees range of motion. You don't need to finesse the knob to try to get it to land on 20.9%. (It's like having the full calibration range on the "fine tuning" adjustment.) Is it worth $12? Well, I spent the money, and I'm happy.

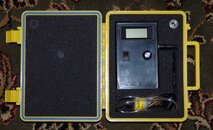
Anyway, I just built my EC2 tonight. I made it a bit differently than "stock", as I mounted everything in the "back" of the case (the side with the battery compartment). Nothing is attached to the front of the case at all, so if I need or want to open it up, I don't have any annoying battery wires or anything.
I mounted the display on the top of the now-front face, with the battery door on the bottom. In the middle, all lined up left to right, I have the sensor cable jack, the switch, and the (10-turn) pot. (I figured with the cable plugged in, it and the pot would prevent accidental switch manipulation. :biggrin
I got the whole thing to pack neatly into a Pelican 1060 case for transport.
Now, I just have to go use it some more.