How to make a rotary switch o-ring seal?

Please register or login

Welcome to ScubaBoard, the world's largest scuba diving community. Registration is not required to read the forums, but we encourage you to join. Joining has its benefits and enables you to participate in the discussions.

Benefits of registering include

  • Ability to post and comment on topics and discussions.
  • A Free photo gallery to share your dive photos with the world.
  • You can make this box go away

Joining is quick and easy. Log in or Register now!

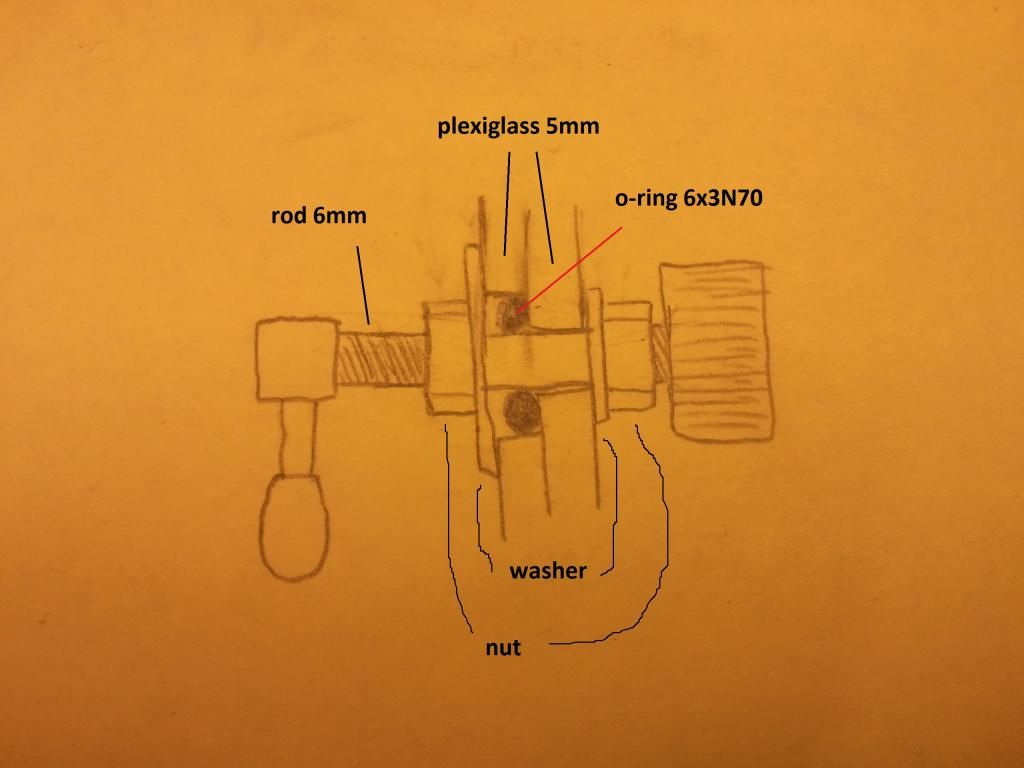
Between washers I would not put any rings because they don't seal enough.

I would apply rich all gaps between washers with SIKAFLEX SEAL KIT and tight washers and nuts tight .

SIKAFLEX work in that way that between curing expand and squeeze all the air from the gap basicaly it made 3D seal .

Sikaflex 291i Marine Adhesive & Sealant 300ml

---------------------------------------------------------------------------

threads in plastic housing are not best idea (depends on material and thickness ) because so called ''notch effect'' what basicaly means'' demolish the structure of the material''

[h=1]notch effect[/h]noun
1.(metallurgy, building trades) the increase in stress in an area of a component near a crack, depression, etc, or a change in section, such as a sharp angle: can be enough to cause failure of the component although the calculated average stress may be quite safe
 
Using a Teflon o-ring backer helps a lot with keeping the o-ring stable without pinching.... The hardest part is getting the OD right to give the right ID to the o-ring to seal on the shaft... Using inner and outer o-rings to seal the shaft is a good safety against leaking... They make small waved Stainless shim washers that would work well with a c-clip to lock the shaft and seal against the o-ring....

And using a ream to get to the final size is much better then drilling to size....

Jim.....
 
Hi all,

We're working on a diy plexiglass underwater case for my camcorder. We've completely sorted out the shape and dimensions of the housing itself, but there's still one challenge to be dealt with.

We want to control the camera's start/stop button by a rotary switch in the right side panel of the housing (which is also the lid).
At the moment, we have made a design as seen below (back view). The axle is to be a smooth 6mm rod, with metric thread cut on both sides to allow the nuts to be screwed on.

The switch will be rotated counterclockwise, so the tip of the switch will move forward and press the start/stop button.

We wonder if this design will be waterproof at 30 metres depth. What do you guys think? Any improvements maybe?

rotaryswitchdesign_zpsfed267c7.jpg

I am willing to bet that your current design will leak easily. To seal an O-ring around a shaft it needs a very accurately sized seat to push the O-ring to its final ID(inside dimension). Your design does not have that. The open front does not allow the proper squeeze of the o-ring. Second, if the holes are not bored with a tight enough tolerance to the shaft size, the small side to side shift of the shaft will squeeze one side of the o-ring and normalize the other, allowing water through. Also, be sure to buy your o-rings from an acctual o-ring supplier, they will have the tolerances of the rings they sell. I am trying to include a pic of what i think you should do to improve the idea, hopefully it comes through.z.png
 
Ikelite control glands are not suitable for us, because of the non-metric dimensions. We just want to know if this is going to work, or how we should tweak this design to make it work.
I have built and modified a few housings . I really recommend geting som ikelite glands AND buttons/rod that work with the glands. they are easy to modify for all kinda cameras and stuff.. or even look into and old ikelite housing of ebay or similar. Then you might get a good deal on several buttons (taken of that housing that is). Why ? Ikelite is proven to work, cheap diy solutions tend to not work so much... Been there, done that.. just a little heads up, and my 2 cents from own experiences :)
 
Lots of good ideas here.

Have you thought of buying a working design and reverse engineering it?

Sea & Sea YS 50 strobes have an on / off control based on a rotating control. Buy one from Ebay, rip it apart!
 
Hi all,

I haven't been here for a while, so missed all the comments from the past few months.

1982Shawn, I think your design is way better than mine indeed, but the problem is that it is hard to make without expensive machines.
I already created my initial design, and i think it will work just fine. It feels really good.

When I finish the camera housing, I will test it at depth (without camera of course :p).

I'll keep you posted.
 
The simplest, easiest way I've found to make camera controls is to use brass compression fittings with a tapered thread on one end and a 1/4" compression fitting on the other. I drill the housing, tap it and install the fitting using plain ol' Teflon tape. I use 1/4" smooth brass rod for the control shaft. Brass is easy to bend by heating with a torch, easy to drill small holes in, and resists corrosion. I unscrew the compression cap, slide two 1/4" O-rings down the shaft, and tighten just beyond finger-tight. Use some silicone grease on the O-Rings and shaft before assembly. It's late and my housings are in the garage but if you are interested I'll send you a picture (tomorrow?). The fittings are available at most hardware stores and so are the 1/4" O-Rings.

I have made many of these controls and none has ever leaked. I've had them down as far as about 80 feet. The only problem I've had is they get sticky so before a dive I loosen the compression nuts and work the controls a bit and they are fine for a few days or so.
i do not understand whut you mean when you refer to a "brass compression fitting". Can you post a pic?
 
upload_2016-5-29_0-48-37.jpeg
 
https://www.shearwater.com/products/perdix-ai/

Back
Top Bottom