Guys:
A while back I was asked if I could make a video or something similar to aid in modifying maglites. I am working on two Mag/OMS based canister lights and decided to take some pics and post the progress.
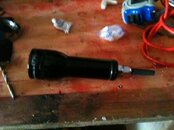
So the first thing to do is to dissassemble the light. Now, I won't go into details on that but I will tell you that for the new generation mags you will need a T7 wrench to remove the switch. Pry off the rubber cover from the switch and stick the T7 in the small hole that goes through the switch. The loosen while tugging back and forth on the wrench. Once you feel the switch move, push it down and out of the tail of the light. That should be the only thing many people will question about dissassembly. You will not need the switch/bulb, reflector, orings, lens... Save those in your garage for 10 years and then throw them away when you realize you'll never use them. I have a bunch laying around for that "one project" that I KNOW will come some day when I'll NEED them... haha!
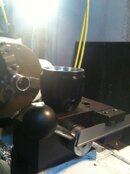
To protect the barrel, keep the old packaging material and tape it around it. Or you could make a Delrin bushing to slide it through to hold it on the lathe... Yes, I use a lathe for my mods. With a lot of patience you may be able to do this with Dremel... I don't have the patience though!!! lol
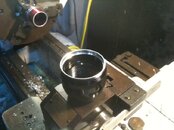
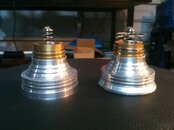
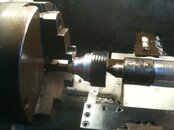
So, first thing to modify- the head... Mount the head on a piece of scrap threaded barrel or use the light's barrel to holt it on the lathe. Protect it as noted above. For this modification we will use the Cree LED modue from DX. This will also apply to the P7 module, although the Cree needs a bit more metal removed to fit. The multi-LED modeules from DX are slightly bigger around towards the bottom and may need additional material removed from the head and the module so not as easy!!! Head modifications are 2- (1) remove about 1.7 mm from the top threads of the head to allow for the new 5mm lens to fit in there with only a minor gap. This is not an abosulute must-do but will make the final head look better... 1.7 mm will still leave a small gap on the bezel and head to ensure the oring is crushed properly. (2) Widen the ID of the head to about 1.95" to allow the LED module to fit in there. You will need to deepen (about 0.45") the wider ID to allow the module to sit in there all the way down. You can also remove some material from the top of the reflector but I don't recomment this as you may knock off some of the reflective coating. Be careful with the reflector!!! Very fragile... Will cover reflector protection in later post.
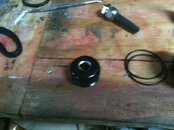
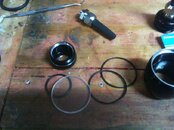
Install bigger orings on head and bezel... The bezel does not get modified at all!
Thigs to watch out for:
1. Do not increase the ID of the head too much or you will get into the threads causing them to come off and ruin the head... I speak from personal experience!!!
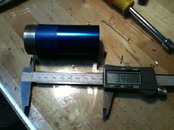
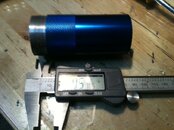
2. I have listed approximate readings as I normally custom fit eveything together so I don't worry abour exact measurements and such. One of these days I'll standardize everything... SOON!!
3. What the heck is a T7 wrench?... Well it's a Torx wrench. It's like a star.. Machinist use these to remove inserts from tooling. I found that one of the best T7 wrenches are the ones that come with some of my tooling. They are really small and fit in the Mag switch hole.
A while back I was asked if I could make a video or something similar to aid in modifying maglites. I am working on two Mag/OMS based canister lights and decided to take some pics and post the progress.
So the first thing to do is to dissassemble the light. Now, I won't go into details on that but I will tell you that for the new generation mags you will need a T7 wrench to remove the switch. Pry off the rubber cover from the switch and stick the T7 in the small hole that goes through the switch. The loosen while tugging back and forth on the wrench. Once you feel the switch move, push it down and out of the tail of the light. That should be the only thing many people will question about dissassembly. You will not need the switch/bulb, reflector, orings, lens... Save those in your garage for 10 years and then throw them away when you realize you'll never use them. I have a bunch laying around for that "one project" that I KNOW will come some day when I'll NEED them... haha!
To protect the barrel, keep the old packaging material and tape it around it. Or you could make a Delrin bushing to slide it through to hold it on the lathe... Yes, I use a lathe for my mods. With a lot of patience you may be able to do this with Dremel... I don't have the patience though!!! lol
So, first thing to modify- the head... Mount the head on a piece of scrap threaded barrel or use the light's barrel to holt it on the lathe. Protect it as noted above. For this modification we will use the Cree LED modue from DX. This will also apply to the P7 module, although the Cree needs a bit more metal removed to fit. The multi-LED modeules from DX are slightly bigger around towards the bottom and may need additional material removed from the head and the module so not as easy!!! Head modifications are 2- (1) remove about 1.7 mm from the top threads of the head to allow for the new 5mm lens to fit in there with only a minor gap. This is not an abosulute must-do but will make the final head look better... 1.7 mm will still leave a small gap on the bezel and head to ensure the oring is crushed properly. (2) Widen the ID of the head to about 1.95" to allow the LED module to fit in there. You will need to deepen (about 0.45") the wider ID to allow the module to sit in there all the way down. You can also remove some material from the top of the reflector but I don't recomment this as you may knock off some of the reflective coating. Be careful with the reflector!!! Very fragile... Will cover reflector protection in later post.
Install bigger orings on head and bezel... The bezel does not get modified at all!
Thigs to watch out for:
1. Do not increase the ID of the head too much or you will get into the threads causing them to come off and ruin the head... I speak from personal experience!!!
2. I have listed approximate readings as I normally custom fit eveything together so I don't worry abour exact measurements and such. One of these days I'll standardize everything... SOON!!
3. What the heck is a T7 wrench?... Well it's a Torx wrench. It's like a star.. Machinist use these to remove inserts from tooling. I found that one of the best T7 wrenches are the ones that come with some of my tooling. They are really small and fit in the Mag switch hole.