Printing pictures developed with Canon DPP

Please register or login

Welcome to ScubaBoard, the world's largest scuba diving community. Registration is not required to read the forums, but we encourage you to join. Joining has its benefits and enables you to participate in the discussions.

Benefits of registering include

  • Ability to post and comment on topics and discussions.
  • A Free photo gallery to share your dive photos with the world.
  • You can make this box go away

Joining is quick and easy. Log in or Register now!

drcolyn

Contributor
Messages
84
Reaction score
5
Location
Langebaan South Africa
# of dives
100 - 199
I recently wanted to see what some of my pictures looks like on actual prints as I found that to be best test for clarity and color.
I took the pics with a Canon G10 in raw and did all adjustments and cropping in Canon DPP before converting it to jpeg. The white balance, crop and lighting looks great in MS office Picture editor so I took it to the nearest K@d&k Express shop (found in almost every mall in South Africa) to have it printed from a memory stick.
The UM pics may have inspired the guy who did the printing but I was disgusted with the result. Firstly their printing package apllied the cropping to the whole image which resulted in 1/3rd of the image not printing.
Secondly the white areas printed very yellow/redish and with the UW WB set om my camera that was not even a problem in the raw version.
I asked the developer what was up and his only advice was to bring the un edited jpeg image to them and then fix it in the shop.
Surely there must be another way of editing at home and printing at the shop?
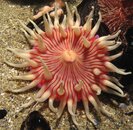
Attached is an example from MS office picture editor.
The K@d&k website looks friendly but offers no help.

Regards
David
 

Attachments

  • IMG_0535.JPG
    IMG_0535.JPG
    103.5 KB · Views: 236
When you say cropping in DPP did you mean that you made your photo the desired print size and dpi such as 4x6 or 5x7 at 300 dpi? When I get any prints made I have already done that, along with all the other adjustments, before taking them to the local mall's developing shop. That way they don't have to do any cropping or resizing.

Your computer monitor probably won't display your finished photos the same as the shops monitor. I always make the shop display each photo on their monitor before printing to be sure no further adjustments are needed. I found that my shops monitor displays my photos darker than my laptop so they usually have to slightly brighten all my photos.

Ask your shop if their monitor is calibrated to their printing equipment. That is important.

I use DPP to adjust the white balance then convert to JPG and complete my other editing in Photoshop. I do that because I am use to PS and can do the editing quicker there than in DPP. I do prefer DPP for the WB adjustment over PS.
 
I agree with Gilligan..........Your monitor is calibrated to your specific requirements. To go to a mall to print out photographs, view them on their monitor and maybe crop there is going to be disappointing.

First off, the photograph that you posted is beautiful. I can see how much time you took composing, shooting and using your computer to get the exact image you want (and saw U/W). I am viewing it on my HD Monitor, calibrated for photography. It makes a big difference.

Secondly, as I'm sure you must know, viewing your art on paper is much different then viewing it on a screen, with our monitor's lighting capability. Also, the 'mall' is very happy with printing 'pictures,' not ""Photographs."

We have just starting looking for a new home Photographic Printer, since our Epson has given us quite a few years of service. I know the costs are high, but if you don't want to make the investment to buy your own Photographic Printer for your art, at least find a Professional Quality printing service and go that route for your high quality work. The mall pictures are good for snapshots at Birthday parties. Your art should be printed professionally.

Again nice work. Safe diving to you.
 
Like everyone said already...the colors will be different from monitor to monitor and then they will even differ from paper to paper used for the print. I always found kodak to be a little on the "yellow" side. If you can find someplace that uses fuji paper (like the crystal archive paper) it seems to work better with underwater photos.
The aspect ratio however is, like everyone said, up to you to crop to your liking. If you handed the printer a photo with a 1:1 ratio like your sample, especially cropped close like that, then they will have to cut something out to make it a 2:3 ratio for a 4"x6" print. I try to take this into consideration when I am underwater shooting, leaving room for different ratios.
 
Not sure how you are converting your RAW to JPG for your prints in DPP. These 6 steps are a way to resize your photo to a 4x6 compatible size print after you finish with your other editing:

Go to the Trimming tool
1.jpg


Click on the 3:2 Aspect Ratio
2.jpg


Click on the photo then position the cursor to get the double arrows.
3.jpg


Pull the corners and move the rectangle to the area you want to print then click "OK"
4.jpg


You now have the portion of the photo to print.
5.jpg


Convert and save to JPEG and set the dpi to 300 for the print.
6.jpg
 
Hi All
Thanks a lot for the pointers and the compliments - being a self taught happy snapper I tend to learn things only when needed and the significance of aspect ratio happens to be the latest - I still have to work on my framing so admittedly I abused the cropping a bit (1:1 ratio handy to hide unsightly background stuff) and got away with it since I only used the photo's as a screensaver on my pc at work.
As for the white balance and lighting - seems like that is a common problem. There is a professional photo shop in Cape Town that use the Fuji printing - will give them a try thanks.
 
I am a novice to the whole color space / calibration issue, but since no one else mentioned it I will add that it is possible to use the ICC color calibration profile of the commercial printer to better match the colors in the digital file. To have that match what you see on your monitor, it obviously needs to be calibrated first.

I took pictures in Maui with my G11 / Sea&Sea strobe, cleaned them up in Photoshop Elements, then sent them to the local pharmacy / 24 hr photo. After that I sent the files to a photo shop that makes the calibration profile available for download. There was a huge difference in the printed pictures, especially in the contrast. The darker areas in my photos were nearly black in the prints from the first shop, but showed detail in the second.

To use the profile, it can be specified in the full version of Photoshop (which I don't have). For us PSE or other low-budget photo editor users, Dry Creek Photo makes a utility that converts TIFFs to JPGs while embedding the ICC color profile for the printer in the process. This obviously means your workflow needs to be RAW -> TIFF -> JPG when this utility is used. The utilitiy can be downloaded at Profile Converter

The Dry Creek Photo site also has a number of excellent write-ups on color profiles usage, printing, etc., plus a database of commercial printer profiles for downloading. The main site is http://www.drycreekphoto.com.

Barry
 
A color managed workflow is not an easy concept. I use Color Eyes Display Pro with a Spyder 3 Colorimeter. I print at home using an Espon Pro 3880 with Image Print 8 RIP software. The Image Print paper profiles are amazing.

Softproofing is a critical step, IMO, to seeing how your prints will appear on paper. Photoshop and Aperture have softproofing capability but Lightroom does not (adobe wants you to own both). Color gamut of the printer which determine the color profile you use when processing RAW files. My printer has a wide gamut so I do everything in Adobe ProPhoto RGB.
 
3880 in your home... I am so jealous. Although I would have to take a loan out every time it needed ink.

I feel so small with only a 13 x 19 printer

I have the eye-0ne spectrophotometer, but in all honesty, have not used it for work flow management in years (does come in handy for other things though).

The trick is to match your monitor to the print source. Change the monitor.. change the printer.. make very little difference, as long as you know what the print system will be producing. I believe I've done one large print that was off color in the last two year...might have been 3.. was a long time ago.

I just use good paper profiles and then adjust the printer for exact color.

Regarding canon's software.. have tried using it for printing, but there are some issues with it's translation to epson... guessing, it would work like a champ with a Canon printer.

I use PSP... which can do raw, but does an excellent job of work flow... and is very low cost. Make all my jpgs from Canon camera's in their software.. then print in Paint shop Pro....

I need to learn how to do the image capture ...would come in handy....


A color managed workflow is not an easy concept. I use Color Eyes Display Pro with a Spyder 3 Colorimeter. I print at home using an Espon Pro 3880 with Image Print 8 RIP software. The Image Print paper profiles are amazing.

Softproofing is a critical step, IMO, to seeing how your prints will appear on paper. Photoshop and Aperture have softproofing capability but Lightroom does not (adobe wants you to own both). Color gamut of the printer which determine the color profile you use when processing RAW files. My printer has a wide gamut so I do everything in Adobe ProPhoto RGB.
 
https://www.shearwater.com/products/peregrine/

Back
Top Bottom