naimis
Contributor
I did a dry fit of the PVC parts I'd bought to make my dive light battery canister, tonight, and am having some misgivings about the feasibility... I'm going to describe what I have and post some pictures I took of the dry fit and ask for comments... I can glue it all up and take it on a dive with me, and if it fails with only the empty pipe, it's obviously not a critical problem, but I wanted to try to get some opinions first..
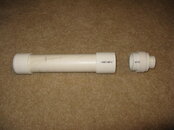
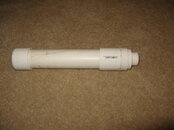
The canister body is a 1 1/2" PVC pipe, schedule 40. The reason it's schedule 40 is because I can't find anyone in town with sch 80 or 120. Pressure is clearly not an issue, the sch 80 or 120 is just for having the thicker walls for screws for the latches (I'm using the ones that OxyCheq sells). My plan for getting around this issue with sch 40 PVC was to double up the wall width using fittings (4mm + 4mm).
The bottom of the canister is capped. Simple enough.
The top of the canister has a 1 1/2" coupler for the lid to fit into. The latch will be screwed into this (predrilled and tapped 6mm into the 8mm walls).
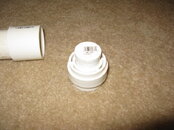
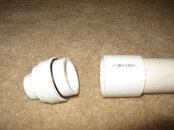
The bulk of the lid is a 1 1/2" x 1" PVC reducer. The reducer has the same OD as the pipe, so it fits inside the coupler. The reducer has the same problem as the pipe as far as screws, but it also needs something for the O-ring to sit up against, so I cut off part of a coupler and stuck it on the reducer. It didn't cut very straight on my miter, but with the pre-formed side facing the coupler on the pipe, it probably doesn't matter much. I would definitely need to sand both edges smooth, though.
In the reducer, I have a 1" plug. The reducer size and plug were chosen because it was the only one I could find that had the nice flat top that would butt up against the O-ring in the Agro cable gland.
My big concern is whether or not this has any chance of actually staying sealed. The reducer doesn't really fit "tight" into the coupler like a pipe tends to do (I suspect that fittings are tapered so the less depth you get into the fitting, the looser it is).
Anyway, any suggestions would be appreciated.
The canister body is a 1 1/2" PVC pipe, schedule 40. The reason it's schedule 40 is because I can't find anyone in town with sch 80 or 120. Pressure is clearly not an issue, the sch 80 or 120 is just for having the thicker walls for screws for the latches (I'm using the ones that OxyCheq sells). My plan for getting around this issue with sch 40 PVC was to double up the wall width using fittings (4mm + 4mm).
The bottom of the canister is capped. Simple enough.
The top of the canister has a 1 1/2" coupler for the lid to fit into. The latch will be screwed into this (predrilled and tapped 6mm into the 8mm walls).
The bulk of the lid is a 1 1/2" x 1" PVC reducer. The reducer has the same OD as the pipe, so it fits inside the coupler. The reducer has the same problem as the pipe as far as screws, but it also needs something for the O-ring to sit up against, so I cut off part of a coupler and stuck it on the reducer. It didn't cut very straight on my miter, but with the pre-formed side facing the coupler on the pipe, it probably doesn't matter much. I would definitely need to sand both edges smooth, though.
In the reducer, I have a 1" plug. The reducer size and plug were chosen because it was the only one I could find that had the nice flat top that would butt up against the O-ring in the Agro cable gland.
My big concern is whether or not this has any chance of actually staying sealed. The reducer doesn't really fit "tight" into the coupler like a pipe tends to do (I suspect that fittings are tapered so the less depth you get into the fitting, the looser it is).
Anyway, any suggestions would be appreciated.