


DaFireMedic
Contributor
As I have mentioned before in these forums, I am new to underwater videography, and I wanted to make sure that I enjoy it enough before dropping several thousand dollars on a new housing and accessories. So here is my “budget” housing setup to allow me to “get my feet wet” in underwater videography. I already had a Canon HV20 high def camcorder. Total cost, not including the HV20 was less than $150 and I have controls for power on/off, start/stop record, and menu access for manual white balance.
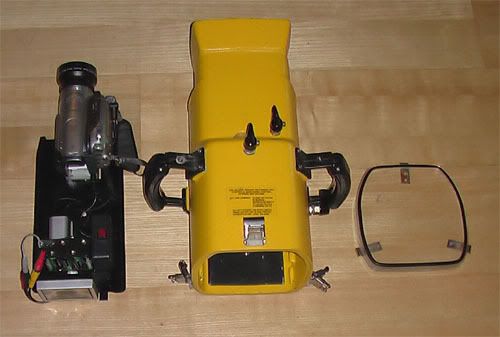
I picked up a used Hypertech housing on Ebay for $79 and replaced all of the o-rings. I then set about mounting the camcorder to the slide in tray, no problem. I found that the forward control rod lies just behind the camcorder when using my wide angle lens, so that is used for the start/stop recording control, and when I rotate it the other direction it contacts the “Menu” button. I just had to bend it in the right spot. You can see it in this pic if you look carefully, the tip is coated with white marine sealant to prevent scratching of the camera controls:
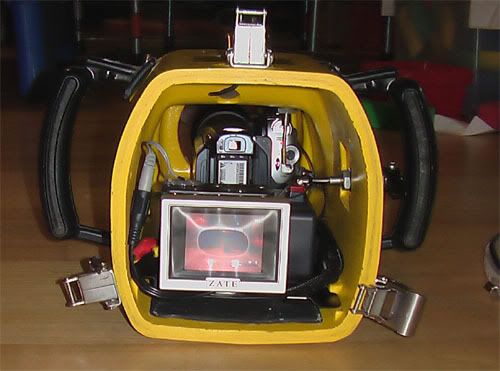
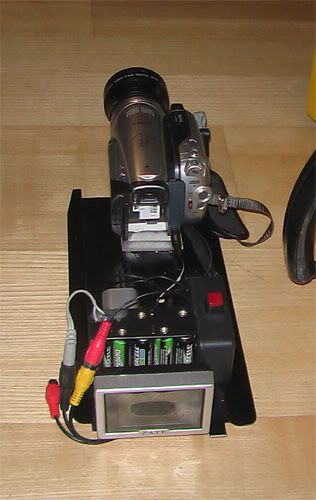
Because the camcorder goes into stand by mode shortly after turning it on, I wanted a power on/off switch. Being that the HV20 has a dial type power switch, I couldn’t modify a way to turn the switch while the camcorder was inside the housing, so I had to come up with another way. I rigged the battery to be mounted to the tray separate from the camcorder and wired to a plug that connects into the jack for the A/C adapter. You can see the gray battery in the pics. Then I wired a push button on/off switch (the red one in the pic below) between the battery and the camcorder and mounted it onto a small project box to raise it up for placement under the side control rod. To turn the camcorder on and off, I leave the camcorder itself in the “on” position, so when I turn the side control knob it pushes the switch, sending or cutting power to the camcorder.
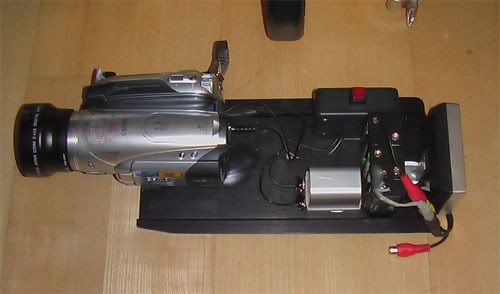
Because the inside of the housing is too small to open the LCD display, I decided pick up a small monitor to enable me to see what I am shooting, as well as to see the menu options on the display. I found this Zate 2.5” TFT monitor on Ebay for about $50. It requires 12 volts, so I had to make a 10 cell battery pack. I just used a 10 cell AA battery holder and NiMH batteries at 1.2v each. I found the right connection to plug into the monitor, which I cut off of an old A/C adapter. I was initially worried about the size of the battery, with regards to both space and negative buoyancy, but it turned out to be just fine. Note: The screen protector sheet for the monitor screen is still on it, which is why it looks concaved in the pics.
My initial tests in the pool have been very successful, not a drop of water and the controls work great. It is almost right on neutral buoyancy in the pool, so it should be a hair positive in the ocean. Unfortunately, due to my schedule, it will be at least a month before I can get it down to the beach for a test run in the ocean. I will do at least one dive without the camcorder, just to be sure, but I don’t anticipate that it will leak at depth as the increased pressure on the rear plate should increase the seal.
I picked up a used Hypertech housing on Ebay for $79 and replaced all of the o-rings. I then set about mounting the camcorder to the slide in tray, no problem. I found that the forward control rod lies just behind the camcorder when using my wide angle lens, so that is used for the start/stop recording control, and when I rotate it the other direction it contacts the “Menu” button. I just had to bend it in the right spot. You can see it in this pic if you look carefully, the tip is coated with white marine sealant to prevent scratching of the camera controls:
Because the camcorder goes into stand by mode shortly after turning it on, I wanted a power on/off switch. Being that the HV20 has a dial type power switch, I couldn’t modify a way to turn the switch while the camcorder was inside the housing, so I had to come up with another way. I rigged the battery to be mounted to the tray separate from the camcorder and wired to a plug that connects into the jack for the A/C adapter. You can see the gray battery in the pics. Then I wired a push button on/off switch (the red one in the pic below) between the battery and the camcorder and mounted it onto a small project box to raise it up for placement under the side control rod. To turn the camcorder on and off, I leave the camcorder itself in the “on” position, so when I turn the side control knob it pushes the switch, sending or cutting power to the camcorder.
Because the inside of the housing is too small to open the LCD display, I decided pick up a small monitor to enable me to see what I am shooting, as well as to see the menu options on the display. I found this Zate 2.5” TFT monitor on Ebay for about $50. It requires 12 volts, so I had to make a 10 cell battery pack. I just used a 10 cell AA battery holder and NiMH batteries at 1.2v each. I found the right connection to plug into the monitor, which I cut off of an old A/C adapter. I was initially worried about the size of the battery, with regards to both space and negative buoyancy, but it turned out to be just fine. Note: The screen protector sheet for the monitor screen is still on it, which is why it looks concaved in the pics.
My initial tests in the pool have been very successful, not a drop of water and the controls work great. It is almost right on neutral buoyancy in the pool, so it should be a hair positive in the ocean. Unfortunately, due to my schedule, it will be at least a month before I can get it down to the beach for a test run in the ocean. I will do at least one dive without the camcorder, just to be sure, but I don’t anticipate that it will leak at depth as the increased pressure on the rear plate should increase the seal.

