I converted a $16 machined aluminum small flashlight (approximately 5" long by 1" in diameter) into a dive light. This is a led with an output of about 100 lumens running on 3 AAA batteries or 1 rechargeable (18650) li-ion battery.
I did it as an inexpensive way to test the concept and to get some experience without wasting a lot of money.
The bottom line is that I have now tested it on a dive to 100fsw (multi-level profile) for a total dive time of 45 minutes. I turned the light off at 100 fsw (4 atmospheres) as a worst case scenario type of test. Turning the light off using a twisting tail cap requires unscrewing it a bit. No leaks.
I used a Romisen RC-K4 flashlight from DealExtreme. This had a clicky type of tail switch. I disassembled the switch, removed the microswitch, and kept only the metal retaining ring, rubber end piece, and the spring mounted on a board.
This left a hole in the end of the tail cap. I used the rubber end piece in reverse to fill it in. I filled the concave portion of the rubber with silicone and covered the entire outer end of the tail cap with epoxy. I filled the inner bottom most part of the tail cap with silicone.
I replaced the retaining ring and simply set the spring with board on top of that. I put some silicone grease on the threads and screwed it together. The light as sold was not a dive light but as are most lights today it was water resistant meaning it does have small o-rings where needed.
I unscrewed the bezel and popped the lens out, removed a very flimsy o-ring (threw it away) and used marine grade silicone sealant in the groove for the o-ring. I put the lens back in and used the sealant along the perimeter of the back face of the glass lens. I put more silicone sealant on the threads and screwed the bezel back together.
On the outside of the lens I used the sealant along the outer perimeter as well. I unscrewed the head from the body and used silicone on those threads.
A few dollars worth of sealant and epoxy and a $16 flashlight and I have a small 100 lumen backup light comparable to the UK SuperQ eled selling for $125 at my local dive store and of course that's just a plastic light.
This was really just more of a proof of concept project for me. If I see a well made flash light with the emitter and other features that I want at the right price I now know that I have a good chance of converting it to a dive light.
No one was more surprised that I when my light made it to 100fsw without any issues!
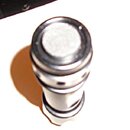
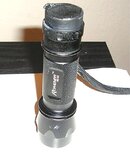
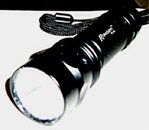
The attached pics aren't that good but the first is a stock clicky switch, the second is after the modification, and the third is of the lens (it's just barely possible to see some irregularities from the silicone).
I did it as an inexpensive way to test the concept and to get some experience without wasting a lot of money.
The bottom line is that I have now tested it on a dive to 100fsw (multi-level profile) for a total dive time of 45 minutes. I turned the light off at 100 fsw (4 atmospheres) as a worst case scenario type of test. Turning the light off using a twisting tail cap requires unscrewing it a bit. No leaks.
I used a Romisen RC-K4 flashlight from DealExtreme. This had a clicky type of tail switch. I disassembled the switch, removed the microswitch, and kept only the metal retaining ring, rubber end piece, and the spring mounted on a board.
This left a hole in the end of the tail cap. I used the rubber end piece in reverse to fill it in. I filled the concave portion of the rubber with silicone and covered the entire outer end of the tail cap with epoxy. I filled the inner bottom most part of the tail cap with silicone.
I replaced the retaining ring and simply set the spring with board on top of that. I put some silicone grease on the threads and screwed it together. The light as sold was not a dive light but as are most lights today it was water resistant meaning it does have small o-rings where needed.
I unscrewed the bezel and popped the lens out, removed a very flimsy o-ring (threw it away) and used marine grade silicone sealant in the groove for the o-ring. I put the lens back in and used the sealant along the perimeter of the back face of the glass lens. I put more silicone sealant on the threads and screwed the bezel back together.
On the outside of the lens I used the sealant along the outer perimeter as well. I unscrewed the head from the body and used silicone on those threads.
A few dollars worth of sealant and epoxy and a $16 flashlight and I have a small 100 lumen backup light comparable to the UK SuperQ eled selling for $125 at my local dive store and of course that's just a plastic light.
This was really just more of a proof of concept project for me. If I see a well made flash light with the emitter and other features that I want at the right price I now know that I have a good chance of converting it to a dive light.
No one was more surprised that I when my light made it to 100fsw without any issues!
The attached pics aren't that good but the first is a stock clicky switch, the second is after the modification, and the third is of the lens (it's just barely possible to see some irregularities from the silicone).