DIY Video Housing a success...

Please register or login

Welcome to ScubaBoard, the world's largest scuba diving community. Registration is not required to read the forums, but we encourage you to join. Joining has its benefits and enables you to participate in the discussions.

Benefits of registering include

  • Ability to post and comment on topics and discussions.
  • A Free photo gallery to share your dive photos with the world.
  • You can make this box go away

Joining is quick and easy. Log in or Register now!

Ive been following this thread for a while,Im building a housing and was wondering...has anyone tried using a continuous bead of silicone in the groove instead of an o ring behind the lens?
 
Blazer,
No way. First, You'd never get a clean enough bead. Silicone is an OK seal if you put the pieces together while it's still wet for a permanent connection, but an Oring is absolutely necessary for parts the get removed frequently. No reason to skimp anyway, these things are less than $2 each.
 
Hi everyone,

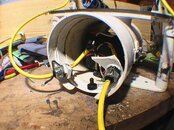
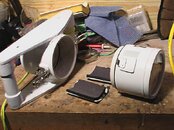
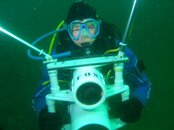
I saw this design last year posted by Bobby M (thanks) and built one. I originally made a large 6" one with 1/2" acrylic ports for an old non-digital camera. I also made a 6" light cannon with an old Dacor rubber toggle switch and three 35 watt halogens and a lead acid gel cell. This set up worked way beyond my expectations, and I have since bought a Panasonic pg-180 and built a 4" sched 40 housing I just tested to 145fsw. The camera housing works great.
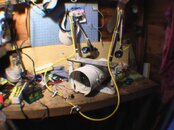
I also built a battery housing out of the 6" tubing, and modified 2 mag lights on aluminum tubing ( like a boat canvas awning)for a double spot light set up. Yesterday I imploded the battery pack at 113fsw. It made a loud bang and threw off my boyancy!
The 6" VC was the regular sewer pipe doubled up to re-inforce it. The original set up woked to 130fsw.

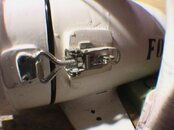
I sourced everything here in Victoria BC, so my latches and o-rings are different than the pictures I've seen, and I made handles by glueing cut end caps on top and bottom, and a wing shaped piece on top and bottom joined at the ends with 1" PVC. I glue everything with heavy duty PVC cement then finish it with Cold Cure Epoxy.
I've attached a picture.
 

Attachments

  • FOX VIDEO.jpg
    FOX VIDEO.jpg
    53.8 KB · Views: 165
Wow, it looks like you really went to town! Congratulations on your success. Your setup looks pretty nice from the picture. I'm nearing completion of my housing built on stretched 4" pipe. I'll post pictures of the construction when I'm done. Several ideas I've tried haven't worked quite the way I planned :wink: . I'm using this all as a learning experience, trying to develop my fabrication skills. So far, I don't think my modifications have brought any real benefit to the project :(.
 
CJfox,

That thing looks great! But don't hold out on us show us some pictures of the implosion.
 
Only the back end where the switch and cable glands were imploded, so it's still salvagable. The picture of the unit underwater was take the day before at 37fsw, and my buddy didn't have a camera when the implosion occurred, but you've given me a great idea for a future video project, a planned and videoed implosion!

Here are some pics of the damage.

I've also shown some detail about where I've made changes. The latches are from a marine supply store "eccentric adjustable stainless latches" and I've made my camera mount out of twp pieces of PVC with neoprene glued to them. They sandwich the camera which then slides into the tube, shock mounted, and adjustable.
 

Attachments

  • IMGA0039.JPG
    IMGA0039.JPG
    46.7 KB · Views: 152
  • IMGA0040.JPG
    IMGA0040.JPG
    59.7 KB · Views: 122
  • IMGA0043.JPG
    IMGA0043.JPG
    100.3 KB · Views: 126
  • IMGA0038.JPG
    IMGA0038.JPG
    66.5 KB · Views: 120
For anyone interested here is a drawing of the housing that I built earlier. It works great now after some additional sealing around the PVC couplings and latches.
 

Attachments

  • VIDEO HOUSING.pdf
    372.9 KB · Views: 198
I can only assume that the "eng" in "engdiver" is engineer. Very nice drawing.

I can't make out a couple of the details. Did you cut the o-ring gland in the face of the pipe/coupling assembly after gluing the two together. I have struggled a little bit in cutting into the face of PVC either because the pipe isn't round or my embryonic machining skills are not quite up to getting good alignment on my little lathe.

Do you have a higher-resolution version of the drawing that you could make available?

Thanks for sharing.
 
The O-ring gland is created by sliding the pipe coupling past the face of the 6" PVC pipe 3/16". I had to make sure the face of the coupling was flat and smooth before I glued them together on both sides.
I have a better resolution drawing of this but I can't attach it on ScubaBoard because of the size.
I am willing to E-mail to anyone who wants it.
 
hard to read the values in the pdf, the resolution was too low.

For CJfox. I suppose that the back lid imploded 'cause the flat and to large surface of the plastic. Try to reduce the area or increase the thickness of that lid. you can also use some kind of reinforcement in the inner space of the housing, like a PVC cross. So you can awoid the bending of the central point of the back surface caused by pressure.:wink:
 
https://www.shearwater.com/products/perdix-ai/

Back
Top Bottom