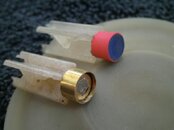
Making difficult to find SP 109 parts. Poppet.

Please register or login

Welcome to ScubaBoard, the world's largest scuba diving community. Registration is not required to read the forums, but we encourage you to join. Joining has its benefits and enables you to participate in the discussions.

Benefits of registering include

  • Ability to post and comment on topics and discussions.
  • A Free photo gallery to share your dive photos with the world.
  • You can make this box go away

Joining is quick and easy. Log in or Register now!

raftingtigger

Contributor
Scuba Instructor
Divemaster
Messages
1,307
Reaction score
817
Location
Woodland, CA, USA
# of dives
500 - 999
Making a old-style bonded seat poppet into a removable seat poppet.

Need:


Directions:
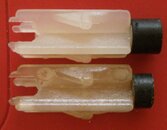
  • Carefully grind off the thickness of the new seat from the seat end. It is important to keep this square. I used a benchtop disk sander and square. Caution the part gets really HOT fast. Dunk it in water after every few seconds of sanding. If you let it get too hot the brass seat support will unglue from the poppet. You should grind off almost all the way through the brass seat support. It is OK if you see plastic in the center

  • Cut a ring of brass tubing, sand the edges, and use a little RTV to glue it in place
  • Apply a tiny amount of RTV silicone (100% silicone) to both the tubing and the metal seat base. Push the LP seat into place and let cure.

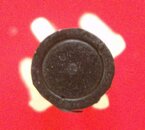
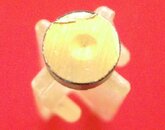
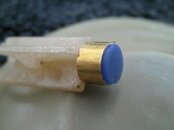
Old style poppet unmodified and shortened.jpgOld style poppet seat view.jpgOld style poppet shortened end view.jpgPICT0105.jpgPICT0106.jpg
Top - unmodified unmodified ground down bottom - ready for seat completed poppet
Bottom - ground down

and for the lawyers...

Following these directions and/or using these parts is COMPLETELY AT YOUR OWN RISK!


CM 5/8/14

As of this writing I used the poppet with the red ring for about 120 minutes of blissfully easy breathing diving before disassembling to check the condition - which was a nice uniform orifice mark.
 
Well done RaftingTiger. This is the first successful attempt I've seen at modifying old poppets for reuse.
 
If you want your old Top-Hat poppet converted I am willing to do a limited number (undecided yet how many) for Beta testing. If you are interested send me a PM so we can coordinate. I'm NOT doing this for money - think of it as a 'pay it forward' idea. I do ask that anyone who takes up my offer report back on this thread with their experiences on this modification whether good or bad.

- Raftingtigger
 
Great idea. The thickness should be somewhat forgiving with the adjustable orifice. Now I'm really glad I have been throwing all those old parts in a bag. Every time my wife sees it she say (not asks) "What are you going to do with that old JUNK!!!" Now I have an answer. Thanks
 
This may be a stupid question but I will ask it anyway. Looking at the indentation from the orifice on the original poppet seat and how far you needed to grind down the poppet, could you just sand down the seat and reuse it?

Also I remember Zung had a thread about a grey poppet he reused, so between his thread and this one you could probably reuse the blue poppets on the G200 and 250s also.
 
This may be a stupid question but I will ask it anyway. Looking at the indentation from the orifice on the original poppet seat and how far you needed to grind down the poppet, could you just sand down the seat and reuse it.

Not a stupid question. Actually that was my first thought. 2 problems however; first, this is a one-time renewable seat rather than a replaceable seat. Second if you glue a new seat on I would be afraid it would dislodge in use. The method was an accident from planning on casting a new duro poppet. I wanted to practice on an old part first. This needed a part to reproduce with a cavity for the new LP seat so I put one together from an old ground down poppet and a ring of heat shrink tubing. When the casting project ran into problems it dawned on me that my temporary model was the solution. I test dove it (pool then ocean) and found it worked great. I later substituted the more durable brass sleeve instead of the heat shrink plastic.
 
If you look a the picture of the two poppets side by side, you can seen where the brass has been ground down into the plastic poppet. Its only the thickness of brass tubing. The original seat is just bonded to the brass cap on the plastic. There really isn't enough rubber to re-use it. When you put on the new seat, you don't use the kind for the BAs. You use a flat disc awap style. I've done a couple like this and found that the typical puck seats are a little too large. I've had limited success punching them with a small piece of the tubing I used to go over the old brass. On the ones I've done, I've coated the exposed brass in black nail polish to try to cut down on the corrosion. When I remove the old seat material, I don't grind them; I just slice it off with a razor blade and polish with sand paper. Generally, there is enough adjustment left, but I've had a couple where when you engage the purge button, it just locks in and you can't stop the free flow.
 
Beta testing update. I now have about 6 hours of dive time on the modified poppet. The first 2 hours were with heat shrink plastic surrounding and retaining the LP seat, the last 4 hours are with the 8mm brass ring. Other than not 'breaking in" the LP seat and tweaking the adj. knob inward on the last dives they have worked flawlessly. I removed the heat shrink tubing one and inspected it and found it in perfect condition - but when removing it from the 2nd stage breathing tube it is easy to separate the parts. I just removed and inspected the brass tubing one and am completely satisfied with the modification. That one come out of the breathing tube easily and firmly all in one piece.
 
https://www.shearwater.com/products/teric/

Back
Top Bottom