rebuilding a DA Aqua Master

Please register or login

Welcome to ScubaBoard, the world's largest scuba diving community. Registration is not required to read the forums, but we encourage you to join. Joining has its benefits and enables you to participate in the discussions.

Benefits of registering include

  • Ability to post and comment on topics and discussions.
  • A Free photo gallery to share your dive photos with the world.
  • You can make this box go away

Joining is quick and easy. Log in or Register now!

jacked_72

Guest
Messages
170
Reaction score
14
Location
Dallas, TX
# of dives
I just don't log dives
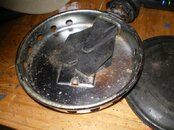
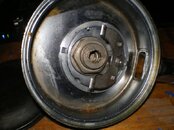
I recently picked up a Delhi Ave. DA Aqua Master, from around 1960, I suppose. Chrome is good, innards look clean. Worst thing seems to be the owner's initials scratched into the can.

Anyway, I'd like to get it into diving order and I was looking for kind of a tutorial or a pictorial where some takes one apart - a step by step kind of thing. I have the manual, so I don't really need it, but i always like to see what else other people have done. If such a tutorial exists, please let me know. I have not been able to find one.

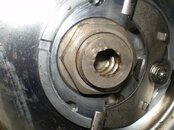
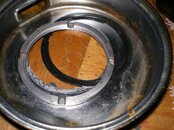
I will need a new duckbill. What are the thoughts on the duckbill eliminator versus the standard duckbill. I also note there are two duckbills that I see on the market. One is $15 and looks like what I took out (the tubular section is formed round) and the other is $5 and is flat from end to end. Do they work equally well, assuming the DBE is not the way to go.

Seats. Do they generally get replaced? I have not seen a source for these. If I need them, where can I get them?

The mushroom or umbrella valves in the mouthpiece are dried out and need replaced. Do the "new and improved" wagon wheels that are available make much of a difference.

Finally, only one of my hoses are bad. One must have been replace in the past 40 years. Is there a source for one rubber hose or are the reproduction silicone hoses the way to go?

Thanks.
 
Vintage Double Hose has all the parts you need. I would not recommend replacing a single hose, even if you find a hose, the odds of them being similar in flexibility is not likely. Depending on the mouthpiece you have, I suggest you consider replacing it with a new one as well. The old straight ones do not fit my mouth well and pretty much all of them are stiff. They tend to irritate my gums in fairly short order. The curved ones are much better IMO and if you don't mind it not being "reg correct" I really prefer the Voit hourglass design in silicone, that is my preferred mouthpiece. I would suggest you invest in a complete set of hoses, mouthpiece and mouthpiece valves. The silicone ones are much better and will last a lot longer than rubber. The new wagon wheels make some difference, not a huge amount but some....if you are buying the hose/mouthpiece package, it comes with them.

You are going to want to replace all the seats and other rubber parts in the reg. Often times you can get away with resurfacing the HP seat but now that those are being reproduced I don't see doing it. Both diaphragms (HP and LP) as well as the Lp seat should be replaced....they are going to be hard. Again, you can sometimes get away with reusing them but for a reg you intend to use, I don't recommend it.

Duckbills are as much a matter of opinion as anything. I prefer the silicone ones over the rubber ones, they are less prone to aging and create less exhaust resistance. The DBE has less resistance still but is more costly. I have not spent too much time diving mine so my in water experience is not extensive but it does seem to work well. For a first time rebuild, I would go with a silicone DB, you can always replace it later

I am unaware of a tutorial for the DH reg, the "Early Aqualung Manual" download off VDH is about as good a manual as I am aware of.

The first thing you are going to have to do is to remove is the C clips. There was some good discussion on VDH a while back on how the members removed and installed the clips. I would suggest you go to VDH and do a search on C clips, there is a lot of good info on how to remove them without damage and how to make installation pliers. Removing them without doing damage is not as easy as it might first appear and replacing them without a good set of custom vise grips is not easy. I use a pair of fairly large wire end nippers to remove them and I have a set of specially ground vise grips to reinstall them. Personally, don't like the C clips so I replace all mine with band clamps.

So what parts are a must replace, what are a should replace and what are nice to replace. This is for a first rebuild of an unknown reg, one you have done before is a different matter.

Must replace for a first rebuild:
LP seat, HP diaphragm, HP diaphragm gasket, first stage nozzle gasket, duckbill, mouthpiece valves, main body gasket, filter if it looks bad and HP seat if you can’t resurface it

Should replace:
Main diaphragm, HP seat, filter, hoses, hose clamps

Nice to replace:
Mouthpiece, replace C clips with band clamp.

Then you will also need....or at least want...some specialty tools. You can get by with out them but the job is a lot more difficult and the odds of damaging the reg is increased. At the risk of sounding like a commercial - I sell a line of DH service tools, here is what I suggest.

Ring nut tool- for removing and installing the main body ring nut
Body wrench- for holding the reg while removing and installing many of the reg parts
HP nozzle assembly tool- for installing the internal parts in the HP nozzle
IP gauge- for setting the IP and trouble shooting first stage problems.

Can you do the job without these tools, absolutely but it’s a pain in the rear.
 
With all that said, my best suggestion is to not do it yourself the first time. Don’t get me wrong, I am a big believer in DIY and I think every DH diver should service his own reg however, this is your first DH reg. They are not like single hose regs and do not behave like one. You are going to have to learn to dive with them and to understand how they must be dove. Putting them on your favorite BC and diving it as normal is not going to work well. It will not kill you but odds are you are not going to like it. By having an experienced DH tech service your reg, you can reduce the odds that the “problem” you are having is the reg itself. Plus, they are more likely to find oddball problems than you are. When the next service time comes or when you buy that second reg, you will have a good understanding of how it should work after you rebuild it.
 
What Herman said. I sent my 1st DH to Bryan at VDH and had it upgraded to a Phoenix. I did spend a bit of coin on that 1st one but no more than I would have spent on a new reg at my LDS anyway. I was very happy with it when I got it back, and I have since done a few projects on my own with good results, with the parts and advice from Vintage Double Hose.
(disclaimer, I am not a paid spokesman)
 
Thanks guys. Herman. I've already got your installation tool for the HP seat and springs on the Conshelf. I think its the same tool, right? What does the tool look like that takes off the big ring nut? (That't the one with the four slots in it, right?) I'm pretty sure that one will be difficult. The box clamps were certainly a booger. I did the sharpened screwdriver method and that worked OK except for stabbing myself.

I've seen the resurfacing page for the HP seat on a German site that looks like it came from vintage double hose originally. I have not seen, however, who sells the HP seats. Who has them and the HP diaphragm, nozzle gasket and HP diaphragm gasket? It looks like the current Conshelf seat fits the Royal Aqua Master, but its different for the non-Royal version, right? It looks like the LP seat might be Awap-able and use the LP seat that the US Divers secondaries take. I've got a bunch of those.

Thanks.
 
Yep that is the same tool so you are good there. The ring nut tool is basically a metal ring with 4 teeth on it that engages the slots in the ring nut. Both the HP nozzle and ring nut can be difficult to remove if you don't have some way to hold the main body. Reinstalling the box clamps, you need to have a way to both compress them and at the same time keep them equally compressed so the diaphragm gets compressed evenly. The best way I know to do that is to use vise grip plyers that have a notch cut in them to hold the clips, as you compress them with the plyers you can start with the plyers expanded, go around the clips, adjust the plyes in some and make another round. You do this until you get them as tight as you want.

Easiest way to get parts you need is to get the service kit VDH has, it has all the parts I suggest plus a few more here Shop Online and the HP seat is here Shop Online

You are correct, the Conshelf/Titan seat will work in the Royal but NOT the DA. The LP seats can be made ala awap.
 
Thank you for the links to the parts. I thought I had been all over that site.
 
I tore it down this afternoon. Not so much a tutorial but pictures as to where the parts go and what they look like. I found the videos on the double hose site thanks to Herman's posts. I can't figure out why I didn't see them before. They were very helpful. I'd say this reg looks like a junior Conshelf with the nifty secondary built right in. Its pretty neat how this basic design has lasted so long.
 

Attachments

  • IMGP2680.jpg
    IMGP2680.jpg
    83.1 KB · Views: 167
  • IMGP2682.jpg
    IMGP2682.jpg
    71.4 KB · Views: 173
  • IMGP2683.jpg
    IMGP2683.jpg
    70 KB · Views: 144
  • IMGP2684.jpg
    IMGP2684.jpg
    82.4 KB · Views: 151
  • IMGP2685.jpg
    IMGP2685.jpg
    71.2 KB · Views: 144
  • IMGP2686.jpg
    IMGP2686.jpg
    78.7 KB · Views: 146
  • IMGP2687.jpg
    IMGP2687.jpg
    64.9 KB · Views: 131
  • IMGP2688.jpg
    IMGP2688.jpg
    70.5 KB · Views: 152
  • IMGP2690.jpg
    IMGP2690.jpg
    78 KB · Views: 144
  • IMGP2691.jpg
    IMGP2691.jpg
    60.6 KB · Views: 145
  • IMGP2692.jpg
    IMGP2692.jpg
    66.5 KB · Views: 138
  • IMGP2693.jpg
    IMGP2693.jpg
    72.8 KB · Views: 135
  • IMGP2694.jpg
    IMGP2694.jpg
    81.4 KB · Views: 155
Here's the rest of them and the tool I made to remove the big ring (and bent removing the ring) I don't know what it would have been like if the thing had really been corroded in. The HP seat is silver, I suppose its plated brass.
 

Attachments

  • IMGP2707.jpg
    IMGP2707.jpg
    58.2 KB · Views: 129
  • IMGP2694.jpg
    IMGP2694.jpg
    81.4 KB · Views: 130
  • IMGP2695.jpg
    IMGP2695.jpg
    74 KB · Views: 133
  • IMGP2697.jpg
    IMGP2697.jpg
    71.8 KB · Views: 131
  • IMGP2698.jpg
    IMGP2698.jpg
    77.1 KB · Views: 145
  • IMGP2699.jpg
    IMGP2699.jpg
    74.9 KB · Views: 140
  • IMGP2701.jpg
    IMGP2701.jpg
    76.8 KB · Views: 135
  • IMGP2704.jpg
    IMGP2704.jpg
    62.6 KB · Views: 130
  • IMGP2705.jpg
    IMGP2705.jpg
    74.2 KB · Views: 131
That one is in pretty good shape. A couple of suggestions/tips. Carefully straighten the tips on the horseshoe supports but DO NOT bend them again when you install them. No one I know does that, it's not necessary and they are the only small part you can not get, be careful with them. When you install the nut on the LP seat holder, once you get it to where you want it, seal it with removable locktite or fingernail polish. DO NOT peen it like the manual suggest. By the way, that is a 5-40 thread, not the more common 4-40. Don't try to reuse the brown phenolic gaskets, they are usually very brittle and more often than not you will break it. Bryan has exact replacements but I prefer the nylon replacements he has....in any case, these are one of the parts I suggest you order a few extra of for spares, esp if you are using the phenolic ones.
 

Back
Top Bottom