


konish
Registered
Howdy!
I'm new to the board and pretty new to SCUBA as well, but have been pretty mechanically inclined all my life. Anyway, my brother sent me 2 full rigs with Sherwood Magnum 1st and 2nd stages and Sherwood Minnimus octos.
Both sets haven't been used in something like 10 years but were stored in reg bags inside the house and were serviced a year or so prior to being stored. I did some pool stuff with them and they worked fine, but I figured I'd freshen them up with a parts kit from NESS before I dove them in open water.
I downloaded the manual and did a ton of reading and research here before I attempted to take them apart. Not to belittle anyone's trade at servicing these but there just isn't that much to 'em, and I have been familiarizing myself with the ports (especially the dry-bleed system) and parts.
Here is where my lack of experience shows. Both piston bores had scratches and a little corrosion. I cleaned them up with a really, really soft polishing tip on a low-speed dremel and managed to lightly polish them up.
However, one of the bores has a ring the runs the entire circumference of the ID, and a noticeable scratch running at a slight angle to the bore centerline (see pic)
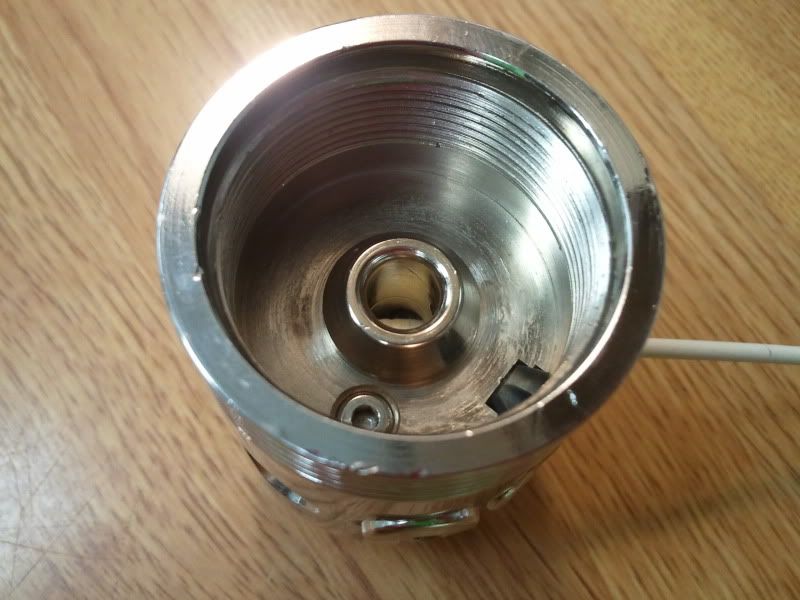
This was after polishing and the pics make them look a lot worse than they are. The edges are smoothed and feathered, but you can still just barely detect them with a toothpick (but *just* barely).
The other bore had some corrosion that cleaned up quickly and overall the bore is in great shape but I noticed this little "dimple" in the bore.
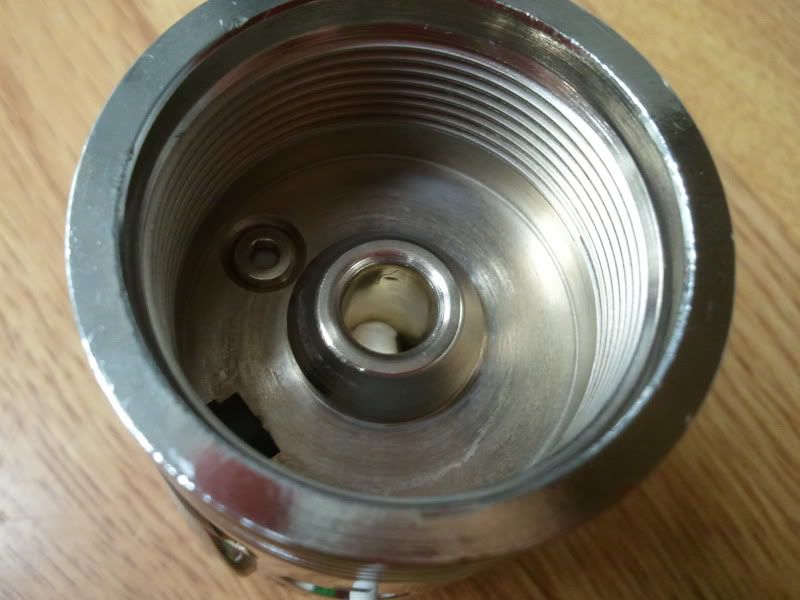
Again, the camera make it look worse than it is. The edges aren't sharp and I can only detect it if I put the tip of a toothpick into the dimple, otherwise, it does not catch on anything that is flat to the bore surface.
Question is whether or not these are going to present a problem or should I try and source some 1st stage bodies? Hone and use a thicker OD o-ring? I'm guessing that they'll be okay as they don't seem to affect the o-rings (no tears, scuffs, flat spots or dull spots).
I've rebuilt pneumatic and hydraulic components with similar defecst in sealing bores etc and never had an issue with a ruptured/torn o-ring, but none of that was life support equipment either.
Thoughts? Thanks in advance
R/
Dustin
I'm new to the board and pretty new to SCUBA as well, but have been pretty mechanically inclined all my life. Anyway, my brother sent me 2 full rigs with Sherwood Magnum 1st and 2nd stages and Sherwood Minnimus octos.
Both sets haven't been used in something like 10 years but were stored in reg bags inside the house and were serviced a year or so prior to being stored. I did some pool stuff with them and they worked fine, but I figured I'd freshen them up with a parts kit from NESS before I dove them in open water.
I downloaded the manual and did a ton of reading and research here before I attempted to take them apart. Not to belittle anyone's trade at servicing these but there just isn't that much to 'em, and I have been familiarizing myself with the ports (especially the dry-bleed system) and parts.
Here is where my lack of experience shows. Both piston bores had scratches and a little corrosion. I cleaned them up with a really, really soft polishing tip on a low-speed dremel and managed to lightly polish them up.
However, one of the bores has a ring the runs the entire circumference of the ID, and a noticeable scratch running at a slight angle to the bore centerline (see pic)
This was after polishing and the pics make them look a lot worse than they are. The edges are smoothed and feathered, but you can still just barely detect them with a toothpick (but *just* barely).
The other bore had some corrosion that cleaned up quickly and overall the bore is in great shape but I noticed this little "dimple" in the bore.
Again, the camera make it look worse than it is. The edges aren't sharp and I can only detect it if I put the tip of a toothpick into the dimple, otherwise, it does not catch on anything that is flat to the bore surface.
Question is whether or not these are going to present a problem or should I try and source some 1st stage bodies? Hone and use a thicker OD o-ring? I'm guessing that they'll be okay as they don't seem to affect the o-rings (no tears, scuffs, flat spots or dull spots).
I've rebuilt pneumatic and hydraulic components with similar defecst in sealing bores etc and never had an issue with a ruptured/torn o-ring, but none of that was life support equipment either.
Thoughts? Thanks in advance
R/
Dustin
Last edited:
