Rudebob
Contributor
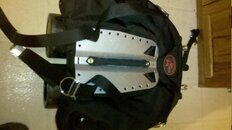
I have been messing around trying to come up with some simple molds so I can make v-weights to go on backplates. This very simple design worked pretty slick. I've have already drilled and installed one on my SS halcyon. This weight easily added 7 balanced pounds that would of been on my waist before. I have a little more room if I want to repour a little larger weight, but this is already vast improvement when extra weight is needed for drysuit diving. I use tin-lead solder materials (I get remnants free from work), but pure lead would be slightly heavier for the same volume.
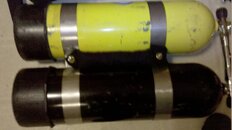
The one shown is sized for a dive rite plate. Basically, I took 1.5" thin walled steel square tubing (aluminum would obviously be better but I don't weld aluminum). I cut one side off the tube as close to the edge of the wall as possible to make a U-shaped channel. Then on the opposing side of the tube I ground each corner down to reduce the wall thickness (don't grind through) to a point less that was less the wall thickness of the tube. I then put each end in a large vise and gently bent the walls outward until reaching the correct angle of the dive rite plate. Because the corners of the tube were ground thinner than the rest of the tube the bend radius was formed in the corner only.
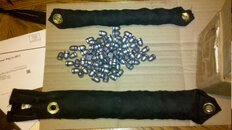
I then further flared the end of the mold out slightly and welded on some sheet metal tabs to close off each end of the mold. Because all surfaces are flare outward somewhat the weight easily drops out after cooling.
Then it is just a matter of drilling the mount holes and grinding out a recess for tank straps or you can use spacers to provide enough clearance.
I may tweak the design a little more. If anyone has any ideas for further improvement please comment.
mg


The one shown is sized for a dive rite plate. Basically, I took 1.5" thin walled steel square tubing (aluminum would obviously be better but I don't weld aluminum). I cut one side off the tube as close to the edge of the wall as possible to make a U-shaped channel. Then on the opposing side of the tube I ground each corner down to reduce the wall thickness (don't grind through) to a point less that was less the wall thickness of the tube. I then put each end in a large vise and gently bent the walls outward until reaching the correct angle of the dive rite plate. Because the corners of the tube were ground thinner than the rest of the tube the bend radius was formed in the corner only.
I then further flared the end of the mold out slightly and welded on some sheet metal tabs to close off each end of the mold. Because all surfaces are flare outward somewhat the weight easily drops out after cooling.
Then it is just a matter of drilling the mount holes and grinding out a recess for tank straps or you can use spacers to provide enough clearance.
I may tweak the design a little more. If anyone has any ideas for further improvement please comment.
mg
Last edited: