Be a fan of ScubaBoard.com

Welcome to ScubaBoard, an online scuba diving forum community where you can join over 205,000 divers from around the world discussing all things related to Scuba Diving. To gain full access to ScubaBoard (and make this large box go away) you must register for a free account. As a registered member you will be able to:

  • Participate in over 500 dive topic forums and browse from over 5,500,000 posts.
  • Communicate privately with other divers from around the world.
  • Post your own photos or view from well over 100,000 user submitted images.
  • Gain access to our free classifieds marketplace to buy, sell and trade gear, travel and services.
  • Use the calendar to organize your events and enroll in other members' events.
All this and much more is available to you absolutely free when you register for an account, so sign up today!

If you have any problems with the registration process or your account login, please contact the ScubaBoard Support Team.
Results 1 to 7 of 7

  1. #1
    Frequent Poster


    Has not set a "status"
     

    bradsab's Avatar
    Join Date
    Jun 2006
    Location
    Illinois
    Posts
    159
    Dives
    50 - 99

    Combo dive/video light

    Here is a summary of my latest light build. There are more details of the evolution of this light here: Need (lots of) help on DIY light . I decided to consolidate the build into a shorter thread, and also critique the light’s performance. I’ll split this into several posts so I can add pics. (haven’t figured out how to embed pics in the text)

    CONCEPT

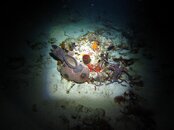
    I am not an u/w photographer, just shoot for my own pleasure and to share with friends & family. I was always happy with the stills I took with my old camera and internal flash, but I never shot much video because the quality was lousy. After I received a new compact point-n-shoot Canon SD960IS for Christmas with HD capability, I wanted to shoot more video.

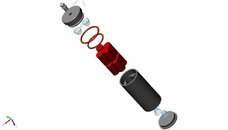
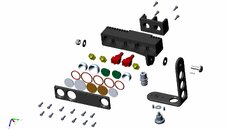
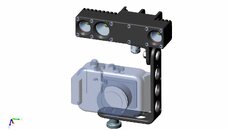
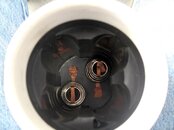
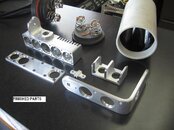
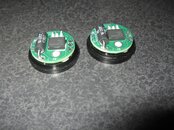
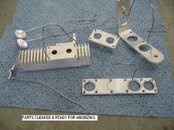
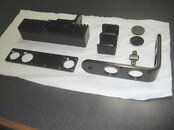
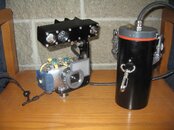
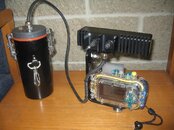
    I love night dives, and wanted to film those, too. I had shot some video with my old camera while holding a light on the subject, but that didn’t work well at all. I decided to build a combination dive/video canister light. Compact size was a high priority; I wanted to be able to have one hand free even on night dives. Towing around a monstrous rig with long arms is not my idea of a good dive. The light head would mount to a tray screwed to the bottom of the camera housing, and have 3 LED emitters. One is my primary dive light, the other two are video floods. After messing around with CAD for a while, I came up with this.
    Attached Images Attached Images

  2. #2
    Frequent Poster


    Has not set a "status"
     

    bradsab's Avatar
    Join Date
    Jun 2006
    Location
    Illinois
    Posts
    159
    Dives
    50 - 99
    COMPONENTS
    The light is powered by eight D cell NiMH batteries arranged 4S2P to give 4.8V. They are removed from the canister for charging. I have an 8 cell MaHa smart charger that will fast charge them in about an hour. I don’t know the burn times I get, the longest night dive we did it was on about an hour and a half, and the charger said they still had half their power left. The canister is made from 3” PVC pipe bored to 3.2 to accommodate four D cells in a cluster. The ends were machined from solid PVC stock. The dividers inside the can holding the batteries in position were cast from 2-K urethane compound.
    LED’s are Luminus SST-90’s. The drivers are made by DIWdiver available here Adjustable 10A linear LED driver - limited quantities - CandlePowerForums You can also contact him here on SB. To date, I think these are still the only drivers available for the SST-90. I used Ledil Lily Wide reflectors for the floods, and a Carclo 26.5mm Optic & Holder found here http://photonfanatic.com/ComponentsFS.html for the dive light.
    Attached Images Attached Images

  3. #3
    Frequent Poster


    Has not set a "status"
     

    bradsab's Avatar
    Join Date
    Jun 2006
    Location
    Illinois
    Posts
    159
    Dives
    50 - 99
    PRODUCTION
    The head and arm are machined from aluminum stock. This was my first experience machining and I don’t have a mill, just a drill press with an XY vise, so I had a machine shop do the o-ring seats. Everything else I did with carbide bits on the drill press or router table, and I cut the cooling fins on the table saw. It was also my first attempt at anodizing. There are a few flaws where either the anodizing or the dye didn't take, maybe I didn't get it cleaned well enough in those spots, or I could've touched the parts before getting them in the dye solution. But overall, it looks good. I tried scratching my test piece and it seems pretty hard, and the parts are all non-conductive. The biggest challenge I had was keeping the anodizing bath at room temp. Even with a single small test piece, it heated up to 90 degrees, so I put the bath tank in a tub of icy water. The first batch stayed under 80, but the second batch had more surface area, and it went over 85. Ideally, it should be kept between 70-75. I found the most useful info here http://www.focuser.com/atm/anodize/anodize.html I bought the black dye and sealer from him, the rest I either had, or bought locally.
    Attached Images Attached Images

  4. #4
    Frequent Poster


    Has not set a "status"
     

    bradsab's Avatar
    Join Date
    Jun 2006
    Location
    Illinois
    Posts
    159
    Dives
    50 - 99
    I only get to take one or two dive trips a year, and I was working till midnight most days to get this light done before a scheduled trip to Cozumel in early March, literally finishing it the day before we left. And the last day, UPS lost the drivers DIWdiver made for me. I rigged up two dummy batteries to make my canister 2p3s and wired the light for direct drive. I didn’t have two power levels, just one somewhere between the high & low I would get with the drivers. With the drivers, I now get close to 1800 lumens on high, and about 700 on low from each LED. But for the trip, direct drive gave me about 1200 lumens initially, and voltage began to drop immediately (particularly when both floods are burning) so I ended up somewhere below 1,000 lumens from each LED. And... I didn't have a switch to turn it off. The switch I have to control the hi/off/lo function of the drivers won't carry enough amps to be able to use it for direct drive. I could hit a sweet spot in the middle of the spot/flood toggle and break the circuit, but it doesn't want to stay there because it is an on-on switch. Below 40fsw the pressure on the toggle boot was enough that it wouldn’t stay in the “sweet spot” anymore, and it was hard to get to stay off. That messed up some of my pics and video, because sometimes I had the white balance set at depth and the light would be on and make everything red. But at least I got to use it. Here are a couple of pics of the completed light.
    Attached Images Attached Images

  5. #5
    Frequent Poster


    Has not set a "status"
     

    bradsab's Avatar
    Join Date
    Jun 2006
    Location
    Illinois
    Posts
    159
    Dives
    50 - 99
    THE VERDICT
    I’ve been a do-it-yourselfer all my life. Two things have I learned: A.) Everything takes waaaaay longer than I think it will, and B.) Nothing turns out as good as I imagine it will. This light may be an exception to B. It looks, feels, and works like a commercially built product. With the exception of the missing drivers, and consequently, proper switching, it performed better than I had hoped. I will be glad for the two power levels; the dive light was almost too bright for night dives. It simply lit things up like daylight. For still pics, the floods were bright enough that the flash usually didn’t fire even at night, and brought out color in day shots. The floods lit up the entire photographed area fairly evenly. It was easy to use, and never got in the way. The only thing I would do differently is try to make it neutrally buoyant. It’s a little negative, not by much, but by the end of an hour-long dive it’s noticeable. I made the arm from ¼” stock, and I think 1/8” would be adequate. And I would machine more material out of the inside of the head. I may try to add something outside to make it more neutral, or I could make a new arm. Probably not worth it for two trips a year.

    I’ve attached a few stills from a night dive to show the beam patterns. Here are some links to a movie I made of the trip.
    YouTube - DIVING COZUMEL, MARCH 2010, PART 1 in HD
    YouTube - DIVING COZUMEL, MARCH 2010, PART 2 in HD
    Part 1 had only day dives, but you can see how the light illuminated color. Part 2 has all the night dive clips in it beginning 4 minutes into the video. At about 5:10, there’s a short clip where I switch from spot to flood, so it gives you an idea what it looked like diving with it. All the other video clips are flood only.

    Now that the light is complete with drivers and power levels, I can’t wait to go diving again. It was almost as much fun building the light as it was diving with it.
    Attached Images Attached Images
    Last edited by bradsab; May 14th, 2010 at 12:53 AM.
    COMBO DIVE/VIDEO LIGHT 1800/3600 Lumen
    http://www.scubaboard.com/forums/do-...ml#post5241107
    DIY Light, 800 Lumen, 4 Power Levels
    http://www.scubaboard.com/forums/do-...er-levels.html

  6. #6
    Registered


    Has not set a "status"
     

    Join Date
    Jan 2009
    Location
    louisville, ky
    Posts
    17
    Dives
    25 - 49
    great job, really impressive, i would like try to make something like that for my camera but i think it maybe over my head.

  7. #7
    Registered


    Has not set a "status"
     

    beaster_scuba's Avatar
    Join Date
    Apr 2009
    Location
    Ontario, Canada
    Posts
    28
    Dives
    50 - 99
    Photos
    7
    Great job bradsab, it looks professionally done. I'm impressed with the machining that you did, especially since you said it was your first time. The DIY anodizing looks awsome too, I am yet to try that myself (mostly because my work sends stuff out regularly and my parts go in for free). I recognize the cable glands and draw latches from McMaster Carr, I used the same ones on my DIY canister light. Your night dive pictures look sick aswell.
    Keep up the great DIY!

Posting Permissions

  • You may not post new threads
  • You may not post replies
  • You may not post attachments
  • You may not edit your posts
  •