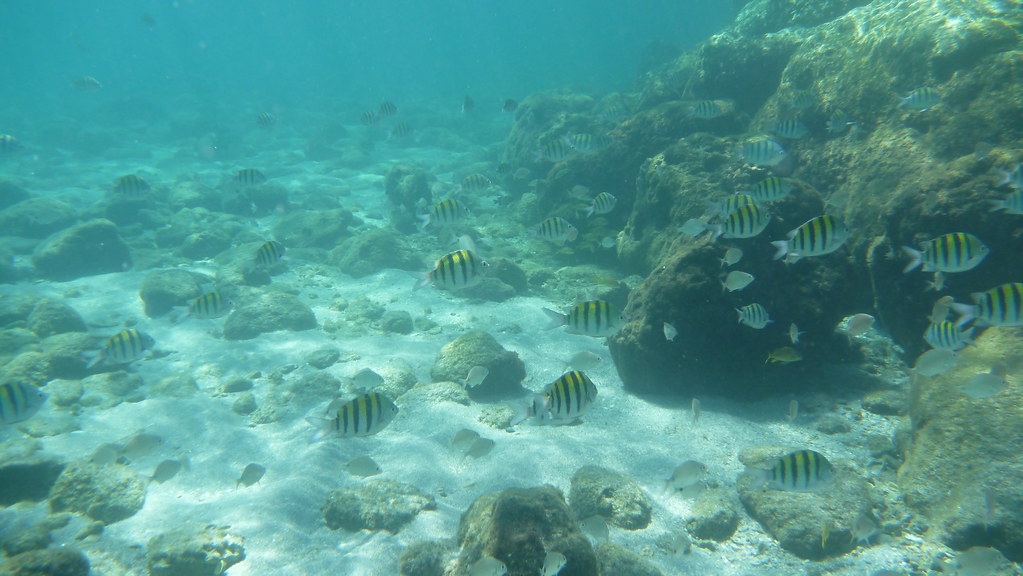
Snorkeling photos

Please register or login

Welcome to ScubaBoard, the world's largest scuba diving community. Registration is not required to read the forums, but we encourage you to join. Joining has its benefits and enables you to participate in the discussions.

Benefits of registering include

  • Ability to post and comment on topics and discussions.
  • A Free photo gallery to share your dive photos with the world.
  • You can make this box go away

Joining is quick and easy. Log in or Register now!

Dave,

How much post-processing did you do on the original photos? They look National Geographic to me :) I was lucky to get a fish in the frame on the first day (have a hard time seeing the LCD).

Thanks,
Amy
 
Here is one of my images that Dave suggested would be good for enhancement. If I get some other software like photo elements I will try the same image and post it back here. One thing of interest is that the original image is about 4 MB and the hand edited one is 12MB!

Regards,
Amy

Original:

sgt_major_shcool_0_orig by huskyaddict, on Flickr

Picassa "Feeling Lucky"

sgt_major_shcool_1_picassa_lucky by huskyaddict, on Flickr

Adobe Photo Elements 9 "smart fix"

sgt_major_school_01_photo_elements_smart_fix by huskyaddict, on Flickr

Picassa hand edits

sgt_major_shcool_4_hand_edit3 by huskyaddict, on Flickr
 
Last edited:
Didn't get to try it on Jasc (on old Desktop upstairs) but did run the original through three different free enhancement programs. I think I like the PhotoScape results the best.

5515765347_852b0acf4d_b.jpg

Original

Original%20huskyaddict.jpg

Picasa I'm Felling Lucky

PhotoScape%20huskyaddict.jpg

PhotoScape using its various auto-level and back-light adjustments. Probably could have used less Sharpening enhancement.

PhotoFiltre%20huskyaddic.jpg

PhotoFiltre's autofilter
 
Last edited:
Amy, your Picasa "feeling lucky" correction doesn't look too different than what you might get in Photo Elements. Obviously, it's much better than the original and much better than the manual editing. Usually for editing snorkeling photos I just auto-correct and then sharpen the photos a little. Sharpening usually helps close-ups a little (it's not an earth-shaking improvement like the auto correction sometimes is), but this may result in too much grain in longer range shots. My attempts at manual editing usually don't turn out that well, maybe because I really don't know the intricacies of Photo Elements. Occasionally lightening the photo or changing the color curves improves upon what the auto correction does. Also, I almost always crop my underwater photos, which often gives the appearance that I was closer to the fish than I really was. It is not easy to get close to fish, especially when snorkeling!

The bottom lline is that I don't do that much post-processing, mostly just cropping and auto correcting. Also, I don't have fancy camera gear, just your typical point-and-shoot. I think one of the keys for taking snorkeling photos is to get down with the fish. Shots looking down on fish from above or from the surface never look any good, and I always use a weight belt to help dive down in the water column. However, most of my shots are not deeper than about 15 feet, so I am not a macho freediver. I also spend a long time in the water when I snorkel, which increases my odds of coming upon a nice scene or something that is photogenic.

A couple of other things - I don't like the "underwater" modes on cameras because they often automatically set the camera to an ISO that is too high. This can result in photos that are grainy. If you are in sunny, clear, tropical water, I recommend setting the camera to an ISO of 100 for snorkeling photos. Typically, this means using a camera setting other than "auto". The other thing is to be as absolutely still as you can be when you take the photo. This can be hard when you are snorkeling because you often have to deal with waves and surge. I try to hold on to a rock (not coral!) with one hand to steady myself and then take the picture with the other hand. Finally, I've found that most of the advice for underwater photography is aimed at scuba divers and may not be applicable for snorkelers. For example, use of strobes is a major topic for scuba divers, but as a snorkeler you can get some great photos with natural sunlight.

Hope this helps,
Dave
 
Dave,

Thanks for your elaboration. I have also found that lightening the photo or doing some adjustment of RGB brightness as a first step will sometimes help the "auto correct". It sounds like I am evolving to follow a similar path. I've played a little bit with "Piknik" (the cost version of picassa) and they have an "auto colors" button that seems to do a great job, better than there overall auto fix for some reason.

I downloaded the Adobe Photo Elements 9 last night (30 day full feature trial) and ran the sgt major photo through their smart fix and posted it up with the rest of my experiments on that photo. My first glance of the software is that it is fairly complex. I'm guessing I'll master just a few features.

I also "snorkel dive" to get down to the fish level but I was having a heck of a time staying still because I was so buoyant w/ a 5 mil suit in open ocean. My SO snapped a couple of my attempts with the video (see below). In the sanctuary areas there seems to often be nothing to hold on to that wouldn't get you fined!

Another question, how close do you try to get to your subject? Do use optical zoom much?

Best,
amy

 
Here is an image that has been a real challenge due to blueness and lack of underlying color. I tried some variations in Picassa and here are the results. I prefer the picnik autofix (3rd pic) on this one but I think the face is a little dark. What do you think? Anything else you can do for this image?

Amy

Original:

sheepshead_00_orig by huskyaddict, on Flickr

Picassa with free autocorrect ("Feeling Lucky"):

sheepshead_01_lucky by huskyaddict, on Flickr

Picassa with pay autocorrect (Picnik auto-fix):

sheepshead_03_picnik_auto_fix by huskyaddict, on Flickr

Picassa with Picnik auto-colors, auto-exposure and a small amount of sharpening

sheepshead_01_picnik_auto_color_and_exposure by huskyaddict, on Flickr
 
I downloaded Photoscape and a few other free programs last night to test on your other image. I didn't get to delve into any of the programs in great detail other than figuring out how to edit*fix* images. I plan on processing some of my images this weekend to test its capabilities, but based on the little exposure I had, I'd suggest you try Photoscape as it is free.

Dave's advice of a quick auto-fix and slight sharpening seemed to provide the best result in my test above.

I also took his advice and gave a weight belt a try. After some practice, I did get some better shots. It definitely helped reduce my movement (floating back to the surface) and allowed me to better frame some shots. I did find it to be a burden on some distance snorkels out to farther flung areas though. But I will continue to use it for close to shore outings.
 
Last edited:
Thanks, Testudo,

I will try the Photoscape software. Dave pointed out that I was forgetting one of the nicest things about having a bizillion megapixel camera (ok, 14), I can crop it down. I think I like this one the best :) Who really needs the rocks? I'm not planning on printing it out anyway so super high-res isn't necessary.

Regards,
Amy


sheepshead_06_crop_first by huskyaddict, on Flickr
 

Back
Top Bottom