OTF
Coney Island Whitefish Biologist
You could print a mold and cast the mouthpiece from an appropriate silicone resin.


Welcome to ScubaBoard, the world's largest scuba diving community. Registration is not required to read the forums, but we encourage you to join. Joining has its benefits and enables you to participate in the discussions.
Benefits of registering include

I would think the Smooth-Sil 960 would work for casting.I tried to print a mouthpiece with flex filament, but it resulted too stiff. The softest filament here has a duro of 95. Mouthpieces are duro 60. Too soft for a FDM printer.
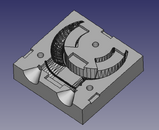
I've also did a two piece model to cast a silicone mouthpiece, but I could not get an adecuate silicone to make a try. Unfortunately getting import woods here is too hard.
You can see what was discussed here : making my own mouth pices
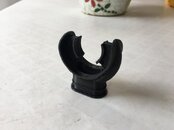
Try this. I’ve never printed it. If that doesn’t work i’ll measure mine w/ calipers and sent you deets.Does anyone have an STL for a tool to insert inflator hose o-rings? Somthing like this.
Alternatively, if anyone has measurements for a non-printed tool, I'll happily model it and share with the group.
 www.thingiverse.com
Those are different tools. The one requested is to install the o-ring that seals against the male QD in the BCD valve.Thy th
Try this. I’ve never printed it. If that doesn’t work i’ll measure mine w/ calipers and sent you deets.
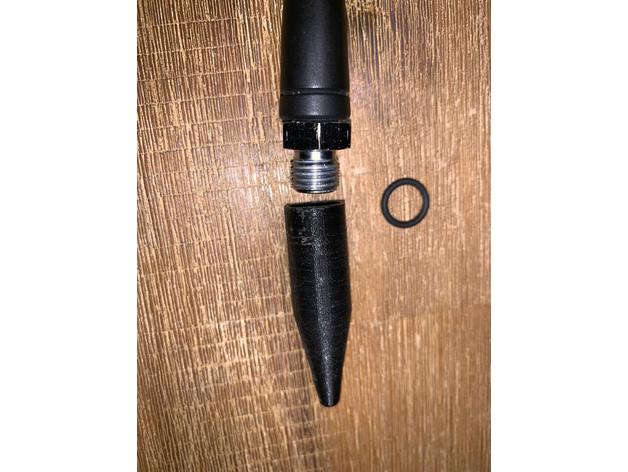
Scuba O-Ring Installation Bullet by bmakowe
This tool is convenient for the installation of LP and HP O-rings on hoses or plugs by placing the tool on the unit and sliding the O-ring on. This makes it easy to fit the O-rings without damaging the O-rings on the threads. Please give me feedback if something doesn't fit.
Try this. I’ve never printed it. If that doesn’t work i’ll measure mine w/ calipers and sent you deets.
Scuba O-Ring Installation Bullet by bmakowe
This tool is convenient for the installation of LP and HP O-rings on hoses or plugs by placing the tool on the unit and sliding the O-ring on. This makes it easy to fit the O-rings without damaging the O-rings on the threads. Please give me feedback if something doesn't fit.
Does anyone have an STL for a tool to insert inflator hose o-rings? Somthing like this.
Alternatively, if anyone has measurements for a non-printed tool, I'll happily model it and share with the group.
If you don't have elephant's foot issues (or can do some touch-up), print it in two halves. Getting kinda small, but not impossible.The problem with th first tool is that the pin is too thin to be printed with 3D, if printed along the Z axis. Printed along any of the X or Y axis will result in a rugous surface owing to supports and not a nice rounded form.