Hey Brandon, I just ran across this thread while fighting the sleepy Munster tonight at work. While looking back, I was insane for spending the money that I did; however I have to acknowledge also that planning my trailer was pretty damn fun too! Just be careful buddy and don't under plan, and on that same note, don't make it more complicated than what it needs. Everything is cool while it's nice and clean, but I promise all those lil nicks and crannies are a PITA to clean and get sand out of later on. Just some things to think about and I'll go over this a lil bit more next week when you come over.
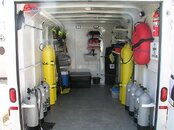
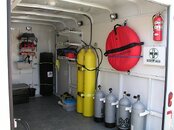
Be thinking about power, lighting, aux batteries, backup lighting, scene lighting, and the capacity that your vehicle has to tow and power this thing. Do you want to be able to use it while disconnected from your vehicle, or plug it in when you're at home and forget about it? What about those 10 cylinders attached to the wall with 4 lil sheet metal screws? Sadly this problem still is my MAJOR weak point. Sand on the floor and not buying rubber mats has now cost me a coat of paint to the bottom of my steel cylinders.
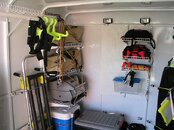
Looking back my major hurdles was, and still is with safe anchoring for my cylinders. The shelving was also a learning curve of trial and error. Now some years later I am beginning to see the effects of not water protecting my walls (although this was planned somewhat). I grossly under estimated the amount of weight I would be putting in this thing, and now wished I would have spent a lil more and purchased a tandem axel with brakes.
Some of the strong points I enjoy are the 12 and 110 volt power system I use that make disconnecting my trailer and it still being able to be used at night, or plug it in and leave it for a day when I get home to my apartment. I enjoy the work bench in the front so that I can assemble gear or tinker with stuff at the dive site. Not having a garage also makes this even more useful.
I’ll try to list a few things to think about, but really this can go on and on. I’ll be interested to see what others have to add as well. But chances are my wallet will not. Lol
1. Weight capacity
2. Outside lighting: Backing, scene, running lights.
3. Convenient placement of spare tire. (don’t forget to get you a JACK and 4 way)
4. Shore line for 110volt
5. 12 volt auxiliary onboard battery for inside lighting.
6. 110volt inverters for radios, coffee pots etc.
7. 12 volt cigarette lighter type port to charge cell phone, IPods etc.
8. 110volt lighting to use when you don’t wish to drain your battery and have a power source
9. 50-100’ heavy gauge extension cord on a reel.
10. Nice heavy duty blower to help dry gear while you sleep at a hotel or sack out from a long drive home.
11. Slip resistant paint for flooring. There are many more expensive options. Be carefull.
12. Waterproofing for walls so you can spray this bad boy out with a water hose and not baby it.
13. Some form of better air venting other than the overhead lid. The wind while driving will beat those to death if they are open, but then again without something open it will be a stinking nasty oven in there waiting on its first victim to open the doors.
14. Horse trailer or cattle trailer type door latches to add a lil extra security.
15. Prepare to buy a bunch of streak be gone. My trailer is looking super nasty right now from the oxidation of the roof running down the sides.
16. Inside shelving and how what you used will or will not hold up on those back country roads when you haven’t passed a crapper in the last 80 miles.
17. Think again about those cylinders and how to anchor them.
18. Where and how will you be diving 5 years from now? Build it now to suit your style then.
I’m sure there is a bunch more things others can think of. You may have already looked in the past, but
here is link to my photo site where I have a few pictures listed.
See ya later Brother,
Ken
(Ok, I tried to copy this over from Word and it totally slaughtered it.)