How to install piezo switch in Halcyon canister lid

Please register or login

Welcome to ScubaBoard, the world's largest scuba diving community. Registration is not required to read the forums, but we encourage you to join. Joining has its benefits and enables you to participate in the discussions.

Benefits of registering include

  • Ability to post and comment on topics and discussions.
  • A Free photo gallery to share your dive photos with the world.
  • You can make this box go away

Joining is quick and easy. Log in or Register now!

Leto

Registered
Messages
36
Reaction score
12
Location
Netherlands
# of dives
200 - 499
Hi guys/girls,

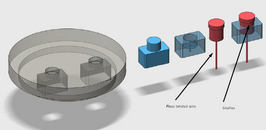
I got my hands on a nice acrylic lid (25mm / 1 inch thick) for a halcyon canister. Currently there is a regular mechanical switch installed which I want to replace with a more durable APEM piezo switch (IP69) (PBAR1AF2000). I hope you can help with a few questions.

1673089563017.png


Can I simply increase the existing (12mm / ½ inch) hole to 16 mm, drop in the piezo switch with the oring and then tighten it using the supplied hex nut? The hole itself is not threaded, it’s just hex nut holding everything in place.

1. The threads on the piezo only allow for about 5mm of acrylic between the hex nut and the bottom of the switch / oring. While the mechanical switch this is more like 8 mm. Is it safe to reduce the acrylic to 5mm in this section in terms of depth rating? The lid / canister is rated to 300 ft but for me 150 ft is enough.

1673089573940.png


2. Do I need to use any epoxy to decrease chances of a leak or is the oring with the tightened hex nut (some Loctite maybe?) good enough?

3. The piezo is a lot smaller than the regular switch. Do I need to fill the empty rectangle space with some sort of epoxy to increase the strength of the lid?

1673089604456.png


Thanks for your time!
 
Hmm

- do you have any power & latch circuit behind switch
IMO simplier could be PBA R1 1 F2000 (1= latch and your A means normaly open switch so need latch& power FET or something else)

- top of switch should be side protected with some kind of hard Oring to avoid possible side hit.

- light builders we are here Tauchlampenbau (tauchfunzel.de) | Facebook

- I think switch should be repearable without problems any time ( with epoxy direct that is almost impossible )

my proposal :

- enlarge the hole to allow the piezo to pass through lid

- I would make an exact casting of this hole ( you grease the hole with liquid wax or non-stick silicone to make it easier to
remove )

you pour epoxy over the hole for the samples and knock it out after about 45min when the epoxy is hard but not crystallised ( it's
terribly hard to knock out afterwards ) I use these Resin Mounted Sample Preparation - element Pi

You can also make void filling with machine milling from raw plastic

- I would mount your switch in that plastic piece . I would not made any drill into 8 or 5 mm acryl , just because to stay on safe side.

- then simple make two holes between switch holder and lid bottom . Neck of switch through lid seal with some SIKA sealent 291 ( not glue ! )

IMO not simplest way , but I think better way, you will be able to change switch if problems , lid will be fine and reinforced. Made some plan what you intend to do .
 
Thanks Lucca for your reply.

1. I'm using a normal pulse piezzo as it's attached to an Arduino microcontroller in which the code 'loop' is fast enough to detect any pushes. Basically, the Arduino code samples the input to which the piezzo is attached every ~10 ms.

2. I'm not sure if i understand the casted shape well. Could you maybe make a simple drawing of the final shape? Do you still keep the piezo oring in place? I tried to put your instructions into a picture but I'm probably missing something. In my situation you would insert the cast from below and then drop the piezzo in from above with sikaflex on it's neck.

1673537618114.png

1673538518965.png
 

Attachments

  • 1673537528722.png
    1673537528722.png
    118.4 KB · Views: 47
You hit nail.
Just support the ''casting'' from below with a plate ( metal could be thiner ) over a plastic insert to a thick acrylic plate and screw it down.
In this case, the switch can remain in the isolated "chamber" in case of leakage.
 
I had a different idea last night which might be simpler. What about putting a 5 mm alu or stainless steel plate on top of the lid and use that plate to fix the piezo's inplace using the supplied hexnut and o-ring. Plate would be glued to the lid using epoxy. JB Weld?

1673605982570.png


1673606088733.png
 
It is simpler but it would looks IMO : horrible

I like to keep old Halcyon lid as it is and implant new technology into it :)

What about to complete close switch hole with liquid glass ( should be perfect transparent ) or some other epoxy resin and and made just new hole with needed parameters ?


It is good to made some kind brainstorming and debate different ideas , sometimes i need same 👍
 
https://www.shearwater.com/products/peregrine/

Back
Top Bottom