Underwater videography on a budget

Please register or login

Welcome to ScubaBoard, the world's largest scuba diving community. Registration is not required to read the forums, but we encourage you to join. Joining has its benefits and enables you to participate in the discussions.

Benefits of registering include

  • Ability to post and comment on topics and discussions.
  • A Free photo gallery to share your dive photos with the world.
  • You can make this box go away

Joining is quick and easy. Log in or Register now!

DaFireMedic

Contributor
Messages
245
Reaction score
1
Location
Southern California
# of dives
50 - 99
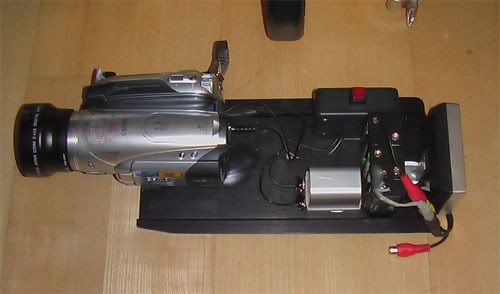
As I have mentioned before in these forums, I am new to underwater videography, and I wanted to make sure that I enjoy it enough to stick with it before dropping several thousand dollars on a new housing and accessories. Others have posted inquiring about how to get started on a budget, so here is my budget housing setup to allow me to “get my feet wet” in underwater videography. Maybe it will give others some ideas. I already had a Canon HV20 high def camcorder (not really "budget", but any camcorder could be adapted). Total cost, not including the HV20 was less than $150 and I have controls for power on/off, start/stop record, and menu access for manual white balance. As I have mentioned before, I have no zoom capability at this time.


Housing1small.jpg


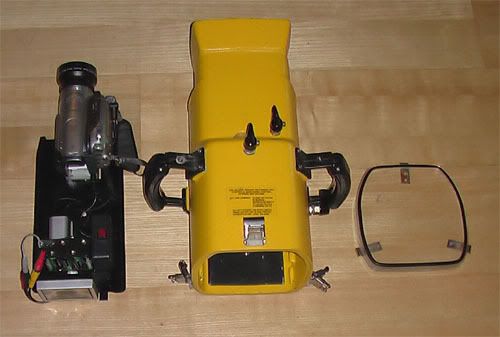
Used Hypertech housing (I believe it was made for a Hi-8 camcorder) from Ebay - $79
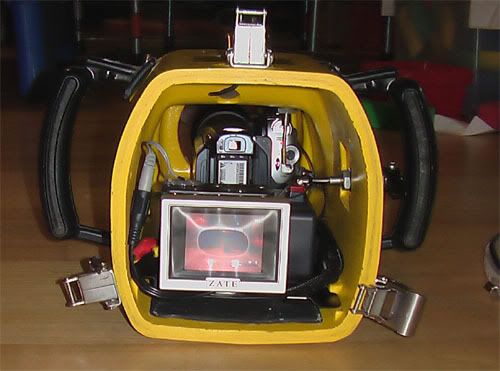
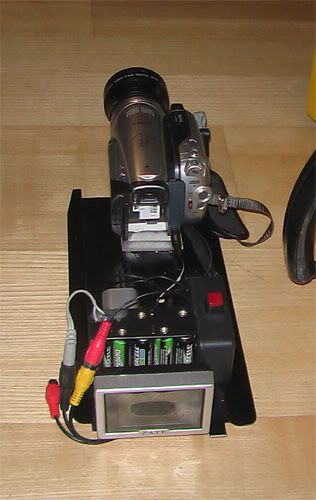
Zate 2.5" monitor - $51

Housing4small.jpg


Because the camcorder goes into stand by mode shortly after turning it on, I wanted a power on/off switch. Being that the HV20 has a dial type power switch, I couldn’t modify a way to turn the switch while the camcorder was inside the housing. I rigged the battery to be mounted externally from the camcorder so that I could wire a push button on/off switch in line with the camcorder. To turn the camcorder on and off, I leave the camcorder dial switch in the “on” position, so when I turn the side control knob it pushes the switch, sending or cutting power to the camcorder.

Housing2small.jpg


Housing3small.jpg


My initial tests in the pool have been very successful, not a drop of water and the controls work great. It is almost right on neutral buoyancy in the pool, so it should be a hair positive in the ocean. Unfortunately, due to my schedule, it will be at least a month before I can get it down to the beach for a test run in the ocean. I will do at least one dive without the camcorder, just to be sure, but I don’t anticipate that it will leak at depth as the increased pressure on the rear plate should increase the seal.

Any comments or suggestions to improve it would be greatly appreciated.

I posted in the DIY forum with more technical information
Here
 
Looks good to me. Mark
 
Looks good and a great idea before diving into an expensive housing. The HV20 has been getting top reviews, I'll be interested to hear how it performs underwater.
 
DUDE! Hats off you you! I'm impressed! That's what I call dedication - and all that trouble despite your not even being sure if you'll like doing this. Hmmm... I guess you will stick to it, since you're already spending so much time with this hobby.
2 thoughts (it's all just personal preference - so no need to agree or disagree):
  • I personally prefer to have the camera's buoyancy slightly negative (around 1kg). That way it's not floating around like a balloon in front of my face when I need both hands and have to let it go. Just be sure to attach it with a quick-release properly! Also: this makes it much easier to just put it on the ground while I set up a shot, prepare additional lights, move a rock away or such.
  • When you test - you could use a cigarette placed on the lowest point in the housing. That is a really good indicator - immediately visible - as to any liquid entering the housing.
As you mention: if housings (and lights) flood, they generally do it in the shallow portion of your dive due to lesser pressure - either on the way down or - more frequently - during safety/deco stop. This way I've lost two lamps on deco stops - that were fine during the entire deep portion of the dive. GOOD LUCK!


Thanks. Once I get it down to salt water, I will fine tune the buoyancy and get it slightly negative, as I have heard others state a similar preference.

Interesting idea on the cigarrette. I will have to take up smoking..... (just kidding). I will bum a cigarette from my chain smoking neighbor and try your suggestion.

Thanks again
 
I like your persistence and your DIY-methods. A few pointers for the fine tuning you mentioned:

Trimming the buoyancy weights can be tricky and take a few submersions, but it's really worth it. I guess, that your setup as it is now will be heavier at the front (camera weight) than at the back (battery weight)? This would mean that your lens keeps pulling downwards. You can check it in the bathtub. It may not seem a lot at first, but when it gets too much you eventually might find that you can't point the camera at the subject without some muscle twitching. That's obviously unacceptable!

1st: Place weights as far down as possible (perhaps lead from an angler shop). On your setup, I'd suggest whacking Velcro to the entire plate to hold the weights in place (you have plenty of space), before actually drilling any holes. Determine to center of gravity your setup in the bathtub. Thanks to Velcro you'll be able to make minute, yet sturdy changes until you have the correct positioning. Then, once at the beach all you'll need to do is add or reduce at that position to compensate for salt water.

Hope this helps. Good luck and fun!
 
https://www.shearwater.com/products/teric/

Back
Top Bottom