Filter modification assistance

Please register or login

Welcome to ScubaBoard, the world's largest scuba diving community. Registration is not required to read the forums, but we encourage you to join. Joining has its benefits and enables you to participate in the discussions.

Benefits of registering include

  • Ability to post and comment on topics and discussions.
  • A Free photo gallery to share your dive photos with the world.
  • You can make this box go away

Joining is quick and easy. Log in or Register now!

widget

Contributor
Messages
712
Reaction score
59
Location
South Africa
# of dives
5000 - ∞
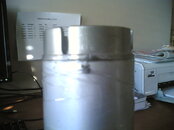
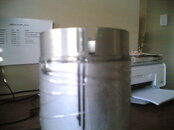
Okay after some work we came to this (3 pics) conclusion.

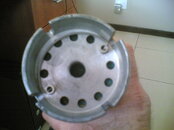
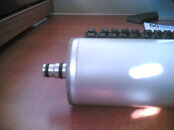
We removed the filter top and machined an aluminium top to fit, its machined to seal inside the tube with a small lip to co-incide with the external tube dimensions.

The lug extends about 15 mm into the tube and is pinned in place with two (one on either side) pins, the idea is that we can remove the pins when the filter is spent, pull out the aluminium lug, refill and re-use the lug again, we will line up the pin holes by the lines we drew in the casing and lug, or we may have two or three lugs machined and just rotate them, so we will always have one ready packed filter.

We then drilled and tapped two small hoes at the top so we could insert the pull handle to get the filter out of the housing.

The issue we have now is length, presently we think the lug is too long (high) as it extends beyond the normal new filter length by about 6mm, so the cap of the housing wont screw down fully, but we will just machine off a bit on monday and try again, I think the housing cap just needs to snug down on the top of the filter cartridge and this will keep it in place.

It wasnt as difficult as I expected, but I think you need access to a lathe to machine a closure for the filter otherwise there is just no way to seal the top - or none that I could see or my mate think of.:D

Well, what do you guys think, will it work, any suggestions?
 

Attachments

  • 06092008(002).jpg
    06092008(002).jpg
    286.7 KB · Views: 134
  • 06092008(003).jpg
    06092008(003).jpg
    355.7 KB · Views: 126
  • 06092008(005).jpg
    06092008(005).jpg
    376.8 KB · Views: 136
Widget, I have no knowledge of this particular filter but some questions come to mind. What is the direction of flow? The "top" cap of the cartridge in the pic looks like a typical bottom(input) fitting. That would not be unusual but until this is answered I can't suggest much except that the output (whichever that happens to be) needs to be sealed with an O ring or other means to prevent air leaking around the cap. The work itself looks good. Always nice to see this kind of initiative.
 
Hi Pescador, the flow is upward, (ie) the clean air exits out of those holes at the top, - we had to make those small cut aways in the lug so the clean air could pass through and out when the filter cap is snugged down.

I posted a pic below of the entry end - this filter has a male end piece which seals down into the filter housing body, this is o-ring sealed so air has to pass through the filter - we didnt think it was necessary to put an o-ring at the exit end because even if there was a slight leak here, the air is already passed through the filter - or is my thinking wrong here?

My biggest concern was keeping the filter "plugged" in, if the length is not right, the air pressure may lift the cartridge out of the sealed plug and allow "contaminated" air through - hense been a little pedantic about getting the length right so the filter housing cap snugs down on the body and holds the cartridge in place against the air pressure.

If we get it all right, we may have to make a type of jig to cut all the filter cartridges at the same length when opening, so the lug completes the length correctly.

Even if we dont get it right, its quite an interesting project which has kept me thinking (and learning a bit more about filters etc) over the last few days.
 

Attachments

  • 06092008(004).jpg
    06092008(004).jpg
    328.5 KB · Views: 182
I recall the British filters which look very much like the above. However, the air flows through the top, then down and out through the O ring sealed neck at the bottom. Regardless, I think that you are saying that the input on your setup includes a neck which is ring sealed to a thick boss on the bottom where air enters the filter and the output air just sprays through the slots to be ducted through the bottom cap or top cap. Instead of pins, the Brits installed a large spring to hold the filter cartridge cap in place. As you pointed out, the length is crucial in order to keep everything rigid and to prevent air pressure from spitting out that filter cartridge from its socket. In some quarters, the ability to eject the filter might be considered a safety feature but best practice is just keep everything tight and not worry about something so far fetched. I would say that you have learned a lot and appreciate your sharing this information with the board.
 
Last edited:
For those out there that don't have access to a machine shop to do this themselves, GMC Scuba sells the parts to convert the Bauer towers to a repackable one.

You would need to buy the adapter to convert from Bauer to Mako style filters, and the stainless steel repackable filter canister.

Towers
 
Widget, proceed quickly when repacking. Vaporshell 13X will begin to adsorb moisture quickly when exposed. Here is another idea to put the old cartridges to work. Dump all the spent desiccant into a flat pan. Bake in an oven @ 450-500F for six hours. When the stuff cools to touch, pour into a sealed container. I have tested the effectiveness of this and Vaporshell can be 95% regenerated. Worthwhile if you have a lot of the stuff available. As for charcoal, use only fresh activated carbon.
 
Widget, proceed quickly when repacking. Vaporshell 13X will begin to adsorb moisture quickly when exposed. Here is another idea to put the old cartridges to work. Dump all the spent desiccant into a flat pan. Bake in an oven @ 450-500F for six hours. When the stuff cools to touch, pour into a sealed container. I have tested the effectiveness of this and Vaporshell can be 95% regenerated. Worthwhile if you have a lot of the stuff available. As for charcoal, use only fresh activated carbon.


Okay, great I didnt know that.

On the directional flow you spoke about in your other post, I am just going to re-check this, I saw a small arrow on the cartridge pointing upwards and just "assumed" this was the flow direction............but, your post got me thinking (I guess it (the arrow) could mean anything) so I will just check it myself tomorrow.

Yup, I agree with you, the length is critical, so tomorrow I will machine it down to the same as original filter length, then I can start working on the repacking.

I was wondering about the dessicant as the supplier here only sells it in 10 kilogram bags which is a heck of a lot of dessicant I will have laying around if things dont work out :D ) but now thats sorted as I will start by baking the old dessicant,(thanks for the tip) - I must have 20 or more old filters laying around here.
The activated charcoal is quite easy to come by (and its available in small quantities) so thats not a problem, but I will have to source those wads that seperate the media, I havent found a local supplier for them yet, or is it possible to re-use them? Would it be an issue?
 
The wads can be reused; if dirty with carbon hand wash and air dry. Packing can be made from dacron felt which should be available in 1/4 inch or 1/2 inch thick sheets. To cut new discs it will be necessary to make or remake a hole cutter with sharp knife edge. Place the sheet on a wood plank and use a drill press to cut new discs. If the edges of the first run cut discs are ragged or if the felt sheet tends to twist under the blade then it will need to be "trapped" between wood or stiff plastic sheets. Just drill the correct holes into the overlying material. Place the sheet with holes over the felt. Run the saw into the same hole(s) in the overlying plastic or wood to drill more discs. Otherwise, it may be necessary to order precut discs from abroad.

Look more closely into the desiccant as to what type, price, shipping and the lot. Desiccant cannot be packed into "bags". A plastic bag will leak moisture into the chemical. The desiccant should be stored in thick plastic jugs with a screw on cap. Dessicant can be tested. A crude test is to place a few drops of water on the material and observe whether it heats up. Desiccant should be capable of adsorbing 20% of its weight in water. A precision scale such as used by ammo reloaders can be used to measure the exact status of the material on hand. Place a few grams of material on the scale and immediately adjust the scale to balance. Record the weight. Later, determine the new weight of the desiccant and do the math. The best desiccant is a molecular sieve. The most well known in the US is Vaporshell (Linde) 13X.

The flow entry point is the desiccant. Observe the order of stacking in the filter cartridge.
 
Looking around on the net I found that activated alumina is sold in bags. The desiccant used in your commercial cartridges is probably molecular sieve and this is what you should try to obtain. This material goes under various names but the most common are Vaporshell 13X, synthetic Zeolite 13X, Multisorb desiccant (blend), molecular sieve 13X, sodium alumino silicate 13X and so forth. In the USA, this material is sold in pails or drums. Small quantities are available (for a price) from Lawrence Factor and this is the "Vaporshell" brand.
 
Molecular sieve is used in some industrial processes. This stuff is sold to the glass manufacturers for purposes of removing moisture from between the insulated panes. It costs less than half that charged by LF for Vaporshell. You might want to make a wider search in your area. Don't buy "dust", the particle size should be about 8X12 mesh which I think is about 2.0 mm granules. I could be wrong.

CRL 5 Pound Molecular Sieve Adsorbent - eBay (item 370031986808 end time Sep-08-08 12:54:18 PDT)
 
https://www.shearwater.com/products/swift/

Back
Top Bottom