ScottZeagle
Contributor
- Messages
- 2,353
- Reaction score
- 72
As many of you who read this forum know, we have had a weird issue with bubbles coming from the inflator module. This is merely cosmetic, and causes no threat to the diver at all, but here is an easy way for your local Zeagle service tech to fix it. I am basically going to post the email here that is going out to all Zeagle dealers, with some slight picture notations since the attachments can't be placed in order. Just count the pictures left to right and all should make sense! Thanks, Scott
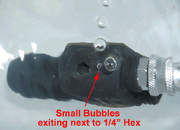
Zeagle has received reports that small number of inflators delivered to Zeagle dealers have exhibited a very small leak of bubbles from an area around the ¼” Hex wrench hole in the 112-1010 Valve Module as seen in picture 1. Zeagle investigated and found that the problem is excess plastic in the 0-ring groove that prevents the O-ring from sealing completely. The leak is not dangerous in any way and the leak will never increase above the small rate seen. However, it is something that a diver does not want to see coming from their inflator.
Upon request, Zeagle can exchange the 112-1010 Valve Module for Zeagle dealers with a new module, but this e-mail describes a simple solution that can be performed in minutes and will fix the small leak easily.
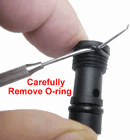
After removing the 112-1010 Valve Assembly from the Power Inflator using a ¼” Allen wrench, remove the top O-ring (Picture 2) taking care not to scratch the O-ring groove. Clean any grease from the O-ring groove with a lint-free cloth.
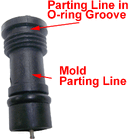
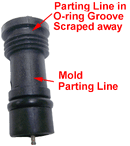
When the Assembly is cleaned and the O-ring is removed, you can see the excess plastic left by the molding process on each side of the plastic body. The leak is created when the excess plastic extends across the bottom of the O-ring groove as indicated in the picture 3.
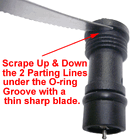
The excess plastic in the O-ring groove can easily be removed by scraping a thin sharp knife blade up and down over the excess plastic until it is rubbed away. (Picture 4)
Picture 5 shows how the bottom of the O-ring groove should look when the excess plastic is removed.
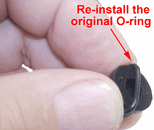
After the excess plastic on each side of the top O-ring is removed with the sharp blade, re-install the lightly lubricated O-ring onto the Valve Assembly (picture 6) and re-install the spring and Valve Assembly back into the Power Inflator. DO NOT OVER TIGHTEN THE VALVE ASSEMBLY WITH THE ¼” ALLEN WRENCH. As soon as you feel the Valve Assembly come to a stop, STOP TURNING IT. Over tightening the Valve Assembly will not stop any leakage and can permanently damage the Valve Assembly.
Test the Power Inflator for leaks and operation and re-install it onto the BC.
Attachments
Last edited:


