The New Scuba Wagon... 2016 350 Transit XLT

Please register or login

Welcome to ScubaBoard, the world's largest scuba diving community. Registration is not required to read the forums, but we encourage you to join. Joining has its benefits and enables you to participate in the discussions.

Benefits of registering include

  • Ability to post and comment on topics and discussions.
  • A Free photo gallery to share your dive photos with the world.
  • You can make this box go away

Joining is quick and easy. Log in or Register now!

When are you going to install the shower?

P1050710_zps14a1b4b9.jpg
 
One of the negatives about my Sprinter was that I was unable to convert it back easily to being just a cargo van. The tank rack was solid but there is no way it can come out without destroying it. While infrequent, there has been at least once I wish I could have removed to the tank rack to move something big. Consequently, I'm designing this in a way to be able to remove the rack and table rather easily. So, Here is the Bottom portion. The corner braces are screwed through the plywood into the steel sides of the van (drilled and tapped). After I put it down, I got on it and bounced a few times. I figured if it would hold me, it would hold all the tanks I need it to. It's as solid as a rock, and I haven't even put in the the bottom screws yet.

upload_2016-8-23_19-34-28.png


Tomorrow, I'll put in the shelf and hopefully the table top. If I have time, I'll paint it as well. I also have the two tool boxes to install. I measured and laid this rack out well. It will hold four ponies and four full sized tanks with or without regs attached. I'll be putting in enough eye bolts and straps to hold another 6 tanks vertically with or without a BC attached. I have a PVC tank holder that can slide under the rack and hold another 12 tanks.
 
It's been a couple of weeks since I got to work on the Transit... some how I keep catching myself trying to call it the Sprinter! Old habits die hard. @MidnightParrot came into town and we decided to drive all over Florida trying to avoid Invest99L which later became Hurricane Hermine. That was a stalker of a storm and we had rain from it every single day she was here. This taught me a few things. I like having a dedicated charging station. I didn't realize how much I relied on it until it wasn't there. Same for the tool boxes. Same for the shelves/table. The trip also showed me how right I was on clearances with the Sprinter. I had installed the shelf a good two inches higher and realized it was just too much wasted space. I was also amazed at how wet the van stayed. Sure, we had non-stop rain, but I think a dehumidifier would be a nice touch.

So, here are some pictures of the tankrack/shelf/table assembly.

upload_2016-9-11_19-46-22.png


upload_2016-9-11_19-46-35.png


upload_2016-9-11_19-46-47.png
 
If you saw my Sprinter, you know I had two tool boxes installed in it. Day before yesterday, I pulled out the first one and put it into the Transit. I didn't like how bouncy the 1/2" plywood wall was. It just didn't seem stable enough, even without the drawers, so I thought a bit. I decided to put in a brace behind the plywood. I wanted something particularly strong, so I went with a 1x6 Oak board. I had found a far more stable hanger while looking around Lowes. Most tool boxes have a lip that you can slip over the lip of another tool box to hang it there. There are limits and I've seen a number of these stressed beyond sanity. However, catching the lip and then bringing out the bottom of the box and anchoring into that gives me not only stability and a box that doesn't always drift open, but it also helps to support the weight. Nothing in this van has a straight line, so I had to get creative. I used a poly board as a spacer between the Oak board and the frame. I took great care in making everything level and then drilled five holes into the frame and installed stainless 8mx1.25 rivet nuts. I did have a problem with one of them and had to grind off the head and install another support bolt. It won't be seen, so it's no real big deal. Just a pain to deal with and I took a cue from that episode and ran a tap through all of the others. Sure enough, the riveting process creates a kink that needs to be cleaned up. The only bad part was that I had to remove the front inside driver's panel in order to gain access for the Oak board to be behind the plywood. That also meant that the front wire mesh support system had to be removed. Going forward often requires us to backtrack a bit. Here are some pictures from yesterday and today's work.

upload_2016-9-11_20-3-4.png


upload_2016-9-11_20-3-26.png


upload_2016-9-11_20-3-45.png


upload_2016-9-11_20-4-2.png


upload_2016-9-11_20-4-19.png


upload_2016-9-11_20-4-33.png


upload_2016-9-11_20-5-19.png
 
  • Like
Reactions: D_B
FWIW, I was going to have the tool boxes on either side of the van over the wheel wells. It really disrupted the flow of the rack/shelf/table unit, so I'm putting them both to port. Putting in the second tool box will be a lot easier now all the groundwork has been done. I'll just need to hang it, pop in the lower support screws and install the drawers. All the hard work has been done. There's still a lot more room in this Transit compared to the Sprinter. As for strength, I am certain that the loaded tool boxes could support me as well. I have no desire to test that out, though! :D :D :D
 
A few of you have probably seen my old 2005 Sprinter. I was proud of the old girl, but it seemed I was spending more time fixing it than having fun with it. It was time to trade up a bit, so I started looking. I have to say, I was sold on the Sprinters. Great gas mileage and very flexible, but there were a few problems. First, Elena was not comfortable in it mostly because it's a harsh riding van. Second, it had a lot of insulation.... even too much insulation. 5 to 6 inches all around, making it hard to stand fully upright in the van. Also, it's horrible above 75. You really had to drive careful and I think there was a governor keeping her below 80. Lastly, the noise level was high. It was a diesel, after all. I remember @Doppler commenting on that very thing one day as I drove up to Dive Outpost.

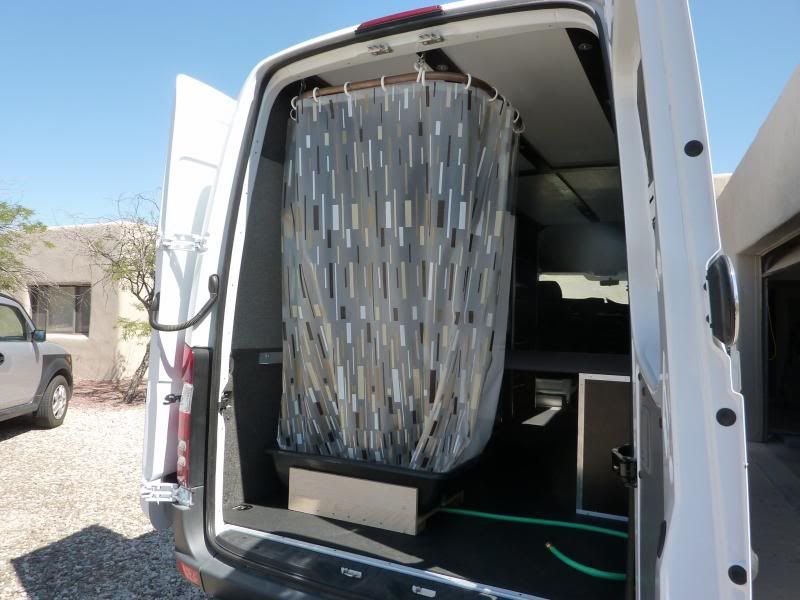
I test drove a number of vehicles, but I was sold on the Ford Transit, XLT. I negotiated the price over emails where they have to give me a good bargain and was pretty happy with the deal. So, this thread is about the build out. It's a good 36" longer, 8" higher and 8" wider than the Sprinter. Even @LowVizWiz will be able to stand up in it. I'll be adding insulation, a tank rack, the tool boxes and charging station that I had in the old Sprinter. I will be locating the drains at the end of the tank rack, stopping water from going into the cargo area. I won't be putting in the hard barrier between the seats and the cargo area, just a curtain. I'll also be adding in a house battery and might put in a jump seat. This past week has been spent in planning and I've started to insulate/sheath the inside. Here's a few photos of my progress so far.

View attachment 378866

The 3/4" R5 Foam board is glued/taped to the flat metal.

View attachment 378867

Then R11 fiberglass batting is added on top of that.

View attachment 378868

Finally, 3/8" exterior glue finish plywood is put over the matrix.​

View attachment 378869

Here is the foam already fitted into the ceiling.​


Did you get that roof fixed up?
 
Did you get that roof fixed up?
Probably during DEMA when I am gone for a week. Let them pay for the rental in Vegas. :D :D :D

It's been cooler here in the Keys. I'm able to get more work done without overheating. Today, I installed the second Tool Box and had to straighten out one of the door slides.

upload_2016-9-13_18-49-54.png


I also installed my custom charging panel. It switches from vehicle power to shore power whenever the van is plugged in. I have the switching charging panel, the Full sine wave inverter and the smart battery charger attached to the wall and plugged into the AC. It's working as designed too, and all the gauges lite up nicely. All I have left to do is to install the house battery, the battery isolater and wire in the DC to get my van mostly operational. Every time I climb into the Sprinter, I am simply amazed at how claustrophobic it feels. I've still got quite a bit of swapping to do, but most of that is little stuff like supplies and hangers. I still have more to do with the ceiling, but that won't make the van more functional. I'm ready to go play.

upload_2016-9-13_18-59-48.png


A view inside my Switched charging panel.

upload_2016-9-13_19-0-47.png


upload_2016-9-13_19-1-8.png


The view from the Driver's Seat (over my left shoulder). I'll be able to check charging status at a glance now.
 
Probably during DEMA when I am gone for a week. Let them pay for the rental in Vegas. :D :D :D

It's been cooler here in the Keys. I'm able to get more work done without overheating. Today, I installed the second Tool Box and had to straighten out one of the door slides.

View attachment 381577

I also installed my custom charging panel. It switches from vehicle power to shore power whenever the van is plugged in. I have the switching charging panel, the Full sine wave inverter and the smart battery charger attached to the wall and plugged into the AC. It's working as designed too, and all the gauges lite up nicely. All I have left to do is to install the house battery, the battery isolater and wire in the DC to get my van mostly operational. Every time I climb into the Sprinter, I am simply amazed at how claustrophobic it feels. I've still got quite a bit of swapping to do, but most of that is little stuff like supplies and hangers. I still have more to do with the ceiling, but that won't make the van more functional. I'm ready to go play.

View attachment 381578

A view inside my Switched charging panel.

View attachment 381579

View attachment 381580

The view from the Driver's Seat (over my left shoulder). I'll be able to check charging status at a glance now.


Next time i come down to the Keys i need to bring my transit and let you work on it lol
Looking good!
 
Throw a couple of solar panels on top of that big roof and you'll be able to keep things charged whenever.. (well, whenever it's light out... and you're not parked in the shade...)
 
Today's project is installing the house battery under the driver's seat. Unfortunately, this AGM is just a little tall for the battery box. There's still a lot of clearance between the seat and the box, so I think I'm golden.

upload_2016-9-14_13-29-32.png


What I found...

upload_2016-9-14_13-31-24.png


Slide the main battery to the rear and the AGM slips right in...

upload_2016-9-14_13-32-14.png


As you can see, it's a bit high. The "rust" on the terminals is actually copperslip, a copper based anti-seize.

upload_2016-9-14_13-34-14.png


The retainer fits over both easily. The cover will be stretched a bit, but I think it will do just fine. Now to wire in the isolator and the DC side of the Switched Charging Panel.
 
  • Like
Reactions: D_B
https://www.shearwater.com/products/perdix-ai/

Back
Top Bottom