Help Identifying Bauer Compressor

Please register or login

Welcome to ScubaBoard, the world's largest scuba diving community. Registration is not required to read the forums, but we encourage you to join. Joining has its benefits and enables you to participate in the discussions.

Benefits of registering include

  • Ability to post and comment on topics and discussions.
  • A Free photo gallery to share your dive photos with the world.
  • You can make this box go away

Joining is quick and easy. Log in or Register now!

The filter change interval is dependent on the size of the filter (amount of desiccant), the output of the compressor, and most importantly the temperature of your compressor room. The first two are fixed numbers but the latter, temperature, varies considerably therefore your filter will not have a fixed service interval.

If you look at the Bauer filter air processing chart above a P0 filter is rated for 3200 cu. feet at 68 F separator inlet temperature which is the temperature of the air entering your triplex filter housing. If the compressor is properly installed and cooled this translates into a compressor room ambient temperature of 53 F. So unless your compressor room is cooled to 53 F you will never see 3200 cu. feet of processing capacity.

Your best case scenario assuming your compressor room is maintained at 53 F and your compressor has a free air output of 8 cfm (not scfm) would be:

(3200 cu. ft/8 cfm)/60 = 6.7 hours. If you're pumping at a higher temperature it all goes downhill from there because the amount of moisture carried into the desiccant rises exponentially with temperature.

Looking at the Bauer temperature correction factors below one can see that if your compressor room is 77 F your filter processing capacity will fall to 6.7 x 0.43 = ~ 3 hours. Warmer than that and capacity falls off further exponentially.

In other words as Jim suggests you will need to purchase a larger tower if you want to keep your compressed air dry and free of volatile organic compounds. Your P0 is undersized for the output of that compressor.

I agree that if you can afford it go for the 30 inch tower and put a visual humidity indicator downstream. When the humidity disc hits 20 % change out your cartridge. That way you won't have to keep track of temperature and run time.
 

Attachments

  • Bauer Filter Temp Correction Factors.pdf
    7.8 KB · Views: 448
Thanks guys for the input I just check it has mineral oil so IM gonna change to synthetic so before I even try and get started IM gonna do a full service and see if funds are available for the tower thanks again IM a total newb at the high pressure stuff but very quickly to learn and very handy 4th generation trucking company owner/ mechanic
 
I think you said the unit has very low hours but you might want to pull the final stage head and check the valves for carbon buildup which is seen with the mineral oil use. If heavy carbon on the valves you might have problems with the oil switch. The torque specs for the head bolts are in the manual but if I recall they are 18 ft. lbs for the 8 mm bolts.

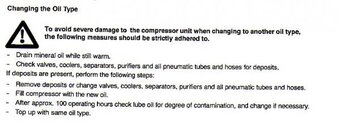
If the valves are clean then follow the standard Bauer manual instructions below or some modified version thereof. I personally just run the first oil change for 25 hours then drain and refill.

These companies sell the Chemlube 800 trimellitate ester that Bauer recommends but just rename it. The oil was developed specifically for breathing air applications for Bauer USA.
https://www.augustindustries.com/shopdisplayproducts.asp?id=26&cat=Lubricants
Compressor Supply & Consumables - Oil (Nuvair 800 = Chemlube 800)
 

Attachments

  • Bauer Mineral to Synthetic Oil Change Instructions.jpg
    Bauer Mineral to Synthetic Oil Change Instructions.jpg
    25 KB · Views: 137
Yes there are six of them with the acorn nut. I trust you have the workshop manual for the compressor?

Odds are if there is truly only 16 hours on the compressor you can just do a mineral to synthetic change without a valve inspection.

Run it up warm, drain the mineral oil fully, replace with synthetic, run for 25 hours, and repeat. If there is no particulate matter in the synthetic you are good to go.
 
I don't have it I was going to download it when I got home out of town working till tomorrow he said he filled the banks 5 times 4 437cf 6000psi tanks I believe what they are then just used the Compressor had a log nook of the hours ran which was 16 but I am going to install an hour meter as well does the head have a head gasket
 
I don't have it I was going to download it when I got home out of town working till tomorrow he said he filled the banks 5 times 4 437cf 6000psi tanks I believe what they are then just used the Compressor had a log nook of the hours ran which was 16 but I am going to install an hour meter as well does the head have a head gasket

First stage has two gaskets that sandwich the reed valve assembly. You are probably going to damage or destroy one or both when you take it apart. The allen head bolts require a 6mm allen on all stages. Second stage has no gasket but the groove on the under side will probably have rtv sealant. Note that the head has been peened at three points around the inlet valve. This prevents it from backing out while in operation. The final stage has no gasket. Note that the inlet valve is NOT peened. There are discharge valve tensioning studs under the acorn nuts on both 2nd and final stage. Although they really don't need to be loosened during removal of the head, they have to be backed out several turns before replacing the head.
 
Since there is no gasket on the final stage it is much easier to just have a quick peak there and odds are if the valves are clean so are the rest. If you really only have 16 original hours I'd just do the oil switch and be done with it.

One other point to add to Craig's post is to not disturb the final stage discharge valve (friction fit) if you are just doing an inspection as you'll likely damage the seal between the stage head and valve. This is an FKM seal (i.e Viton) due to the heat and pressure at that point and the seal is very susceptible to damage. I think it is an 016 FKM duro 90 but best to get the OEM seal from Bauer rather than some cheap brand that will give you trouble. Do not use nitrile (Buna) rings on any of the stage's discharge valves. They should all be FKM.
FKM - Wikipedia, the free encyclopedia

In order to remove the intake valves you'll need the Bauer tool if you don't have one. It will fit into a 24 mm socket.
https://www.augustindustries.com/shopdisplayproducts.asp?keyword=bauer+tool
 
Ok thanks for the heads up I figured it would have some type of gasket and it would most likely end up being garbage during removal I had my wife go check it says on the PO filter 350 bar when I got it he just started it do just a few moments and I laid my hand over the intake and it was sucking in air so I figured it does build air but how can I check to see if it will build pressure up to at least enough to fill a dive tank don't want to but a tank on the whips cause it hasn't been used in some time and IM sure the filter is shot
 
You can empty an aluminum 80 and time how long it takes to fill it from when the PM valve opens which is probably about 2000 psi. You can determine this by running the compressor and seeing at what pressure air starts to discharge from the fill whip. The flow should start about 1500 to 2000 psi as the pressure regulator integrated into the P0 filter appliance opens. It is at this point that you start timing.

In order to know the exact original output of your compressor (it may be on some of the documentation that came with it) you'll have to have the block model and rpm of the fan flywheel or HP of the motor. Bauer should be able to help you with this or Craig above might know the free air delivery (FAD) if you have the rpm. Bauer has charts to determine the FAD vs rpm.

If you have the scfm number or "standard" cfm that is the output when timing an aluminum 80 from 500 psi to 3000 psi. It is a marketing gimmick to make compressors appear a higher output than they truly are. You do the same procedure as above but start with 500 psi in the tank.

Personally I find the best way to measure the compressor's output is to just attach a flow meter to the P0 output fitting. Use some latex hose from Home Depot with a clamp and run it to a flow meter such as the FL-2062 here. The standard one comes with a valve so just make sure it is open before connecting it!.
Acrylic Flowmeters
 

Back
Top Bottom