Happy new year Scubaboard, I am working on a project to build custom SCUBA masks. My goal is to create a profile that is custom fitted to the face, doesn't leak, and is comfortable for long dives. I recently completed time as a Navy submariner and diver and experienced issues with my mask on long dives.
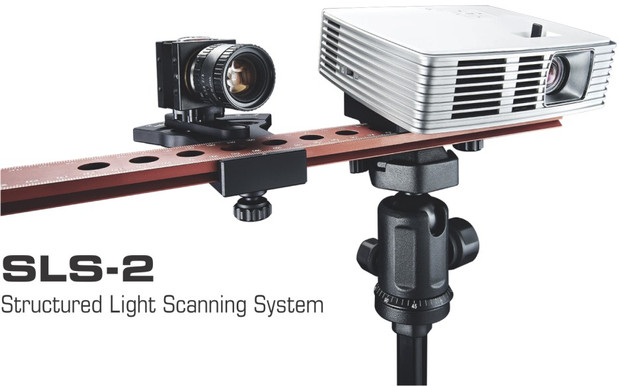
I have experience in product design and development and will use some pretty trick gear: a structured-light 3D scanner and a 3D printer. I am exploring ways of collecting facial scan data both in person with the scanner and remotely with pictures.
I hope you will enjoy following along as I work on this project. (I have my new 3D printer in the mail as we speak! :cool2")
Here's my progress so far: you can see more at my blog at www.reeftoridge.com
One of the first challenges that needs to be tackled for producing custom SCUBA masks is capturing facial data of customers and producing an accurate and useable 3D model from it.
At first I tried a program called "FaceGen". FaceGen uses photographs, typically two profiles and a frontal, and generates a 3D model of your face.

The models look great and they look like you, but when you inspect the actual mesh (the underlying 3D data) you see that a generalized shape is modeled and not an accurate one. FaceGen uses statistical data about human faces to generate it's models. Ultimately, the purpose of this software is to create realistic looking faces for uses in games and animation. Despite early promise, I was off to find another solution.
It was inconceivable to develop my own software solution, accomplishing that would be a significant start-up by itself, so I continued to search for software that took 2D images and converted them to 3D models. I found a product from Autodesk called 123D Catch. "Catch" as I'll refer to it is a free application that takes images and creates 3D models from them. To accomplish this, the user takes a series of high resolution photographs around a stationary object. The better the photos and the more of them, the better the 3D model. (Autodesk 123D Catch | Generate 3d model from photos) Here's an example of the photographs I took to create a test model of my face:

Each was taken with a Canon point-and-shoot, so nothing fancy. The images are taken in good light. I remained perfectly still and my wife simply rotated around me with the camera, trying to remain roughly equidistant from my head. I included a scale in the image, each circle is exactly one inch. This would be used later to scale the model.
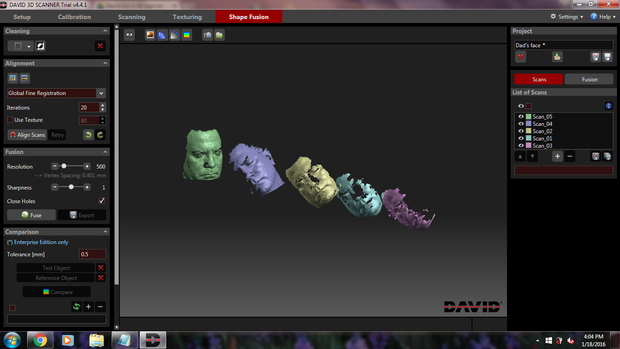
Once the images are on your computer, you simple upload them into 123D Catch and the image processing is handled on Autodesk servers. Here is a screen cap of the raw 3D model output from 123D Catch, which can be exported to a standard 3D mesh format.

At this point I was pretty amazed, in the 123D Catch software this model could be rotated and zoomed. Now I needed a program that could take this data and export it to a useable format. I found a solution in Meshlab, a free program that allows the viewing and manipulation of 3D meshes. (www.meshlab.sourceforge.net) Underneath the 3D model above is something called a "mesh". Meshes uses hundreds of thousands, if not millions, of linked triangles to define a 3D model. Here is my face, viewed as a mesh:

And here it is as a rendered 3D model, after I trimmed the mesh:

Look at the level of detail. You can see the clear outline of the features below my nose, the shape of the bone of my brow and cheekbones. There are some aberrations, for example I don't have a wart-like bump on my nose. However, for the purposes of creating a custom mask, this is sufficient.
The last challenge was ascertaining whether this 3D model was dimensionally accurate. To do that, I took measurements on several of the prominent features of my face: the space between the cupid's bow of my lips, and the distance between my pupils:

I didn't have the processing power or a program capable of scaling or warping the model to achieve dimensional accuracy. To accomplish this task I hired a freelance 3D modeler through the website Upwork.com. (www.upwork.com) I highly recommend Upwork. You can hire freelance workers to perform almost anything you can imagine: 3D modeling, website programming and design, logo creation, and copy-writing. This is just a small example of the skills Upwork freelancers possess. These workers come from all over the world. I hired a gentleman and for 25 USD, he trimmed, scaled, and validated the dimensional accuracy of my model within one day. He also converted the mesh into a .STL format, which is required for 3D printing. For perspective, a brick-and-mortar 3D modeling company quoted 450 USD for the same task. Here is the completed 3D model, ready for 3D printing (loaded into another free program for validating 3D print models: netfabb)

To summarize so far: I set out with the goal of generating an accurate 3D model of my face using nothing but photographs. The intent is to allow my customers to remotely provide the data necessary to create a custom SCUBA mask. I am running a lean start-up operation here so low-burn (i.e. little $$) is key. So far I've strung together a series of free software packages and leveraged freelance skilled labor: 123D Catch, Meshlab, Upwork, and netfabb.
What do you think it would cost to print a 1:1 scale 3D model of your head? If you asked a brick-and-mortar shop, the cost is in excess of $1000. Can you imagine my disappointment if my model turned out to be inaccurate? $1000 out the door. For perspective, a Flashforge 3D printer itself costs $1000. Here comes another byproduct of the amazing "maker" revolution that we find ourselves in. A time when the online community of inventors, tinkerers, and makers are coming together to empower each other's projects. Enter 3DHubs.com. 3DHubs pairs people with 3D printers with people who want their models 3D printed. For $40, a fellow in Kansas 3D printed my face in ABS plastic and then acetone vapor-polished it to achieve a smooth finish.
Most home desktop printers are FDM, or Fused deposition modeling:

A plastic filament is feed and heated before being extruded on a flat bed. The extruder moves in the X and Z direction while the bed moves up and down in the Y direction. Here is a typical result:

Do you see the small ridges? This is a result of the printer resolution limitations. You could mechanically smooth these with sandpaper or a grinder but the fine print detail would be lost. Another option is called acetone vapor polishing. The print is immersed in a cloud of acetone vapor which effectively melts the surface layer of the print, achieving a smooth finish while maintaining details. Here is the finished 3D print of my face:

I won't typically print the heads of all of my customers but I wanted to this first time in order to verify the accuracy and dimensionality of my 3D data. From this head I'll take some measurements and pull a few clay models and fit them to my actual face. Here's a sneak peek of the mask model:

I hope you've enjoyed following along on this first technical post. I encourage you to explore the various websites, software, and services that I mentioned in this post. It is truly amazing what you can accomplish with open source digital technology and the trend towards community 2-sided markets like Upwork and 3DHubs. Check back for when I discuss the process of designing a mask around this 3D model. You can check out more at www.reeftoridge.com. If you have any questions or comments please post or send me a PM
I have experience in product design and development and will use some pretty trick gear: a structured-light 3D scanner and a 3D printer. I am exploring ways of collecting facial scan data both in person with the scanner and remotely with pictures.
I hope you will enjoy following along as I work on this project. (I have my new 3D printer in the mail as we speak! :cool2
Here's my progress so far: you can see more at my blog at www.reeftoridge.com
One of the first challenges that needs to be tackled for producing custom SCUBA masks is capturing facial data of customers and producing an accurate and useable 3D model from it.
At first I tried a program called "FaceGen". FaceGen uses photographs, typically two profiles and a frontal, and generates a 3D model of your face.
The models look great and they look like you, but when you inspect the actual mesh (the underlying 3D data) you see that a generalized shape is modeled and not an accurate one. FaceGen uses statistical data about human faces to generate it's models. Ultimately, the purpose of this software is to create realistic looking faces for uses in games and animation. Despite early promise, I was off to find another solution.
It was inconceivable to develop my own software solution, accomplishing that would be a significant start-up by itself, so I continued to search for software that took 2D images and converted them to 3D models. I found a product from Autodesk called 123D Catch. "Catch" as I'll refer to it is a free application that takes images and creates 3D models from them. To accomplish this, the user takes a series of high resolution photographs around a stationary object. The better the photos and the more of them, the better the 3D model. (Autodesk 123D Catch | Generate 3d model from photos) Here's an example of the photographs I took to create a test model of my face:
Each was taken with a Canon point-and-shoot, so nothing fancy. The images are taken in good light. I remained perfectly still and my wife simply rotated around me with the camera, trying to remain roughly equidistant from my head. I included a scale in the image, each circle is exactly one inch. This would be used later to scale the model.
Once the images are on your computer, you simple upload them into 123D Catch and the image processing is handled on Autodesk servers. Here is a screen cap of the raw 3D model output from 123D Catch, which can be exported to a standard 3D mesh format.
At this point I was pretty amazed, in the 123D Catch software this model could be rotated and zoomed. Now I needed a program that could take this data and export it to a useable format. I found a solution in Meshlab, a free program that allows the viewing and manipulation of 3D meshes. (www.meshlab.sourceforge.net) Underneath the 3D model above is something called a "mesh". Meshes uses hundreds of thousands, if not millions, of linked triangles to define a 3D model. Here is my face, viewed as a mesh:
And here it is as a rendered 3D model, after I trimmed the mesh:
Look at the level of detail. You can see the clear outline of the features below my nose, the shape of the bone of my brow and cheekbones. There are some aberrations, for example I don't have a wart-like bump on my nose. However, for the purposes of creating a custom mask, this is sufficient.
The last challenge was ascertaining whether this 3D model was dimensionally accurate. To do that, I took measurements on several of the prominent features of my face: the space between the cupid's bow of my lips, and the distance between my pupils:
I didn't have the processing power or a program capable of scaling or warping the model to achieve dimensional accuracy. To accomplish this task I hired a freelance 3D modeler through the website Upwork.com. (www.upwork.com) I highly recommend Upwork. You can hire freelance workers to perform almost anything you can imagine: 3D modeling, website programming and design, logo creation, and copy-writing. This is just a small example of the skills Upwork freelancers possess. These workers come from all over the world. I hired a gentleman and for 25 USD, he trimmed, scaled, and validated the dimensional accuracy of my model within one day. He also converted the mesh into a .STL format, which is required for 3D printing. For perspective, a brick-and-mortar 3D modeling company quoted 450 USD for the same task. Here is the completed 3D model, ready for 3D printing (loaded into another free program for validating 3D print models: netfabb)
To summarize so far: I set out with the goal of generating an accurate 3D model of my face using nothing but photographs. The intent is to allow my customers to remotely provide the data necessary to create a custom SCUBA mask. I am running a lean start-up operation here so low-burn (i.e. little $$) is key. So far I've strung together a series of free software packages and leveraged freelance skilled labor: 123D Catch, Meshlab, Upwork, and netfabb.
What do you think it would cost to print a 1:1 scale 3D model of your head? If you asked a brick-and-mortar shop, the cost is in excess of $1000. Can you imagine my disappointment if my model turned out to be inaccurate? $1000 out the door. For perspective, a Flashforge 3D printer itself costs $1000. Here comes another byproduct of the amazing "maker" revolution that we find ourselves in. A time when the online community of inventors, tinkerers, and makers are coming together to empower each other's projects. Enter 3DHubs.com. 3DHubs pairs people with 3D printers with people who want their models 3D printed. For $40, a fellow in Kansas 3D printed my face in ABS plastic and then acetone vapor-polished it to achieve a smooth finish.
Most home desktop printers are FDM, or Fused deposition modeling:
A plastic filament is feed and heated before being extruded on a flat bed. The extruder moves in the X and Z direction while the bed moves up and down in the Y direction. Here is a typical result:
Do you see the small ridges? This is a result of the printer resolution limitations. You could mechanically smooth these with sandpaper or a grinder but the fine print detail would be lost. Another option is called acetone vapor polishing. The print is immersed in a cloud of acetone vapor which effectively melts the surface layer of the print, achieving a smooth finish while maintaining details. Here is the finished 3D print of my face:
I won't typically print the heads of all of my customers but I wanted to this first time in order to verify the accuracy and dimensionality of my 3D data. From this head I'll take some measurements and pull a few clay models and fit them to my actual face. Here's a sneak peek of the mask model:
I hope you've enjoyed following along on this first technical post. I encourage you to explore the various websites, software, and services that I mentioned in this post. It is truly amazing what you can accomplish with open source digital technology and the trend towards community 2-sided markets like Upwork and 3DHubs. Check back for when I discuss the process of designing a mask around this 3D model. You can check out more at www.reeftoridge.com. If you have any questions or comments please post or send me a PM
Last edited: