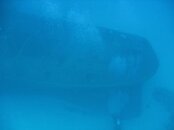
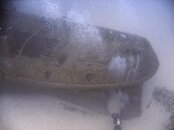
Correcting Colour Cast

Please register or login

Welcome to ScubaBoard, the world's largest scuba diving community. Registration is not required to read the forums, but we encourage you to join. Joining has its benefits and enables you to participate in the discussions.

Benefits of registering include

  • Ability to post and comment on topics and discussions.
  • A Free photo gallery to share your dive photos with the world.
  • You can make this box go away

Joining is quick and easy. Log in or Register now!

Well, ok, no raw. C'mon you can do a custom white balance. I can relate to low vis and murky water- did my DM course in the murkiest water of Southampton and Portsmouth Naval base, and to do that you need a slate and WB preset ability on your camera, which most cameras do, which camera do you have?

I don't dispute my camera does have manual WB, buried way down in Menus.

This also requires moving it off 'underwater mode' , so another ease of use loss :)
 
MWB might be a great tool for shots where you have time to do so, but under water a lot of things move around fast. You also need to set the WB for every noticable change in depth to have the best possible results.
Changing the WB all the time takes time and you dont neccesarilly have that time if you want to capture the subject.

That is my point.
I have also found that manual white balance often fails 'balance' , it struggles at
I used to use my worse dive slate, or even back of my hand .
 
If you have black or neutrally colored fins you can use them as well.
 
If you have black or neutrally colored fins you can use them as well.

Bright blue Avanti Quatro's with a wet suit, and bright yellow with my dry suit :)

However the problem was that it often came up with White Balance failed, that was against a white card.
Maybe just expecting too much at depth.
 
Bright blue WB should call for some awsome effects :p

Failed WB and then the subject is gone on top of it seems like fun tho..
 
Photoshop is a pixel editor for creating fantasies or compositing photos - Nice for HDR and studio stuff; not so much for underwater stills. It'll do what you need eventually though much harder than it should be...

OK, so you don't have an idea what Photoshop is and does... well, that's OK, as long as you are happy.

Photoshop is the top of the bill photo editor. It can do lots more than the very limited image correction facilities image 'management' systems like Lightroom offer... people who use both will notice some resemblances between the two because they are using the same base, but PS is the 'bid daddy' of all image editing. The standard RGB color mode Photoshop is working in does not have a 'temperature control' (I think that is what you refer to as being a 'white balance' tool), but if you want it per-se, you could use Photoshops Camera Raw plugin to get one. Or you could make a little round-trip to Lab color space, that works similar.

A problem with any 'global'correction method in RGB color space (channel blending, curves adjustment etc.) is that when you alter RGB values to change a color, you inherently alter the lightness of pixels. That is why corrected uw pictures are very prone to artefacting and colorisation, especially in the dark parts of the image. In the examples mentioned in the thread, you can always notice red contamination of the shades, even though the picture isn't that dark. And it's logical that happens, because you add 'red' light to the WHOLE of the picture, not just to the parts that need it.

There are 2 methods that don't suffer (as much) from this effect. One is by making use of the Lab colorspace, but for using it you have to have an understanding of how that space works. That's asking for too much for most PS-users.
The other one is a method in RGB space, which makes a luminosity map of the image that is colored in, and overlayed onto the original. That map makes sure that light patches in the picture get their share of red light. Let me describe it briefly:

1. open the bluecast image
2. copy it twice (ctrl-J)
3. fill the middle layer with 50% gray (shift-backspace) or (Edit -> Fill)
4. set the blending mode of the top layer to 'Luminosity' mode by selecting that in the upper left dropdown box in the layers pallette. The image will turn into a grayscale representation.
5. press ctrl-E to merge the top layer with the gray layer.
6. add an empty layer to the top of the stack
7. fill this top layer with bright red
8. set the top layers blending mode to 'Multiply' blend mode (thus coloring the luminosity map red)
9. press ctrl-E to merge the red layer with the L-map
10. set the resulting correction layer to 'Screen' Blend mode, to counter the blue cast of the image.

That should give you a decent starting point for further corrections. You can alter the transparency of that layer a bit, or you can clip a Hue/adjustment layer to it to colorize it to another shade of red/orange to counter the specific bluecast better...

some examples. The first two are using this RGB correction method, the one with the wreck has such a massive hue to it the only way I could make something out of it was using a Lab method...
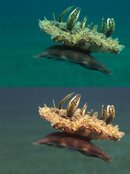
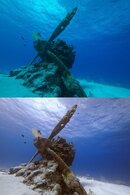
183DA0F6CDAA4433A202D94213A8ABBB.jpg E82014C4FE044C2F8E72F3F63858DDFD.jpg 14E5574944FA42FCB64F98A26CFCEB2B.jpg 14992066B49844D3A5E0F3AA674AFA85.jpg
 
  • Like
Reactions: dfx
Pretty familiar with the method you describe ... There are even atn scripts to do this in one-click.

Be interested if you care to share more on using LAB space to do this correction.
 
That is my point.
I have also found that manual white balance often fails 'balance' , it struggles at
I used to use my worse dive slate, or even back of my hand .

That is because an automated WB tool is assuming 'normal' light to be present, it assumes the medium through which light travels has little effect, and it assumes that surfaces will reflect the light according to their properties. So light that has all visible wavelengts present, and if you take a median value on a picture it should become gray... auto-WB is not very smart.
Under water, only the last assumption is true, surfaces will reflect the light that is sent to them in a regular way. Problem is, that the light that is falling onto the object lacks the red, orange and yellow components depending on the depth you are at. Those wavelengths cannot penetrate water to that extend. And the little light that is reflected from the object suffers the same degrading effect, because it has to travel trough another column of water to your eye/camera. That water can also be contaminated with sludge or algae, giving the picture a greenish or yellowish hue.
What WB-correction does, is alter the relative amounts of the red, green and blue components of an image. If there is no red component, WB will go crazy. Most methods described use the green channel of an image to substitute the red channel (logical choice, because the green channel also takes part in forming 'yellow' as a color), but that is not a very precise method. It will turn the parts of your image that should be red a shade of yellow/orange (because mixing green and red equally gives yellow), and when you try to correct that, the green parts will become too magenta. This effect is mostly seen in the darker parts of the image, the shadows take on color they should not have. And it is inherent to using a RGB based colorsystem.
Best way to get color into an underwater picture is to bring your own lightsource down to make sure you have some red/yellow light to work with. Minor WB adjustments can be made then. Everything else, however advanced the method, is just damage control.
 

Best way to get color into an underwater picture is to bring your own lightsource down to make sure you have some red/yellow light to work with. Minor WB adjustments can be made then. Everything else, however advanced the method, is just damage control.

I started with compact .. went bigger, then back again, then added strobe, WA lens and then modelling light ...

Just sold my strobe & modelling lamp as the whole set up was interfering with enjoyment factor of the dive ... too much kit.

Going to revert to a compact ... with nothing else. to me I'm there to dive, photography is something that happens not the focus of the dive.

Thanks for your feedback though ... informative.
 
https://www.shearwater.com/products/perdix-ai/

Back
Top Bottom