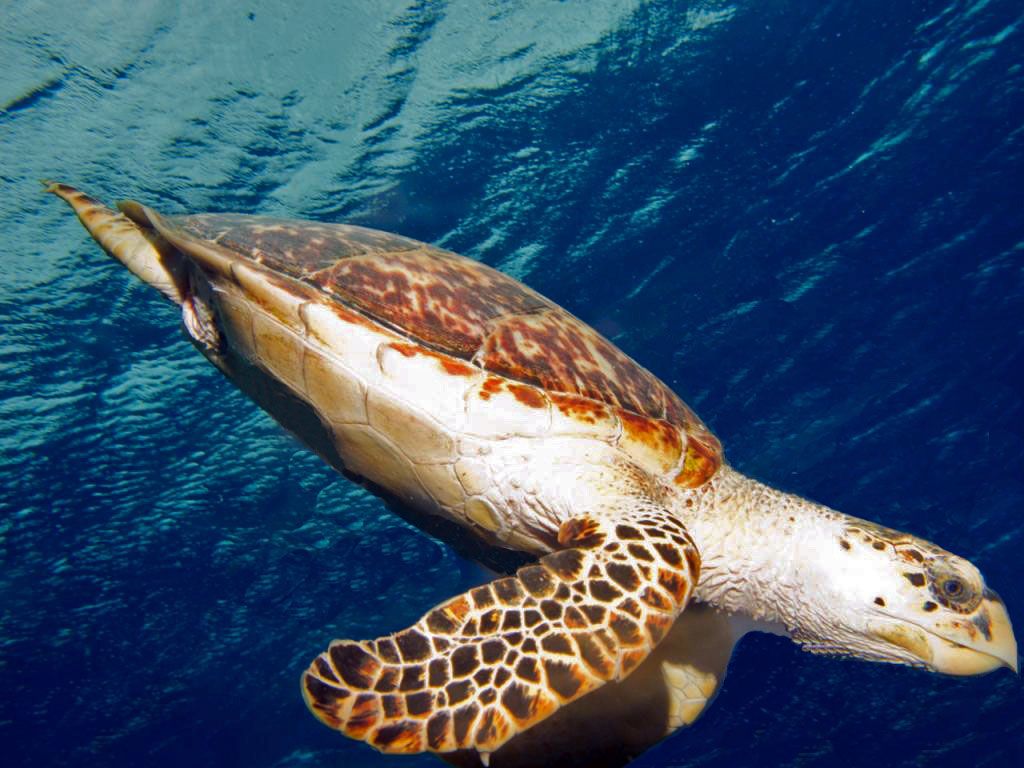
Can I fix this pic?

Please register or login

Welcome to ScubaBoard, the world's largest scuba diving community. Registration is not required to read the forums, but we encourage you to join. Joining has its benefits and enables you to participate in the discussions.

Benefits of registering include

  • Ability to post and comment on topics and discussions.
  • A Free photo gallery to share your dive photos with the world.
  • You can make this box go away

Joining is quick and easy. Log in or Register now!

volvorules

Registered
Messages
63
Reaction score
18
Location
CA, USA
# of dives
50 - 99
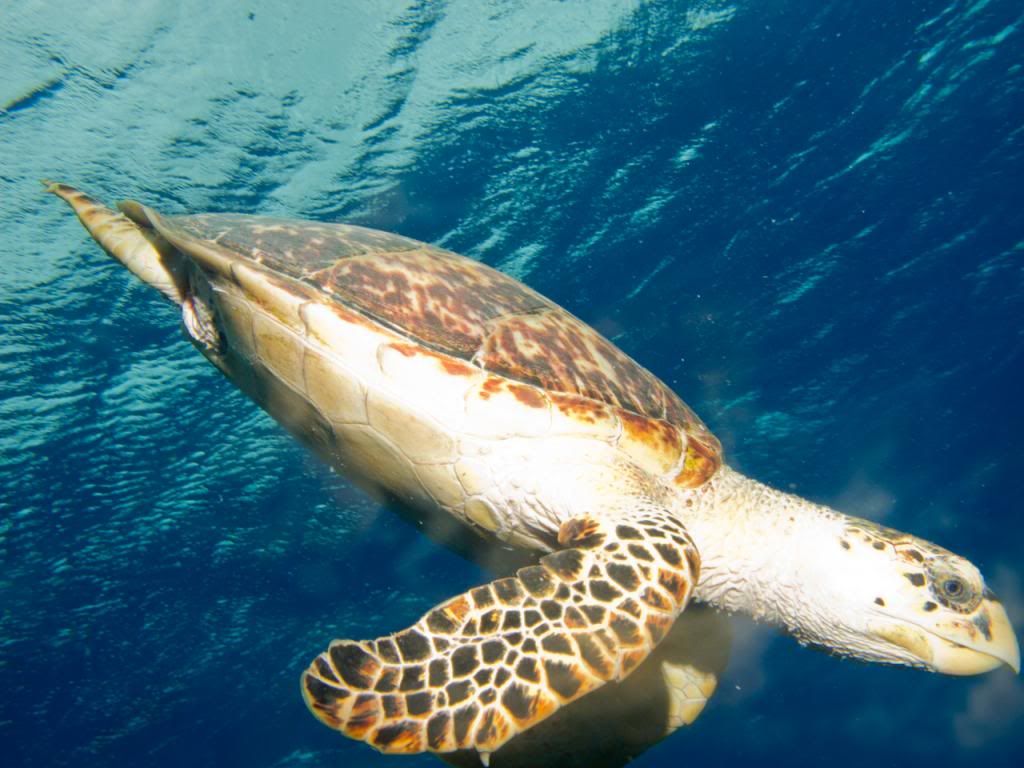
Took this in Cozumel last week, this little turtle was catching his breath while we were on our safety stop, and then dropped back down to the reef right past me! I wasn't ready and didn't have a chance to do anything but snap away, and got this pic. I think the blurry spots are from condensation/spots on the inside of my Canon housing, they seem to reoccur towards the end of each dive, but that's another problem. Does anyone have any tips or tricks to get rid of the blur and make this picture awesome?

Thanks in advance!

20130323-IMG_0884_zps92724d0e.jpg
 
Yes, but it takes time and effort.. Photoshop has a tool for that kinda job :)
 
You can use the clone stamp in Photoshop to fix most of the blue water areas. You can also "clone" using the smart brush tool. I did for the bottom of his neck since I wanted to capture the skin texture. Later versions of CS have a smart paint tool that might be useful - one thing it would do is add more water to the bottom/right side if applied carefully. It mimics the surrounding pattern so you wouldn't be able to tell either.

The problem will be under his neck - the left fin and area in front of it. as there's nothing to clone from. Very carefully you could paint it blue by cloning from the background nearby in small segments - most people won't be able to tell. And the spot immediately behind his flipper. The one farther back you can clone from the area next to it - it will be false but no one will be able to tell.

Just to see - this took me about 3mins.

I totally faked the bottom of his neck by cloning from the area ahead of it. Notice how it's thicker than your original. Had I done it correctly I should have inpainted it with blue water first then re-pasted his neck over that - grabbing sections of skin sequentially from the original so it would have more texture - mine is just a blur. It would have been sharper with a more natural looking defined break.

Also the left front foot is a total fabrication. It's blurry since I did it quickly - by zooming in and selecting smaller groups of pixels it would look a lot more like the other foot if working off the original larger image.

The shadows there would be a problem also to get natural looking. Most of the blue I cloned from surrounding areas also, again more time would yield better results. One other thing you can do with the original is copy a very thin vertical strip from the right edge and past it back into a slightly larger image size a couple of times. This will give you slightly more blue in front of his nose and balance the picture a little more. In that small an area, even the wave patterns will look correct.

I also saved it at low resolution so it's blurrier than it should be. Working off the original you won't have that problem - save it as a .tif first as that's a non-destructive format - everytime you re-save a .jpg it gets worse.

test.jpg
 
Is this better?
20130323-IMG_0884_zps92724d0epse_zps88531748.jpg
 
better than my feeble attempt...
 
Thank you for the tips diversteve! I had started to try the clone tool, but knowing how long that would take I decided to ask here first!

LarryC, that looks pretty darn good! Care to reveal your secrets?
 
One thing about cloning is that for it to work best, typically you want to use a small brush - unless you're trying to fill large areas with the same thing. It fools the eye somewhat to not see a repeating pattern. Takes more time though. I also often re-clone from the same or a close by point, otherwise every clone eventually starts to look like a pattern.

In my attempt, I accidentally did that in the area below his chin - just to left of that little dot. Notice how it looks the same down that whole darker line - all I did was select a sample then push the mouse to the left while pasting it. With more time I wouldn't have done that.

Also use a brush that has a less clearly defined edge, some of them that are "fuzzy" around the edges are the best for blending.
 
I did it in PSE7. It took about 10 minutes. First, I used the clone tool to move large areas with the same lighting and color to replace the backscatter. Often, it'll be a little dark and you have to go to>edit>undo and remove what didn't work and try a different area. Stay away from color borders. Next, I shrunk the clone tool and took areas from my replaced sections to touch up the border areas. Where artifacts showed, I went back a little larger and found details from other areas that would cover the artifacts. The clone tool will often give you repeating patterns that are obvious if you try to use multiple patterns of a single clone, so you need to find something that looks right for the area and use it to create a smoother transition and a more natural look. Sometimes you can smooth out artifacts with the spot repair tool, but if you get too close to another color, it will mix them badly and you'll get something way too light or dark.
After getting rid of the back scatter, I went to >lighting>shadows and highlights. This is one of my favorite tools. The whole picture was a bit overbright and there was blown out area in the neck, so I moved the shadow lightening to "0" and reduced the highlights to bring back detail. I try to never go much over +10 or -10 on these or it looks overprocessed. I also increased the midrange contrast slightly, usually +2 to +3 will make a picture pop a bit without looking phony. Try bigger ranges and you'll see the problems, then back off.
Next I went to "Brightness/Contrast" and decreased the brightness slightly and upped the contrast a little. Usually I stay at +/- 5 on these.
Once the lighting was where I wanted, I went back and tried auto levels. This is either awesome or awful, so be ready to >edit>undo. One thing I've found is if a picture is underlit and has background backscatter, I can use autolevels to find it, then undo, Control +++ to concentrate the area and eradicate the backscatter with whatever tools I need. Make sure when you're done you "Save as" with a modified file name to protect the original. I usually just add a PSE to the filename or PSE Crop if I've cropped it.
It really helps to be a crappy photographer, like I am. Then you can get lots of practice fixing things in Photoshop that better photographers don't have to deal with. They just save a JPEG and print.
Almost forgot. When I was done with color and detail, I went to >Sharpen>unsharp mask. I set this to really small areas, usually about .2 pixels or you lose a lot of detail. Next I used >Filter>sharpen>motion blur. Find a sample with blur, then turn the dial till it looks sharpest. I stay below .5 pixels. If I have a picture that has a subject very slightly out of focus, I'll use >Filter>Sharpen>Lens blur, also about .5 pixels. If you don't like what any of these things does, >edit>undo and try higher or lower pixel counts or just get rid of your changes if you liked it better before.
 
https://www.shearwater.com/products/swift/

Back
Top Bottom