How to make an equipment line?

Please register or login

Welcome to ScubaBoard, the world's largest scuba diving community. Registration is not required to read the forums, but we encourage you to join. Joining has its benefits and enables you to participate in the discussions.

Benefits of registering include

  • Ability to post and comment on topics and discussions.
  • A Free photo gallery to share your dive photos with the world.
  • You can make this box go away

Joining is quick and easy. Log in or Register now!

You could use one line with an eye splice at each end and as many eye splices in the middle of the line as you think you will need. Then you could use whatever clip you like to secure the gear. I prefer to use mountain climbing carabiners for this as I already use them for many other applications.
 
These are called Jon lines, which also shares the same name for hook lines used to fasten yourself to the anchor line during Deco & Stops...

Jonlines or Jon Lines are used to isolate jerking and/or expand hand-holds on a downline or anchor line. Lines hung off a boat for decompression and/or hanging off gear predate Jon Hulburt’s line by decades.

Jonline - Wikipedia, the free encyclopedia
 
Mine's a single piece of poly rope with a bolt snap one one end and three circular stainless steel rings looped into the line. The rings are adjusted so that the top one's at about surface level and the other two are at least a foot apart underneath. Lowest ring's for the camera. Middle ring's for the right tank. The one closest to the surface is for the left tank. I clip the tanks in butt side up, so that the shoulder side tank clip is hanging free. That allows me to clip the tank into my BCD first, before detaching it from the rope and clipping in the butt side. Once in the water I work my way down the rope ... left tank, then right tank, then the last thing I unclip is the camera.

This assumes calm conditions and little to no current ... I'll adjust my plan accordingly if I need to be in more of a hurry due to conditions ... in which case I'll only hang one tank and put the other one on while on-board. I may only partially clip till I'm down in that case, and have someone hand me the camera once I'm in the water.

... Bob (Grateful Diver)
 
I have five "Tag Lines" on my little SIB. The key to remember is to throw them overboard BEFORE getting off the boat :wink:

The length should vary to adapt to your tie off point and the width of your tubes. I like them long enough to have plenty of room to stay away from a bouncing boat as I take my gear off. Mine are around 6-7ft, so a little over 2 meters. You will need longer ones.

Since I want them to have give instead of yanking on my gear hard during rougher conditions, I made them with a 3/8" bungee cord inside. For strength so I don't loose gear, I make them out of 1" tubular webbing. I sew bolt snaps on both ends (Found them to work great as dock bungees sometimes too). There is no fear of the webbing breaking and the sewing is strong enough I trust my life to the climbing gear I make. A #18 needle on any decent sewing machine does the trick. The weakest link is the bolt snap (Errr saw handle, see photo below).

For my gal I put a d-ring on her weight belt, locked on with a clip. That way when she returns to the boat she can connect a bolt snap to the belt, remove her waist and crotch strap, then drop the belt before doffing her BP/W. My tubes are low enough, I just toss my belt into the boat. We clip the tag line off to our left chest d-ring before doffing our BP/W's. Not sidemount, so your tanks will probably sink. I would recommend keeping them close to the more stable stern.

I don't have a photo of one of my exact tag lines handy, but this is a lanyard I made for my top handle arborist saw, which is very similar. Just exchange the carabiner for a bolt snap. (No need for the red or blue part is that is my safety breakaway, so I don't get drug out of a tree. Didn't get used last week though when the saw got yanked out of my hand. Wood piece is still stuck in the chain, but it tore the front of the handle off the saw.) The 3/8" bungee cord is feed inside the tubing, then tied with just an overhand aka half hitch knot. If someone wanted to get fancy they could sew it. I just set them up to have a foot of give or so.
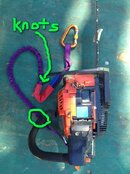
Bungee.jpg

Careful with poly as it is hard to tie knots in, and can slip. A couple of zip ties can stop it from coming apart. Poly is what my boat has for lifelines, and I had made a couple of tag lines that way but retired them after noticing a little slippage.

Of course some rope or webbing and a couple of bolt snaps using a bowline or buntline hitch would work. If you wanted to add in some loops use an Alpine Loop and you could tie some bolt snaps in there too. No need to sew, even if you wanted bungee cord inside tubing.
 
Thank you very much, indeed! Now I have several methods to choose from!

J.
 
My gear line is a length of 1 inch nylon webbing. At one end is a loop that the line can be passed through to go around a post or rail for shore diving or through a cleat on a boat or around the rail. At the other end is a large brass snap hook. About a foot above that is a loop made just in the line and another above that. Nothing to ding the side of a boat and I can hang a reel or, as I did in my deco instructor class, my O2 bottle so that I can descend, grab it, and clip it on under water which in Sidemount is much easier since I carry the deco bottle on top of my left SM tank. Steve Lewis showed me this method and it works very well. The nylon webbing also seems to take less room than a rope, dries faster, does not kink, and was cheap and easy to make.
 
I have five "Tag Lines" on my little SIB. The key to remember is to throw them overboard BEFORE getting off the boat :wink:

So now we have another name confusion. Tag lines are the same as granny lines up here. A length of line, usually poly, that extends straight out from the back of the boat on the surface. It's what you grab in a current if you miss the ladder or have to wait. Keeps you from drifting away.


iPhone. iTypo. iApologize.
 
So now we have another name confusion. Tag lines are the same as granny lines up here...

We call the line trailing behind the boat a “drift line”, which is often 100'+ long. A line that runs from the anchor line to the stern that is rigged for high surface currents is often called a “granny line” in my area.

I finally learned the origin of “Hog Line” after decades of using the term. http://www.scubaboard.com/forums/commercial-divers/376258-hog-line.html
 
I always referred to the granny line as the one that ran from bow to stern so that you could pull yourself along in current to the mooring or anchor line. And the one you hung onto in current to get back to the tag line! Unless it wrapped itself into the prop because the current was so strong on the surface. Happened to me on a dive on the Duane. Cap borrowed my gear to jump in and free it after I told him what happened.
 
We call the line trailing behind the boat a “drift line”, which is often 100'+ long. A line that runs from the anchor line to the stern that is rigged for high surface currents is often called a “granny line” in my area

Agreed! I have a yellow poly line that is 150ft and another that is 100ft. I found the 100ft to be enough since if I feel we need to deploy the line, we probably shouldn't be diving anyway. No need for a granny line on my boat as it has lifelines.

"Tag Line" is more of a rigging term used to describe a line that helps controls a load. I guess I am the crane...plus I do use the tag line to pull the load towards the boat :) Any of my friends would know exactly what I am talking about. Lately the only tag line I have been using is clipped off to a girth hitch wrapped around a tree branch. Only 4 more acacia trees to drop!

To the OP, there sure are a lot of options. Pick the one that is right for you. Nothing wrong with experimenting either; I sure have.
 

Back
Top Bottom