Scubapro MK 20 Mysteries

Please register or login

Welcome to ScubaBoard, the world's largest scuba diving community. Registration is not required to read the forums, but we encourage you to join. Joining has its benefits and enables you to participate in the discussions.

Benefits of registering include

  • Ability to post and comment on topics and discussions.
  • A Free photo gallery to share your dive photos with the world.
  • You can make this box go away

Joining is quick and easy. Log in or Register now!

Zung

Contributor
Messages
1,652
Reaction score
304
Location
Geneva, Switzerland
# of dives
500 - 999
Dear Board,

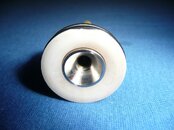
I just dug out another SP MK 20. This one has the preferred composite piston, but there's a little bit missing on the plastic crown: see the attached pic. There's no loose bits inside the reg.

Q.: is this by design or has it broken off? Any wild guess: will it still seal? Is it worth putting it back for a try or should I replace it right away?

Thanks for any comments.

Zung
 

Attachments

  • P1020110s.jpg
    P1020110s.jpg
    237.7 KB · Views: 401
Nothing is missing. They are made with that little flat. IP is pushing the o-ring away from it so no sealiong problem.
 
You know, Awap may look just like ordinary folks but he's actually a Ninja expert :vintagediver:
 
Yeah, there's a japanese word for it, moving at the speed of thoughts; I'll look up my references.

But since I woke you up, I'd like to ask another one: is it worth while to try to remove the TIS (the black bushing below the crown) and clean and/or replace the o-ring that may be buried inside? And do you know what size it is? It appears to be a very tight fit.
 
Last edited:
A fingernail is my preferred removal tool for that bushing. No real need to remove it other than curiosity. That was enough for me. It will give you an idea of how that piston is assembled. If you clean off the red loctite you see in the hole in the shaft, you will see the threads where the two metal pieces screw together. But you will want to replace the loctite as I'm sure it is there to keep the two pieces from coming loose and crating a leak through the piston sandwich. the two metal pieces sandwith the plastic head and it is all sealed by an o-ring (-013 as I recall). I had one develop a leak which gave me the opportunity to see what was there. Since it was my wife's reg, I did install a new piston but I also repaired to old one to verify the diagnosis and in case mine ever fails.
 
Thanks.

Another one still, regarding the re-assembly, then I'll leave you alone, it's bed time here:

According to the Technical Service Reference & Repair Guide from 1996, you insert the piston into the body first, then you thread the swivel/cap onto the body.

In Feb. 2000, when they introduced the composite piston, they changed their mind and stated, in the Engineering Bulletin #267 and in great length, that you should first insert the piston into the swivel/cap, and then thread the swivel/cap/piston onto the body.

Then in the Repair Guide from 2003, they changed their mind again and went back to method #1, 1996.

What is the preferred way? Or does it matter at all?

I had to go back and read 267. I suspect that change in the assembly procedure is not a function of the change in the piston design as opposed to a response to tech having problems installing the two piston o-ring bushings and the o-ring. Although the change in the "knife edge" may have increased errors. If not careful, it is real easy to knock the o-ring out of place (big leak) and have to disassemble and DIR (another lesson learned the hard way). That procedure seems to reduce (or eliminate) that problem. I still do it the old way, just more carefully now.

It really is too bad that newer Scubapro instructions seem to go out of their way not to address "why". This is an example where it would probably have made the new procedure actually make some sense. Perhaps they don't believe their "authorized technicians" need to know "why" any more.
 
My preference is to put the piston in the swivel cap, then thread it on the body. The reason is that it is much easier to get things aligned and then ensure the o-rings are both properly seated. Doing it the other way can result in an improperly seated piston head o-ring and some pretty amazing leaks.

The downside of putting the piston in the head first is that you then have to keep the spring and any shims in place, but that just requires some intelligent use of gravity.

The bushings will tend to push out either way, unless you use the Mk 20 tool or a similarly sized piece of tubing to hold them inplace while you install the piston stem with a piston bullet.
 
Thanks for the enlightenments, DA, this is much appreciated.

You mentioned the use of the bullet tool: will the one for the MK 10's work? I presume it's preferable now that they make the edge of the MK 20 piston less rounded.

The SP EB #267 described an alternative procedure: insert the "inner" (IP side) piston bushing, hold it with the plastic tool, insert & thread the swivel/cap/piston from the other end, then install the piston stem o-ring and the "outter" (HP side) piston bushing.
 
https://www.shearwater.com/products/swift/

Back
Top Bottom